一篇快速 熟悉 React 生命周期

为了更快的看到效果我在html里面做了个demo,复制就可以看到效果,认真看几次就记住了,熟悉之后就可以在自己的项目中灵活运用 !
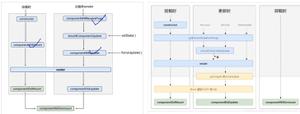
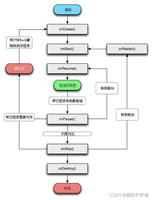
React 生命周期分为三种状态 1. 初始化 2.更新 3.销毁 看图
初始化
1、getDefaultProps()
设置默认的props,也可以用dufaultProps设置组件的默认属性.
2、getInitialState()
在使用es6的class语法时是没有这个钩子函数的,可以直接在constructor中定义this.state。此时可以访问this.props
3、componentWillMount()
组件初始化时只调用,以后组件更新不调用,整个生命周期只调用一次,此时可以修改state。
4、 render()
react最重要的步骤,创建虚拟dom,进行diff算法,更新dom树都在此进行。此时就不能更改state了。
5、componentDidMount()
组件渲染之后调用,只调用一次。
更新
6、componentWillReceiveProps(nextProps)
组件初始化时不调用,组件接受新的props时调用。
7、shouldComponentUpdate(nextProps, nextState)
react性能优化非常重要的一环。组件接受新的state或者props时调用,我们可以设置在此对比前后两个props和state是否相同,如果相同则返回false阻止更新,因为相同的属性状态一定会生成相同的dom树,这样就不需要创造新的dom树和旧的dom树进行diff算法对比,节省大量性能,尤其是在dom结构复杂的时候
8、componentWillUpdata(nextProps, nextState)
组件初始化时不调用,只有在组件将要更新时才调用,此时可以修改state
9、render()
组件渲染
10、componentDidUpdate()
组件初始化时不调用,组件更新完成后调用,此时可以获取dom节点。
卸载
11、componentWillUnmount()
组件将要卸载时调用,一些事件监听和定时器需要在此时清除。
下面上代码:
<!DOCTYPE html><html lang="en">
<head>
<meta charset="UTF-8">
<meta name="viewport" content="width=device-width, initial-scale=1.0">
<meta http-equiv="X-UA-Compatible" content="ie=edge">
<title>一篇读懂react生命周期</title>
</head>
<body>
<div id="app"></div>
<script src="https://cdn.staticfile.org/react/16.4.0/umd/react.development.js"></script>
<script src="https://cdn.staticfile.org/react-dom/16.4.0/umd/react-dom.development.js"></script>
<script src="https://cdn.staticfile.org/babel-standalone/6.26.0/babel.min.js"></script>
<script type="text/babel">
class Child extends React.Component{
constructor(props){
super(props)
this.state={
message: 'react的生命周期',
date:''
}
}
getDefaultProps(){
console.group('------getDefaultProps 设置默认的props,也可以用dufaultProps设置组件的默认属性.------');
console.log("%c%s", "color:red" , "props : " + this.props); //undefined
}
getInitialState(){
// 在使用es6的class语法时是没有这个钩子函数的,可以直接在constructor中定义this.state。此时可以访问this.props
console.group('------getInitialState 在使用es6的class语法时是没有这个钩子函数的------');
console.log("%c%s", "color:red" , "此时可以访问this.props: " + this.props); //undefined
}
componentWillMount(){
console.group('------componentWillMount 在渲染前初始化时只调用一次,在客户端也在服务端,以后组件更新不调用,整个生命周期只调用一次,此时可以修改state ------');
console.log("%c%s", "color:red" , "el : " + this.state.$el); //undefined
console.log("%c%s", "color:red","state : " + this.state); //undefined
console.log("%c%s", "color:red","message: " + this.state.message)
}
// render() 组件渲染
componentDidMount(){
console.group('------componentDidMount 组件渲染之后调用,只调用一次------');
console.log("%c%s", "color:red","message: 组件渲染之后调用,只调用一次" )
}
componentWillReceiveProps(nextProps){
console.group('------componentWillReceiveProps 组件初始化时不调用,组件接受新的props时调用------');
console.log("%c%s", "color:red","nextProps : " ,nextProps)
}
shouldComponentUpdate(nextProps, nextState){
console.group('------shouldComponentUpdate react性能优化非常重要的一环。组件接受新的state或者props时调用,我们可以设置在此对比前后两个props和state是否相同,如果相同则返回false阻止更新,因为相同的属性状态一定会生成相同的dom树,这样就不需要创造新的dom树和旧的dom树进行diff算法对比,节省大量性能,尤其是在dom结构复杂的时候------');
console.log("%c%s", "color:red","nextProps : " , nextProps)
console.log("%c%s", "color:red","nextState : " , nextState)
console.log("%c%s", "color:red","this.props : " , this.props)
// 默认
// return true
// 优化
//旧的message == 新的message
if(nextProps.message == nextState.message){
console.log('前一个对象' + JSON.stringify(nextProps.message)+
'后一个对象' + JSON.stringify(nextState.message));
return false
}
return true
}
componentWillUpdata(nextProps, nextState){
console.group('------componentWillUpdata 组件初始化时不调用,只有在组件将要更新时才调用,此时可以修改state------');
console.log("%c%s", "color:red","nextProps : " , nextProps)
console.log("%c%s", "color:red","nextState : " , nextState)
}
// render() 组件渲染
componentDidUpdate(){
console.group('------componentDidUpdate 组件初始化时不调用,组件更新完成后调用,此时可以获取dom节点------');
}
componentWillUnmount(){
console.group('------componentWillUnmount 组件将要卸载时调用,一些事件监听和定时器需要在此时清除------');
}
Codechanger(event){
this.setState({message:event.target.value});
}
render(){
console.group('------render react最重要的步骤,创建虚拟dom,进行diff算法,更新dom树都在此进行。此时就不能更改state了------');
console.log("%c%s", "color:red","message: 进行diff算法,更新dom树都在此进行。此时就不能更改state了")
// react最重要的步骤,创建虚拟dom,进行diff算法,更新dom树都在此进行。此时就不能更改state了。
return(
<div>
<h1>{this.state.message}</h1>
<h1>{this.props.date.toLocaleTimeString()}</h1>
<input type="text" name="text" id="text" value={this.state.message} onChange={this.Codechanger.bind(this)} />
</div>
)
}
}
Index()
//setInterval(Index, 1000);
function Index(){
ReactDOM.render(
<div>
<Child date={new Date()} />,
</div>,
document.getElementById('app'));
}
</script>
</body>
</html>
参考 菜鸟教程 React官方文档
以上是 一篇快速 熟悉 React 生命周期 的全部内容, 来源链接: utcz.com/z/381612.html

