webpack4+Vue搭建自己的Vue-cli

前言
最近在看webpack4,深感知识浅薄,这两天也一直在思考cli的配置,借助一些别人的实践,尝试自己搭建vue的项目,这里使用webpack4版本,之前我在网上查找别人的vue项目搭建,但是都是webpack3的,所以写了本文,如果有错误,或者有什么问题,请大佬们指出
关于webpack的本文不会多说,请看webpack文档
关于本文的github地址vue-MYCLI
基础版本
完成了基本的js vue css 的配置 基础版本
完整版本
安装了vue-router vuex less eslint,webpack配置已经调整完毕,基本可以使用 完整版本
前置知识
- 熟悉 webpack4
- 熟悉 vue
搭建基本骨架
npm init安装webpack4
npm install webpack webpack-cli --save-dev在开始之前先实验一下环境
根目录新建文件 index.html
<!DOCTYPE html><html lang="en">
<head>
<meta charset="UTF-8">
<meta name="viewport" content="width=device-width, initial-scale=1.0">
<meta http-equiv="X-UA-Compatible" content="ie=edge">
<title>Vue</title>
</head>
<body>
<script src="./src/mian.js"></script>
</body>
</html>
根目录新建文件 src/main.js
console.log("我是main");根目录新建文件webpack.config.js
const path = require('path')module.exports = {
entry: './src/main.js',
output: {
path: path.resolve(__dirname, dist),
filename: 'index.js'
}
}
打包js文件
npx webpack --config webpack.config.js会看到一些报错,只要构建成功就ok
这里说明环境是没有问题的
配置初始生成环境
开始安装vue-loader吧
npm i webpack vue vue-loader -D //-D就是--save-dev安装完成后看输出
提示安装的依赖要安装
npm install webpack css-loader -D安装完毕后新建src/app.vue
<template> <div>
你好 {{ data }}
</div>
</template>
<script>
export default {
data(){
return {
data: "Vue"
}
}
}
</script>
<style scoped>
</style>
.vue文件是无法直接运行的,需要在webpack里面配置loader
这里参照某课的老师的方法,html用webpack生成(后面说明)
在根目录新建index.js 删除index.html
import Vue from 'vue'import App from './app.vue'
const root = document.createElement('div')
document.body.appendChild(root)
new Vue({
render: (h) => h(App)
}).$mount(root)
改写webpack.config.js
const path = require('path')module.exports = {
entry: path.resolve(__dirname, 'src/index.js'), //关于path模块可以看看阮一峰的教程 http://javascript.ruanyifeng.com/nodejs/path.html#toc0
output: {
path: path.resolve(__dirname, 'dist'),
filename: 'index.js'
},
module: {
rules: [{
test: /\.vue$/,
loader: 'vue-loader'
}]
}
}
在package里面添加脚本
"build": "webpack --config webpack.config.js"控制台运行
npm run build不出意外会报错
这里有2个问题,一个是没有指定mode 一个是没有引用vue的插件
我们需要改写webpack.config.js,在config里面加一行
mode: 'production', //暂时指定为生产环境再次运行npm run build 会报错,需要安装一个包
这个报错,原本在vue-loader就有提示,不知道为什么现在没有,运行之前报错
Error: [vue-loader] vue-template-compiler must be installed as a peer dependency, or a compatible compiler implementation must be passed via options安装vue-template-compiler
npm install vue-template-compiler -D再再次运行npm run build
假如按步骤来不除意外这里可以打包成功了~~~~
我们需要验证打包文件时候是否正确,所以这里使用插件HtmlWebpackPlugin,帮我们自动创建html文件,并且在后续的hash文件名上很有用,具体可以看官方介绍
npm install html-webpack-plugin -D改webpack.config.js代码
const path = require('path')const { VueLoaderPlugin } = require('vue-loader')
var HtmlWebpackPlugin = require('html-webpack-plugin'); //引入插件
module.exports = {
mode: 'production', //暂时指定为生产环境
entry: path.resolve(__dirname, 'src/index.js'), //关于path模块可以看看阮一峰的教程 http://javascript.ruanyifeng.com/nodejs/path.html#toc0
output: {
path: path.resolve(__dirname, 'dist'),
filename: 'index.js'
},
module: {
rules: [{
test: /\.vue$/,
loader: 'vue-loader'
}]
},
plugins: [
new VueLoaderPlugin(),
new HtmlWebpackPlugin()
]
}
npm run build打包一下,dist文件夹下面会有两个文件
打包Vue程序完成~~~~
至此完成了最基本的webpack配置
接下来我们要完成的的配置开发环境
配置开发环境
关于开发环境以及生成环境,webpack是需要区分的,根据文档模块,我决定在命令里面指定模式,相应的就将开发环境以及生成环境分开,
这里我使用的是提起基本的webpack配置使用webpack-merge 这个包来拼接我们webpack配置
npm i webpack-merge -D修改配置文件
将各各环境的代码区分开,webpack的结构是这样的
webpack.config.base.js
const path = require('path')const config = {
entry: path.resolve(__dirname, '../src/index.js'),
output: {
path: path.resolve(__dirname, 'dist'),
filename: 'index.js'
},
module: {
rules: [{
test: /\.vue$/,
loader: 'vue-loader'
}]
}
}
module.exports = config
webpack.config.build.js
const { VueLoaderPlugin } = require('vue-loader')const HtmlWebpackPlugin = require('html-webpack-plugin')
const merge = require('webpack-merge')
const baseConfig = require('./webpack.config.base')
const config = merge(baseConfig ,{
plugins: [
new VueLoaderPlugin(),
new HtmlWebpackPlugin()
]
})
module.exports = config
这里配置开发环境就是重头戏了,我们使用webpack-dev-server
webpack-dev-server是一个小型的Node.js Express服务器,代码都跑在内存里面
安装webpack-dev-server
npm install webpack-dev-server -Dwebpack.config.dev.js
const webpack = require('webpack')const merge = require('webpack-merge')
const baseConfig = require('./webpack.config.base')
const { VueLoaderPlugin } = require('vue-loader')
const HtmlWebpackPlugin = require('html-webpack-plugin')
const config = merge(baseConfig, {
devServer: {
port: '8000',
host: 'localhost',
hot: true, //热加载
//quiet: true //控制台中不输出打包的信息
},
plugins: [
new VueLoaderPlugin(),
new HtmlWebpackPlugin(),
new webpack.HotModuleReplacementPlugin()
]
})
module.exports = config
最后在package里面添加脚本
"build": "webpack --mode=production --config build/webpack.config.build.js","dev": "webpack-dev-server --mode=development --progress --config build/webpack.config.dev.js"
执行npm run dev查看控制台
这就成功了,在浏览器里面输入http://localhost:8000/,修改app.vue文件,实现了vue-cli的热加载了~~~~
接下来完善一下,不能只有.vue文件的loader,其他的webpack也要认识
我们配置一下图片的loader,以及css的loader,同时css使用postcss进行预处理
url-loader 用于将文件转换为base64 URI file-loader是依赖loader
npm i url-loader file-loader -D添加配置webpack.config.base.js>module>rules
{ test: /\.(gif|png|jpg|svg)$/,
use: [{
loader: 'url-loader',
options: {
limit: 2048,
name: 'resources/[path][name].[hash:8].[ext]'
}
}]
},
配置css(vue-cli里面的实现非常友好,有机会可以去看看) 下面的是最简单的配置
npm install css-loader -Dnpm install vue-style-loader -D
npm install postcss-loader -D
添加配置webpack.config.base.js>module>rules (postcss不了解谷歌一下)
{ test: /\.css$/,
use: [
'vue-style-loader',
'css-loader',
{
loader: 'postcss-loader',
options: {
sourceMap: true //启用源映射支持,postcss-loader将使用其他加载器给出的先前源映射并相应地更新它
}
}
]
}
npm install autoprefixer -D根目录新建文件postcss.config.js,安装autoprefixer (自动添加浏览器前缀)
const autoprofixer = require('autoprefixer')module.exports = {
plugins: [
autoprofixer()
]
}
配置到这里基本的图片以及css就配置完成了,运行一下试试 npm run dev
我找src下面创建了assets/img/user.jpg
app.vue
<template> <div>
你好 {{ data }}
<img src="./assets/img/user.jpg">
</div>
</template>
<script>
export default {
data(){
return {
data: "Vue Cli"
}
}
}
</script>
<style>
div{
font-size: 20px;
color: red;
}
img {
width: 100px;
}
</style>
实现了开发环境的图片以及css的配置
打包一下试试
build后生成的目录是这样的
这不是我们想要的,webpack把代码,类库,css都打包在一起,这样不管是上线还是首屏加载都有影响,所以这里我们要优化webpack
在处理之前想安装一个可以帮助我们每次build之前自动删除上次build生成的文件的插件
clean-webpack-plugin这个插件不知道为什么,怎么配置路径都没效果
这里我使用rimraf来进行删除(vue-cli也是使用rimraf,但是他是写在代码里面)
npm install rimraf -D在package里面变一下脚本,让打包之前帮我们删除之前到打包文件
"build-webpack": "webpack --mode=production --config build/webpack.config.build.js","delete": "rimraf dist",
"build": "npm run delete && npm run build-webpack"
分离打包css
它会将所有的入口 chunk(entry chunks)中引用的
*.css,移动到独立分离的 CSS 文件
npm install extract-text-webpack-plugin@next -D因为开发环境和生产环境不一样
我们需要将css部分的代码分环境配置
- 将原先的css配置放到webpack.config.dev.js里面
- 在webpack.config.build.js里面重写
module: { rules: [{
test: /\.css$/,
use: ExtractTextPlugin.extract({
fallback: "vue-style-loader",
use: [
'css-loader',
{
loader: 'postcss-loader',
options: {
sourceMap: true
}
}
]
})
}]
},
这样的话,我们开发环境不影响依旧是之前到模式,build的时候用ExtractTextPlugin帮我们分离非js文件,实现css的分离打包
我们打包一下试试npm run build
分离js文件
接下来是分离js文件,就是将库文件以及我们的代码分离开,利于上线后的浏览器缓存,代码会经常变,库不会经常变
在webpack4之前js分离用的插件是CommonsChunkPlugin,不过这插件现在移除了,现在用的是optimization.splitChunks 来进行公共代码与第三方代码的提取,splitChunks参数如下
optimization: { splitChunks: {
chunks: "initial", // 代码块类型 必须三选一: "initial"(初始化) | "all"(默认就是all) | "async"(动态加载)
minSize: 0, // 最小尺寸,默认0
minChunks: 1, // 最小 chunk ,默认1
maxAsyncRequests: 1, // 最大异步请求数, 默认1
maxInitialRequests: 1, // 最大初始化请求书,默认1
name: () => {}, // 名称,此选项课接收 function
cacheGroups: { // 缓存组会继承splitChunks的配置,但是test、priorty和reuseExistingChunk只能用于配置缓存组。
priority: "0", // 缓存组优先级 false | object |
vendor: { // key 为entry中定义的 入口名称
chunks: "initial", // 必须三选一: "initial"(初始化) | "all" | "async"(默认就是异步)
test: /react|lodash/, // 正则规则验证,如果符合就提取 chunk
name: "vendor", // 要缓存的 分隔出来的 chunk 名称
minSize: 0,
minChunks: 1,
enforce: true,
reuseExistingChunk: true // 可设置是否重用已用chunk 不再创建新的chunk
}
}
}
}
官方包括这解释,我并不是很看懂,所以打包策略并不是很好
在webpack.config.build.js>config
output: { filename: '[name].[chunkhash:8].js'
},
optimization: {
splitChunks: {
chunks: "all",
cacheGroups: {
vendor: {
test: /node_modules/, //这里虽然分离了,但是没有做到按需引入,看官方配置也不是很明白
name: 'vendors',
chunks: 'all'
}
}
},
runtimeChunk: true
}
build一下查看目录,可以看出代码与库之间分离了
.gitignore
这里处理一下git 新建文件.gitignore
.DS_Storenode_modules/
/dist/
npm-debug.log*
yarn-debug.log*
yarn-error.log*
# Editor directories and files
.idea
.vscode
*.suo
*.ntvs*
*.njsproj
*.sln
.editorconfig,
处理一下编译器的统一配置
新建文件 .editorconfig,(关于editorconfig,以及配置解释)
root = true[*]
charset = utf-8
indent_style = space
indent_size = 2
end_of_line = lf
insert_final_newline = true
trim_trailing_whitespace = true
还有一点要注意,假如没有效果,vscode需要安装一个插件EditorConfig for VS Code ,其他编译器不太清楚
.babelrc
处理一下ES6,以及js文件的webpack的loader配置
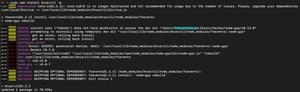
今天装了babel-loader8.0.0 报错报一上午,心态都搞崩了,所以这里我使用的是7版本
npm install babel-loader@7 babel-core babel-preset-env -D在webpack.config.base.js>module>rules里面添加代码
{ test: /\.js$/,
exclude: /node_modules/,
loader: 'babel-loader'
}
新建文件 .babelrc
{ "presets": [
"env"
]
}
首先检查开发环境
我新建了一个es6语法的js 导入到app.vue里面
运行结果
eslint
eslint的安装相对简单,可以看官方指南
npm install --save-dev eslint eslint-config-standard eslint-plugin-standard eslint-plugin-promise eslint-plugin-import eslint-plugin-node因为.vue文件不会是纯js代码,所以,我们需要安装额外的解析的插件
npm install eslint-plugin-html -D然后我们配置eslint到我们的项目
在根目录新建文件.eslintrc
{ "extends": "standard",
"plugins": [
"html"
],
"rules": {
"no-new": "off" //因为new Vue但是eslint默认不许new 我们需要把这个关掉
}
}
在package里面添加两行脚本
"lint": "eslint --ext .js --ext .jsx --ext .vue src/", "lint-fix": "eslint --fix --ext .js --ext .jsx --ext .vue src/"
现在运行npm run lint即检查项目
运行npm run lint-fix,即是将不规范的地方修正
下一步我们配置到我们的webpack里面让运行的时候同时检查代码
npm install eslint-loader babel-eslint -D改写配置文件
{ "extends": "standard",
"plugins":[
"html"
],
"parser":"babel-eslint",
"rules": {
"no-new": "off"
}
}
在webpack.config.base里面的module> rules 里面加一个字段
{ test: /\.(vue|js|jsx)$/,
loader: 'eslint-loader',
exclude:/node_modules/,
enforce: 'pre' //预处理
}
最后
至此,基本的vue项目骨架的搭建完毕了,后面还有vue-router 以及vuex less的安装,请查看我的github,当然他没有vue-cli那么强大,或许最大的益处是让我们熟悉一个vue项目的大致webpack配置,当然我们可以一步一步的优化项目
以上是 webpack4+Vue搭建自己的Vue-cli 的全部内容, 来源链接: utcz.com/z/379662.html