Spring Boot + Vue 开发前后端分离的员工管理系统

一、项目介绍
1.1 项目准备
- 需求分析--模块--功能
- 库表设计--数据库
- 详细设计--流程图伪代码方式
- 编码环节
- a.环境准备
- b.正式进入编码环节
- 测试
- 部署上线
1.2 技术选型
- 前端:Vue axios
- 后端:SpringBoot" title="SpringBoot">SpringBoot Redis mybatis
- 数据库:MySQL
1.3 需求分析
- 用户模块
- a.用户登录
- b.用户注册
- c.验证码实现
- d.欢迎xx用户展示
- e.安全退出
- f.员工列表展示
- 员工模块
- g.员工添加
- h.员工删除
- i.员工修改
1.4 库表设计
分析系统中所需建立的表
分析表与表之间关系
分析表中字段
用户表 id username realname password sex stauts registerTime
员工表
id name path(头像) salary age
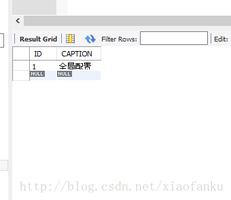
- 建立数据库
CREATE SCHEMA `emplin` DEFAULT CHARACTER SET utf8mb4 ;- 创建库表
CREATE TABLE `t_emp` ( `id` int(6) NOT NULL AUTO_INCREMENT,
`name` varchar(40) DEFAULT NULL,
`path` varchar(100) DEFAULT NULL,
`salary` double(10,2) DEFAULT NULL,
`age` int(3) DEFAULT NULL,
PRIMARY KEY (`id`)
) ENGINE=InnoDB AUTO_INCREMENT=10 DEFAULT CHARSET=utf8;
CREATE TABLE `t_user` (
`id` int(6) NOT NULL AUTO_INCREMENT,
`username` varchar(60) DEFAULT NULL,
`realname` varchar(60) DEFAULT NULL,
`password` varchar(50) DEFAULT NULL,
`sex` varchar(4) DEFAULT NULL,
`status` varchar(4) DEFAULT NULL,
`regsterTime` timestamp NOT NULL DEFAULT CURRENT_TIMESTAMP ON UPDATE CURRENT_TIMESTAMP,
PRIMARY KEY (`id`)
) ENGINE=InnoDB AUTO_INCREMENT=5 DEFAULT CHARSET=utf8;
- 执行代码,库表入库--> emplin
1.5 项目展示
注册界面
登录界面
员工列表界面
添加员工界面
修改员工信息界面
二、环境搭建
2.1 引入依赖
pom.xml
<?xml version="1.0" encoding="UTF-8"?><project xmlns="http://maven.apache.org/POM/4.0.0" xmlns:xsi="http://www.w3.org/2001/XMLSchema-instance"
xsi:schemaLocation="http://maven.apache.org/POM/4.0.0 https://maven.apache.org/xsd/maven-4.0.0.xsd">
<modelVersion>4.0.0</modelVersion>
<parent>
<groupId>org.springframework.boot</groupId>
<artifactId>spring-boot-starter-parent</artifactId>
<version>2.2.5.RELEASE</version>
<relativePath/> <!-- lookup parent from repository -->
</parent>
<groupId>com.lin</groupId>
<artifactId>ems_vue_lin</artifactId>
<version>0.0.1-SNAPSHOT</version>
<name>ems_vue_lin</name>
<description>ems manager for Spring Boot</description>
<properties>
<java.version>1.8</java.version>
</properties>
<dependencies>
<dependency>
<groupId>org.springframework.boot</groupId>
<artifactId>spring-boot-starter-web</artifactId>
</dependency>
<dependency>
<groupId>org.mybatis.spring.boot</groupId>
<artifactId>mybatis-spring-boot-starter</artifactId>
<version>2.1.3</version>
</dependency>
<dependency>
<groupId>org.springframework.boot</groupId>
<artifactId>spring-boot-devtools</artifactId>
<scope>runtime</scope>
<optional>true</optional>
</dependency>
<dependency>
<groupId>mysql</groupId>
<artifactId>mysql-connector-java</artifactId>
<scope>runtime</scope>
</dependency>
<dependency>
<groupId>org.projectlombok</groupId>
<artifactId>lombok</artifactId>
<optional>true</optional>
<version>1.18.12</version>
</dependency>
<dependency>
<groupId>org.springframework.boot</groupId>
<artifactId>spring-boot-starter-test</artifactId>
<scope>test</scope>
<exclusions>
<exclusion>
<groupId>org.junit.vintage</groupId>
<artifactId>junit-vintage-engine</artifactId>
</exclusion>
</exclusions>
</dependency>
<dependency>
<groupId>com.alibaba</groupId>
<artifactId>druid</artifactId>
<version>1.1.19</version>
</dependency>
<dependency>
<groupId>commons-fileupload</groupId>
<artifactId>commons-fileupload</artifactId>
<version>1.4</version>
</dependency>
</dependencies>
<build>
<plugins>
<plugin>
<groupId>org.springframework.boot</groupId>
<artifactId>spring-boot-maven-plugin</artifactId>
</plugin>
</plugins>
</build>
</project>
2.2 配置文件
application.properties
server.servlet.context-path=/ems_vueserver.port=8989
spring.application.name=ems
spring.datasource.type=com.alibaba.druid.pool.DruidDataSource
spring.datasource.driver-class-name=com.mysql.cj.jdbc.Driver
spring.datasource.url=jdbc:mysql://localhost:3306/emplin?characterEncoding=UTF-8&serverTimezone=UTC
spring.datasource.username=root
spring.datasource.password=2014206gjl
spring.resources.static-locations=classpath:/static/,file:${photo.dir}
mybatis.mapper-locations=classpath:com/lin/mapper/*.xml
mybatis.type-aliases-package=com.lin.entity
logging.level.com.lin.dao=debug
logging.level.com.lin.service=info
logging.level.com.lin.controller=info
photo.dir=E:/IdeaProject/ems_vue_lin/src/main/resources/static/pthotos
2.3 项目目录结构
三、部分功能详述
3.1 验证码&用户注册实现
验证码工具类:
package com.lin.utils;import javax.imageio.ImageIO;
import java.awt.*;
import java.awt.geom.AffineTransform;
import java.awt.image.BufferedImage;
import java.io.File;
import java.io.FileOutputStream;
import java.io.IOException;
import java.io.OutputStream;
import java.util.Arrays;
import java.util.Random;
/**
*@创建人
*@创建时间 2020/7/1
*@描述 验证码生成
*/
public class VerifyCodeUtils{
//使用到Algerian字体,系统里没有的话需要安装字体,字体只显示大写,去掉了1,0,i,o几个容易混淆的字符
public static final String VERIFY_CODES = "23456789ABCDEFGHJKLMNPQRSTUVWXYZ";
private static Random random = new Random();
/**
* 使用系统默认字符源生成验证码
* @param verifySize 验证码长度
* @return
*/
public static String generateVerifyCode(int verifySize){
return generateVerifyCode(verifySize, VERIFY_CODES);
}
/**
* 使用指定源生成验证码
* @param verifySize 验证码长度
* @param sources 验证码字符源
* @return
*/
public static String generateVerifyCode(int verifySize, String sources){
if(sources == null || sources.length() == 0){
sources = VERIFY_CODES;
}
int codesLen = sources.length();
Random rand = new Random(System.currentTimeMillis());
StringBuilder verifyCode = new StringBuilder(verifySize);
for(int i = 0; i < verifySize; i++){
verifyCode.append(sources.charAt(rand.nextInt(codesLen-1)));
}
return verifyCode.toString();
}
/**
* 生成随机验证码文件,并返回验证码值
* @param w
* @param h
* @param outputFile
* @param verifySize
* @return
* @throws IOException
*/
public static String outputVerifyImage(int w, int h, File outputFile, int verifySize) throws IOException{
String verifyCode = generateVerifyCode(verifySize);
outputImage(w, h, outputFile, verifyCode);
return verifyCode;
}
/**
* 输出随机验证码图片流,并返回验证码值
* @param w
* @param h
* @param os
* @param verifySize
* @return
* @throws IOException
*/
public static String outputVerifyImage(int w, int h, OutputStream os, int verifySize) throws IOException{
String verifyCode = generateVerifyCode(verifySize);
outputImage(w, h, os, verifyCode);
return verifyCode;
}
/**
* 生成指定验证码图像文件
* @param w
* @param h
* @param outputFile
* @param code
* @throws IOException
*/
public static void outputImage(int w, int h, File outputFile, String code) throws IOException{
if(outputFile == null){
return;
}
File dir = outputFile.getParentFile();
if(!dir.exists()){
dir.mkdirs();
}
try{
outputFile.createNewFile();
FileOutputStream fos = new FileOutputStream(outputFile);
outputImage(w, h, fos, code);
fos.close();
} catch(IOException e){
throw e;
}
}
/**
* 输出指定验证码图片流
* @param w
* @param h
* @param os
* @param code
* @throws IOException
*/
public static void outputImage(int w, int h, OutputStream os, String code) throws IOException{
int verifySize = code.length();
BufferedImage image = new BufferedImage(w, h, BufferedImage.TYPE_INT_RGB);
Random rand = new Random();
Graphics2D g2 = image.createGraphics();
g2.setRenderingHint(RenderingHints.KEY_ANTIALIASING,RenderingHints.VALUE_ANTIALIAS_ON);
Color[] colors = new Color[5];
Color[] colorSpaces = new Color[] { Color.WHITE, Color.CYAN,
Color.GRAY, Color.LIGHT_GRAY, Color.MAGENTA, Color.ORANGE,
Color.PINK, Color.YELLOW };
float[] fractions = new float[colors.length];
for(int i = 0; i < colors.length; i++){
colors[i] = colorSpaces[rand.nextInt(colorSpaces.length)];
fractions[i] = rand.nextFloat();
}
Arrays.sort(fractions);
g2.setColor(Color.GRAY);// 设置边框色
g2.fillRect(0, 0, w, h);
Color c = getRandColor(200, 250);
g2.setColor(c);// 设置背景色
g2.fillRect(0, 2, w, h-4);
//绘制干扰线
Random random = new Random();
g2.setColor(getRandColor(160, 200));// 设置线条的颜色
for (int i = 0; i < 20; i++) {
int x = random.nextInt(w - 1);
int y = random.nextInt(h - 1);
int xl = random.nextInt(6) + 1;
int yl = random.nextInt(12) + 1;
g2.drawLine(x, y, x + xl + 40, y + yl + 20);
}
// 添加噪点
float yawpRate = 0.05f;// 噪声率
int area = (int) (yawpRate * w * h);
for (int i = 0; i < area; i++) {
int x = random.nextInt(w);
int y = random.nextInt(h);
int rgb = getRandomIntColor();
image.setRGB(x, y, rgb);
}
shear(g2, w, h, c);// 使图片扭曲
g2.setColor(getRandColor(100, 160));
int fontSize = h-4;
Font font = new Font("Algerian", Font.ITALIC, fontSize);
g2.setFont(font);
char[] chars = code.toCharArray();
for(int i = 0; i < verifySize; i++){
AffineTransform affine = new AffineTransform();
affine.setToRotation(Math.PI / 4 * rand.nextDouble() * (rand.nextBoolean() ? 1 : -1), (w / verifySize) * i + fontSize/2, h/2);
g2.setTransform(affine);
g2.drawChars(chars, i, 1, ((w-10) / verifySize) * i + 5, h/2 + fontSize/2 - 10);
}
g2.dispose();
ImageIO.write(image, "jpg", os);
}
private static Color getRandColor(int fc, int bc) {
if (fc > 255)
fc = 255;
if (bc > 255)
bc = 255;
int r = fc + random.nextInt(bc - fc);
int g = fc + random.nextInt(bc - fc);
int b = fc + random.nextInt(bc - fc);
return new Color(r, g, b);
}
private static int getRandomIntColor() {
int[] rgb = getRandomRgb();
int color = 0;
for (int c : rgb) {
color = color << 8;
color = color | c;
}
return color;
}
private static int[] getRandomRgb() {
int[] rgb = new int[3];
for (int i = 0; i < 3; i++) {
rgb[i] = random.nextInt(255);
}
return rgb;
}
private static void shear(Graphics g, int w1, int h1, Color color) {
shearX(g, w1, h1, color);
shearY(g, w1, h1, color);
}
private static void shearX(Graphics g, int w1, int h1, Color color) {
int period = random.nextInt(2);
boolean borderGap = true;
int frames = 1;
int phase = random.nextInt(2);
for (int i = 0; i < h1; i++) {
double d = (double) (period >> 1)
* Math.sin((double) i / (double) period
+ (6.2831853071795862D * (double) phase)
/ (double) frames);
g.copyArea(0, i, w1, 1, (int) d, 0);
if (borderGap) {
g.setColor(color);
g.drawLine((int) d, i, 0, i);
g.drawLine((int) d + w1, i, w1, i);
}
}
}
private static void shearY(Graphics g, int w1, int h1, Color color) {
int period = random.nextInt(40) + 10; // 50;
boolean borderGap = true;
int frames = 20;
int phase = 7;
for (int i = 0; i < w1; i++) {
double d = (double) (period >> 1)
* Math.sin((double) i / (double) period
+ (6.2831853071795862D * (double) phase)
/ (double) frames);
g.copyArea(i, 0, 1, h1, 0, (int) d);
if (borderGap) {
g.setColor(color);
g.drawLine(i, (int) d, i, 0);
g.drawLine(i, (int) d + h1, i, h1);
}
}
}
public static void main(String[] args) throws IOException {
//获取验证码
String s = generateVerifyCode(4);
//将验证码放入图片中
outputImage(260,60,new File("/Users/chenyannan/Desktop/安工资料/aa.jpg"),s);
System.out.println(s);
}
}
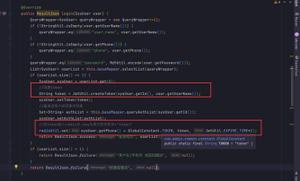
后台控制器:需要对生成的验证码图片进行 Base64 编码后传到前端页面,前端再解析展示图片。
@RestController@CrossOrigin //允许跨域
@RequestMapping("user")
@Slf4j
public class UserController {
@Autowired
private UserService userService;
/**
* 生成验证码图片
*/
@GetMapping("getImage")
public String getImageCode(HttpServletRequest request) throws IOException {
//1.使用工具类生成验证码
String code = VerifyCodeUtils.generateVerifyCode(4);
//2.将验证码放入servletContext作用域
request.getServletContext().setAttribute("code", code);
//3.将图片转为base64
ByteArrayOutputStream byteArrayOutputStream = new ByteArrayOutputStream();
VerifyCodeUtils.outputImage(120, 30, byteArrayOutputStream, code);
return "data:image/png;base64," + Base64Utils.encodeToString(byteArrayOutputStream.toByteArray());
}
}
前端页面:
<p> <input type="button" @click="register" class="button" value="Submit »" />
</p>
<script> var app = new Vue({
el:"#wrap",
data:{
url:"",
user:{
sex:"男"
},
code:"",
},
methods:{
//用来更换验证码实现
getImg(){
this.getSrc();
},
//获取验证码的
getSrc(){
var _this = this;
axios.get("http://localhost:8989/ems_vue/user/getImage?time="+Math.random()).then(res=>{
_this.url = res.data;
});
},
//用来注册用户信息
register(){
axios.post("http://localhost:8989/ems_vue/user/register?code="+this.code,this.user).then(res=>{
console.log(res.data);
if(res.data.state){
alert(res.data.msg+",点击确定跳转至登录页面!");
location.href="/ems_vue/login.html";
}else{
alert(res.data.msg);
}
});
}
},
created(){
//获取验证码
this.getSrc();
}
})
</script>
3.2 用户登录
<p> <input type="button" @click="login" class="button" value="Submit »"/>
<a href="/ems_vue/regist.html">注册</a>
</p>
<script> var app = new Vue({
el: "#wrap",
data: {
user:{},//用来保存用户数据
},
methods:{
//用户登录
login(){
//发送登录请求
axios.post("http://localhost:8989/ems_vue/user/login",this.user).then(res=>{
console.log(res.data);
if(res.data.state){
alert(res.data.msg+",点击确定进入主页!");
//将登录用户信息放入localStorage key value
localStorage.setItem("user",JSON.stringify(res.data.user));
location.href="/ems_vue/emplist.html";
}else{
alert(res.data.msg);
}
});
}
}
});
</script>
3.3 员工列表展示&员工删除
<script> var app = new Vue({
el: "#wrap",
data: { //数据
user: {
realname: "",
},//用来存放用户登录信息
emps: [],
},
methods: { //自定义函数
//处理安全退出
logout() {
localStorage.removeItem("user");
location.reload(true);//刷新页面
},
//删除员工信息方法
delEmp(id) {
if(window.confirm("确定要删除这条员工信息吗?")){
var _this = this;
axios.get("http://localhost:8989/ems_vue/emp/delete?id=" + id).then(res => {
if (res.data.state) {
alert(res.data.msg + ",点击确定刷新数据!");
_this.findAll();//重新加载数据
} else {
alert(res.data.msg);
}
});
}
},
//查询员工列表方法
findAll() {
var _this = this;
axios.get("http://localhost:8989/ems_vue/emp/findAll").then(res => {
_this.emps = res.data;
});
}
},
created() {//生命周期函数
var userString = localStorage.getItem("user");
if (userString) {
this.user = JSON.parse(userString);
} else {
alert("您尚未登录,点击确定跳转至登录页面!");
location.href = "/ems_vue/login.html";
}
//查询所有信息
this.findAll();
}
});
</script>
3.4 员工添加
<script> var app = new Vue({
el: "#wrap",
data: { //数据
user:{
realname:"",
},//用来存放用户登录信息
emp:{}//定义员工信息
},
methods: { //自定义函数
//处理安全退出
logout(){
localStorage.removeItem("user");
location.reload(true);//刷新页面
},
//用来保存员工信息
saveEmp(){
console.log(this.emp); //员工信息
console.log(this.$refs.myPhoto.files[0]);//获取文件信息
//文件上传时 请求方式必须是post enctype必须为multipart/form-data
var formData = new FormData();
formData.append("name",this.emp.name);
formData.append("salary",this.emp.salary);
formData.append("age",this.emp.age);
formData.append("photo",this.$refs.myPhoto.files[0]);
var _this = this;
axios({
method:"post",
url:"http://localhost:8989/ems_vue/emp/save",
data:formData,
headers:{
\'content-type\':\'multipart/form-data\'
}
}).then(res=>{
console.log(res.data);
if(res.data.state){
if(window.confirm(res.data.msg+",点击确定跳转到列表页面!")){
location.href="/ems_vue/emplist.html";
}else{
_this.emp = {};
}
}else{
alert(res.data.msg);
}
});
}
}
});
</script>
3.5 员工修改
<script> var app = new Vue({
el: "#wrap",
data: { //数据
user:{
realname:"",
},//用来存放用户登录信息
emp:{}
},
methods: { //自定义函数
//处理安全退出
logout(){
localStorage.removeItem("user");
location.reload(true);//刷新页面
},
//处理员工信息修改
editEmp(){
console.log(this.emp);
console.log(this.$refs.photo.files[0]);
//文件上传时 请求方式必须是post enctype必须为multipart/form-data
var formData = new FormData();
formData.append("id",this.emp.id)
formData.append("name",this.emp.name);
formData.append("path",this.emp.path);
formData.append("salary",this.emp.salary);
formData.append("age",this.emp.age);
formData.append("photo",this.$refs.photo.files[0]);
var _this = this;
axios({
method:"post",
url:"http://localhost:8989/ems_vue/emp/update",
data:formData,
headers:{
\'content-type\':\'multipart/form-data\'
}
}).then(res=>{
console.log(res.data);
if(res.data.state){
if(window.confirm(res.data.msg+",点击确定跳转到列表页面!")){
location.href="/ems_vue/emplist.html";
}
}else{
alert(res.data.msg);
}
});
}
},
created(){//生命周期函数
var userString = localStorage.getItem("user");
if(userString){
this.user = JSON.parse(userString);
}else{
alert("您尚未登录,点击确定跳转至登录页面!");
location.href ="/ems_vue/login.html";
}
//获取对应id信息
var start = location.href.lastIndexOf("=");
var id = location.href.substring(start+1);
console.log(id);
//查询一个人信息
var _this = this;
axios.get("http://localhost:8989/ems_vue/emp/findOne?id="+id).then(res=>{
console.log(res.data);
_this.emp = res.data;
});
}
});
</script>
五、后续安排
尝试用Vue-cli搭建前端部分,并用Element-UI框架美化前端界面。
以上是 Spring Boot + Vue 开发前后端分离的员工管理系统 的全部内容, 来源链接: utcz.com/z/379159.html