springBoot定时任务处理类的实现代码
首先在启动类上添加注解:@EnableScheduling 来开启定时任务
@SpringBootApplication
@EnableScheduling
public class Application {
public static void main(String[] args) {
SpringApplication.run(Application.class, args);
}
}
然后新建定时任务类
@Component
public class QuartzService {
/**
* 通过时间表达式执行定时任务
*/
@Scheduled(cron = "0 0/1 * * * ?")
public void timerToNow(){
System.out.println("now time:" + new SimpleDateFormat("yyyy-MM-dd HH:mm:ss").format(new Date()));
}
/**
*启动时间点之后 X毫秒秒执行一次
*/
@Scheduled(fixedRate = 5000)
public void timerToZZP(){
System.out.println("fixedRate:" + new Random().nextLong() + new SimpleDateFormat("HH:mm:ss").format(new Date()));
}
/**
* 结束时间点之后 每X毫秒执行一次
*/
@Scheduled(fixedDelay = 10000)
public void timerToReportCount(){
System.out.println("fixedDelay:" + new Random().nextLong() + new SimpleDateFormat("HH:mm:ss").format(new Date()));
}
/**
* 第一次延迟 X毫秒执行,之后按照fixedRate的规则每X毫秒执行
*/
@Scheduled(initialDelay = 10000,fixedRate = 6000)
public void timerToReport(){
System.out.println("initialDelay:" + new Random().nextLong() + new SimpleDateFormat("HH:mm:ss").format(new Date()));
}
}
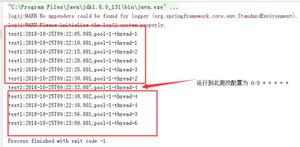
启动项目,定时任务开始
总结
以上所述是小编给大家介绍的springBoot定时任务处理类的实现代码,希望对大家有所帮助,如果大家有任何疑问请给我留言,小编会及时回复大家的。在此也非常感谢大家对网站的支持!
以上是 springBoot定时任务处理类的实现代码 的全部内容, 来源链接: utcz.com/z/362227.html