ios原生二维码扫描
做iOS的二维码扫描" title="二维码扫描">二维码扫描,有两个第三方库可以选择,ZBar和ZXing。今天要介绍的是iOS7.0后AVFoundation框架提供的原生二维码扫描。
首先需要添加AVFoundation.framework框架到你工程中build phase的"Link Binary With Libraries"之下,然后就可以开始了。
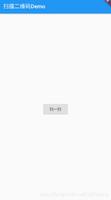
一、做好准备工作,搭建UI
UI效果如图
IBOutlet、IBAction如下:
@property (weak, nonatomic) IBOutlet UIView *viewPreview;
@property (weak, nonatomic) IBOutlet UILabel *lblStatus;
@property (weak, nonatomic) IBOutlet UIButton *startBtn;
- (IBAction)startStopReading:(id)sender;
接下来就都是代码的事情了
二、控制器ViewController.h
首先导入AVFoundation框架
#import <AVFoundation/AVFoundation.h>
然后控制器实现 AVCaptureMetadataOutputObjectsDelegate协议
@interface ViewController ()<AVCaptureMetadataOutputObjectsDelegate>
整体property如下:
@property (span, nonatomic) UIView *boxView;
@property (nonatomic) BOOL isReading;
@property (span, nonatomic) CALayer *scanLayer;
-(BOOL)startReading;
-(void)stopReading;
//捕捉会话
@property (nonatomic, span) AVCaptureSession *captureSession;
//展示layer
@property (nonatomic, span) AVCaptureVideoPreviewLayer *videoPreviewLayer;
然后在ViewDidLoad方法中初始化
- (void)viewDidLoad {
[super viewDidLoad];
_captureSession = nil;
_isReading = NO;
}
接下来实现startReading方法(这可就是重点咯)
- (BOOL)startReading {
NSError *error;
//1.初始化捕捉设备(AVCaptureDevice),类型为AVMediaTypeVideo
AVCaptureDevice *captureDevice = [AVCaptureDevice defaultDeviceWithMediaType:AVMediaTypeVideo];
//2.用captureDevice创建输入流
AVCaptureDeviceInput *input = [AVCaptureDeviceInput deviceInputWithDevice:captureDevice error:&error];
if (!input) {
NSLog(@"%@", [error localizedDescription]);
return NO;
}
//3.创建媒体数据输出流
AVCaptureMetadataOutput *captureMetadataOutput = [[AVCaptureMetadataOutput alloc] init];
//4.实例化捕捉会话
_captureSession = [[AVCaptureSession alloc] init];
//4.1.将输入流添加到会话
[_captureSession addInput:input];
//4.2.将媒体输出流添加到会话中
[_captureSession addOutput:captureMetadataOutput];
//5.创建串行队列,并加媒体输出流添加到队列当中
dispatch_queue_t dispatchQueue;
dispatchQueue = dispatch_queue_create("myQueue", NULL);
//5.1.设置代理
[captureMetadataOutput setMetadataObjectsDelegate:self queue:dispatchQueue];
//5.2.设置输出媒体数据类型为QRCode
[captureMetadataOutput setMetadataObjectTypes:[NSArray arrayWithObject:AVMetadataObjectTypeQRCode]];
//6.实例化预览图层
_videoPreviewLayer = [[AVCaptureVideoPreviewLayer alloc] initWithSession:_captureSession];
//7.设置预览图层填充方式
[_videoPreviewLayer setVideoGravity:AVLayerVideoGravityResizeAspectFill];
//8.设置图层的frame
[_videoPreviewLayer setFrame:_viewPreview.layer.bounds];
//9.将图层添加到预览view的图层上
[_viewPreview.layer addSublayer:_videoPreviewLayer];
//10.设置扫描范围
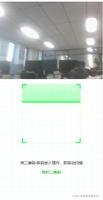
captureMetadataOutput.rectOfInterest = CGRectMake(0.2f, 0.2f, 0.8f, 0.8f);
//10.1.扫描框
_boxView = [[UIView alloc] initWithFrame:CGRectMake(_viewPreview.bounds.size.width * 0.2f, _viewPreview.bounds.size.height * 0.2f, _viewPreview.bounds.size.width - _viewPreview.bounds.size.width * 0.4f, _viewPreview.bounds.size.height - _viewPreview.bounds.size.height * 0.4f)];
_boxView.layer.borderColor = [UIColor greenColor].CGColor;
_boxView.layer.borderWidth = 1.0f;
[_viewPreview addSubview:_boxView];
//10.2.扫描线
_scanLayer = [[CALayer alloc] init];
_scanLayer.frame = CGRectMake(0, 0, _boxView.bounds.size.width, 1);
_scanLayer.backgroundColor = [UIColor brownColor].CGColor;
[_boxView.layer addSublayer:_scanLayer];
NSTimer *timer = [NSTimer scheduledTimerWithTimeInterval:0.2f target:self selector:@selector(moveScanLayer:) userInfo:nil repeats:YES];
[timer fire];
//10.开始扫描
[_captureSession startRunning];
return YES;
}
实现AVCaptureMetadataOutputObjectsDelegate协议方法
#pragma mark - AVCaptureMetadataOutputObjectsDelegate
- (void)captureOutput:(AVCaptureOutput *)captureOutput didOutputMetadataObjects:(NSArray *)metadataObjects fromConnection:(AVCaptureConnection *)connection
{
//判断是否有数据
if (metadataObjects != nil && [metadataObjects count] > 0) {
AVMetadataMachineReadableCodeObject *metadataObj = [metadataObjects objectAtIndex:0];
//判断回传的数据类型
if ([[metadataObj type] isEqualToString:AVMetadataObjectTypeQRCode]) {
[_lblStatus performSelectorOnMainThread:@selector(setText:) withObject:[metadataObj stringValue] waitUntilDone:NO];
[self performSelectorOnMainThread:@selector(stopReading) withObject:nil waitUntilDone:NO];
_isReading = NO;
}
}
}
实现计时器方法moveScanLayer:(NSTimer *)timer
- (void)moveScanLayer:(NSTimer *)timer
{
CGRect frame = _scanLayer.frame;
if (_boxView.frame.size.height < _scanLayer.frame.origin.y) {
frame.origin.y = 0;
_scanLayer.frame = frame;
}else{
frame.origin.y += 5;
[UIView animateWithDuration:0.1 animations:^{
_scanLayer.frame = frame;
}];
}
}
实现开始和停止方法
- (IBAction)startStopReading:(id)sender {
if (!_isReading) {
if ([self startReading]) {
[_startBtn setTitle:@"Stop" forState:UIControlStateNormal];
[_lblStatus setText:@"Scanning for QR Code"];
}
}
else{
[self stopReading];
[_startBtn setTitle:@"Start!" forState:UIControlStateNormal];
}
_isReading = !_isReading;
}
-(void)stopReading{
[_captureSession stopRunning];
_captureSession = nil;
[_scanLayer removeFromSuperlayer];
[_videoPreviewLayer removeFromSuperlayer];
}
以上内容就是本文给大家介绍ios原生二维码扫描的全部内容,希望大家喜欢。
以上是 ios原生二维码扫描 的全部内容, 来源链接: utcz.com/z/345060.html