C#图像亮度调式与伪彩色图的处理教程(推荐)
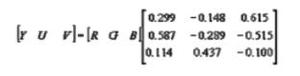
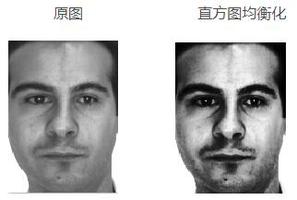
如图,左图是效果,右图是原理,右图X轴代表图像一个像素点的灰度,Y轴代表RGB三个颜色对应的伪彩色图颜色。代码如下:
for (int y = 0; y < height; y++)
{
for (int x = 0; x < width; x++)
{
Color c = bmp.GetPixel(x, y);
int R = c.R; int G = c.G; int B = c.B;
byte temp = (byte)(B * 0.114 + G * 0.587 + R * 0.299);
if (temp >= 0 && temp <= 63)
{
bmp.SetPixel(x, y, Color.FromArgb(0, (byte)(4 * temp), (byte)255));
}
if (temp >= 64 && temp <= 127)
{
bmp.SetPixel(x, y, Color.FromArgb(0, 255, (byte)(510 - 4 * temp)));
}
if (temp >= 128 && temp <= 191)
{
bmp.SetPixel(x, y, Color.FromArgb((byte)(4 * temp - 510), 255, 0));
}
if (temp >= 192 && temp <= 255)
{
bmp.SetPixel(x,y, Color.FromArgb(255, (byte)(1022 - 4 * temp),0));
}
}
}
图像亮度调整:
for (int y = 50; y < 100; y++)
{
for (int x = 50; x < 100; x++)
{
// 处理指定位置像素的亮度
Color c = b.GetPixel(x, y);
int R = c.R; int G = c.G; int B = c.B;
R = R + degree; if (R > 255) R = 255;
G = G + degree; if (G > 255) G = 255;
B = B + degree; if (B > 255) B = 255;
b.SetPixel(x, y, Color.FromArgb(R, G, B));
}
}//其中degree是亮度阶梯度
以上这篇C#图像亮度调式与伪彩色图的处理教程(推荐)就是小编分享给大家的全部内容了,希望能给大家一个参考,也希望大家多多支持。
以上是 C#图像亮度调式与伪彩色图的处理教程(推荐) 的全部内容, 来源链接: utcz.com/z/336874.html