浅谈maven 多环境打包发布的两种方式
集合工程中 maven 的多环境打包发布
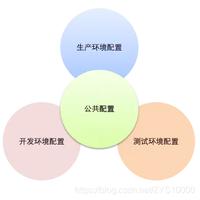
在一个项目的开发过程中,我们经常要进行 开发环境 , 测试环境, 正式环境 打包部署,如果每次打包过程中我们都是人为的 根据 不同 环境 去修改一些 配置文件 ,这样不但工作量太庞大,而且还容易出错,而maven的插件正好解决了我们的困扰。
1. maven 聚合工程的创建
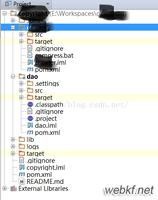
创建过程直接忽略,看最终的结果图
第一种方式
2. 不同环境打包的配置
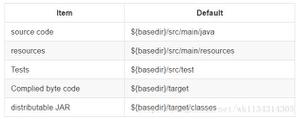
因为要发布一个webapp的主要配置文件集中在 web工程中,故而,相关的配置文件都在 ecps-manager-web工程的 resources下。
原本在 ecps-manager-web的resources中是没有 dev 和 test 文件夹的。改造后就是上图。
针对我的resources中文件的管理是分文件夹管理,故而, 在分环境打包是也是按照这种结构创建不同环境的文件分布。
很显然。我们把需要更改的配置文件,复制到各个不同环境的文件夹中, 同时保持原有的结构。那些不需要更改的文件是不需要复制的。
例如:
resources/properties/jdbc.properties是需要更改的配置文件,我们就需要的 dev 和 test 的文件下分别 创建一个 properties 文件夹,然后复制一分jdbc.properties文件即可。
pom.xml中的配置后面再说,先理清思路。
3. 开发中的使用
现在在这种结构下。我来描述开发中的存在情况。
1. 本地开发环境
我们通常在 svn 或者 github 中 checkout 项目的代码之后,需要在本地启动开发,这个时候,我们是不需要更改任何东西的。
比如 resource/properties/jdbc.properties 里面本来就配置的开发中的环境, 所以直接 tomcat 启动即可。不需要管 dev 或者 test
2. 开发环境
在前后端分离的开发方式下,后台本地开发完代码之后,需要打包发布到开发的环境中,提供API接口,这个时候就 使用 dev 中的配置文件,打包,或者交由 Jenkins 自动构建开发环境。
3. 测试环境
在前后端功能完成之后,就需要将当前功能截止的代码 打包部署到测试环境,供测试人员测试。这个时候 就 使用 test 中的配置文件, 打包,或者交由jenkins 自动构建测试环境。
4. 生产环境
测试完成之后,经过预发布环境之后,就要新的 tag 代码打包部署到正式环境,上线。这个时候 就 使用 prod 中的配置文件,打包。交由运维人员部署代码。
4. 具体的pom文件
这里的工程 又有ecps-manager 是聚合工程,因此,相关的打包部署信息都配置在 ecps-manager 聚合工程的pom中。
<project xmlns:xsi="http://www.w3.org/2001/XMLSchema-instance" xmlns="http://maven.apache.org/POM/4.0.0"
xsi:schemaLocation="http://maven.apache.org/POM/4.0.0 http://maven.apache.org/xsd/maven-4.0.0.xsd">
<parent>
<artifactId>ecps-parent</artifactId>
<groupId>com.ecps</groupId>
<version>1.0-SNAPSHOT</version>
<relativePath>../ecps-parent/pom.xml</relativePath>
</parent>
<modelVersion>4.0.0</modelVersion>
<artifactId>ecps-manager</artifactId>
<packaging>pom</packaging>
<name>ecps-manager</name>
<url>http://maven.apache.org</url>
<modules>
<module>/ecps-manager-model</module>
<module>/ecps-manager-mapper</module>
<module>/ecps-manager-service</module>
<module>/ecps-manager-web</module>
</modules>
<properties>
<project.build.sourceEncoding>UTF-8</project.build.sourceEncoding>
</properties>
<profiles>
<!--开发环境-->
<profile>
<id>dev</id>
<properties>
<package.environment>dev</package.environment>
</properties>
<activation>
<activeByDefault>true</activeByDefault>
</activation>
</profile>
<profile>
<!--测试环境-->
<id>test</id>
<properties>
<package.environment>test</package.environment>
</properties>
</profile>
</profiles>
<!-- 如果不添加此节点mybatis的mapper.xml文件都会被漏掉。 因为maven默认读取src/main/resources下的文件-->
<build>
<finalName>ecps-manager-web</finalName>
<plugins>
<plugin>
<!-- maven war plugin-->
<groupId>org.apache.maven.plugins</groupId>
<artifactId>maven-war-plugin</artifactId>
<version>2.2</version>
<configuration>
<webXml>src\main\webapp\WEB-INF\web.xml</webXml>
<warSourceDirectory>webapp</warSourceDirectory>
<archive>
<addMavenDescriptor>false</addMavenDescriptor>
</archive>
<webResources>
<resource>
<directory>src/main/resources/${package.environment}</directory>
<targetPath>WEB-INF/classes</targetPath>
<filtering>true</filtering>
</resource>
</webResources>
</configuration>
</plugin>
<!-- 添加tomcat插件 -->
<plugin>
<groupId>org.apache.tomcat.maven</groupId>
<artifactId>tomcat7-maven-plugin</artifactId>
<configuration>
<port>8080</port>
<path>/</path>
<!-- 系统热部署配置-->
<url>http://192.168.31.104:8080/manager/text</url>
<username>tomcat</username>
<password>tomcat</password>
</configuration>
</plugin>
</plugins>
</build>
</project>
打包使用的插件: maven-war-plugin
动态指定目录,接受参数 : ${package.environment}
目标路径:targetPage
webXml : 配置web.xml路径
5. maven 命令打包
mvn clean package -P test -----> 测试环境
mvn clean package -P dev -----> 开发环境
在IDEA 中可以这样操作:
6. 可能出现的错误:
web.xml 不存在
有些文档会将此处配置为:
执行 mvn clean package -P test 的时候,报错 web.xml找不到:
就需要修改 中的内容。
也就是你工作空间中的对应的web.xml的路径(src/开始)
页面不能访问,jsp不存在
修改 为自己jsp存放路径
第二种方式
其实第一种方式打包之后的war中的结构中依旧存在 dev和test文件夹,而且pom.xml中的配置有点复杂, 现在提出第二种方式,简单的不能想象。
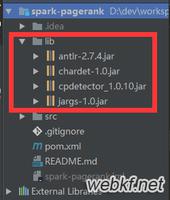
依旧展示一下打包之前使用第二种方式的结构(工程结构不变,展示ecps-manager-web结构):
这里把dev 和 test 全部包含到 env 文件夹下。
ecps-manager 聚合工程中 pom.xml
<project xmlns:xsi="http://www.w3.org/2001/XMLSchema-instance" xmlns="http://maven.apache.org/POM/4.0.0"
xsi:schemaLocation="http://maven.apache.org/POM/4.0.0 http://maven.apache.org/xsd/maven-4.0.0.xsd">
<parent>
<artifactId>ecps-parent</artifactId>
<groupId>com.ecps</groupId>
<version>1.0-SNAPSHOT</version>
<relativePath>../ecps-parent/pom.xml</relativePath>
</parent>
<modelVersion>4.0.0</modelVersion>
<artifactId>ecps-manager</artifactId>
<packaging>pom</packaging>
<name>ecps-manager</name>
<url>http://maven.apache.org</url>
<modules>
<module>/ecps-manager-model</module>
<module>/ecps-manager-mapper</module>
<module>/ecps-manager-service</module>
<module>/ecps-manager-web</module>
</modules>
<properties>
<project.build.sourceEncoding>UTF-8</project.build.sourceEncoding>
</properties>
<profiles>
<!--开发环境-->
<profile>
<id>dev</id>
<!-- 项目日志配置 -->
<!-- <properties> <maven.log.output.directory>${catalina.home}/logs/${project.artifactId}</maven.log.output.directory>
</properties>-->
<build>
<resources>
<resource>
<directory>src/main/resources/env/dev</directory>
</resource>
</resources>
</build>
<activation>
<activeByDefault>true</activeByDefault>
</activation>
</profile>
<profile>
<!--测试环境-->
<id>test</id>
<!-- <properties> <maven.log.output.directory>${catalina.home}/logs/${project.artifactId}</maven.log.output.directory>
</properties>-->
<build>
<resources>
<resource>
<directory>src/main/resources/env/test</directory>
</resource>
</resources>
</build>
</profile>
</profiles>
<build>
<finalName>ecps-manager-web</finalName>
<!--打包之后不包含env-->
<resources>
<resource>
<directory>src/main/resources</directory>
<filtering>true</filtering>
<excludes>
<exclude>**/env/**</exclude>
</excludes>
</resource>
</resources>
<plugins>
<!-- 添加tomcat插件 -->
<plugin>
<groupId>org.apache.tomcat.maven</groupId>
<artifactId>tomcat7-maven-plugin</artifactId>
<configuration>
<port>8080</port>
<path>/</path>
<!-- 系统热部署配置-->
<url>http://192.168.31.104:8080/manager/text</url>
<username>tomcat</username>
<password>tomcat</password>
</configuration>
</plugin>
</plugins>
</build>
</project>
最终的打包结果:
以上是 浅谈maven 多环境打包发布的两种方式 的全部内容, 来源链接: utcz.com/z/324219.html