IDEA配置JRebel实现热部署的方法
1.下载JRebel and XRebel for Intellij插件
2. 激活
请查看这个文章http://www.cicoding.cn/other/jrebel-activation/
激活后
开始配置自动编译
3.勾选Build project automatically
ctrl + shift + alt + / ,选择Registry,勾上 Compiler autoMake allow when app running
4.Edit Configurations
on update action和 on frame deactivation改成 update classes and resources
5.打开JRebel tool
6.勾选你要热部署的应用
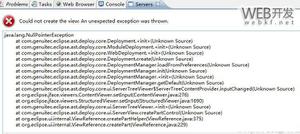
查看JRebel日志
使用JRebel启动springboot项目
查看控制台日志
常见错误
jrebel.jar不兼容
JRebel-JVMTI [ERROR] You're using an incompatible 'jrebel.jar' with the JRebel Agent.
JRebel-JVMTI [FATAL] Please make sure that'C:\Users\XXX\AppData\Roaming\JetBrains\IntelliJIdea2020.2\plugins\jr-ide-idea\lib\jrebel6\jrebel.jar' is a copy of lib JRebel ZIP release \Jrebel.jar.
这可能是因为你的IDEA可能不是最新版本,但jrebel的jar包为最新版导致的,
因此请转到官方网站下载你指定IDEA版本的JRebel压缩包。然后解压缩压缩包以找到jrebel.jar,并将jrebel使用的jar包的路径更改为解压缩后的jrebel.jar的文件路径。
再次使用JRebel启动SpringBoot项目并成功启动。如果修改代码,将鼠标点向IDEA窗口以外的区域会自动build(或者手动按ctrl+shfit+F9)
MrBird nb
到此这篇关于IDEA配置JRebel实现热部署的方法的文章就介绍到这了,更多相关IDEA配置JRebel实现热部署内容请搜索以前的文章或继续浏览下面的相关文章希望大家以后多多支持!
以上是 IDEA配置JRebel实现热部署的方法 的全部内容, 来源链接: utcz.com/z/322981.html