【spring boot】SpringBoot初学(6)– aop与自定义注解
本文内容纲要:【spring boot】SpringBoot初学(6)– aop与自定义注解
前言
github: https://github.com/vergilyn/SpringBootDemo
一、AOP
官方demo:https://github.com/spring-projects/spring-boot/tree/master/spring-boot-samples/spring-boot-sample-aop
1.1 pom依赖
<dependency> <groupId>org.springframework.boot</groupId>
<artifactId>spring-boot-starter-aop</artifactId>
</dependency>
1.2 demo
对aop的properties配置有:
#### AOP# spring.aop.auto=true # Add @EnableAspectJAutoProxy.
# spring.aop.proxy-target-class=false # Whether subclass-based (CGLIB) proxies are to be created (true) as opposed to standard Java interface-based proxies (false).
这两个配置都允许注解配置: @EnableAspectJAutoProxy (proxyTargetClass = false,exposeProxy = false),默认值都是false
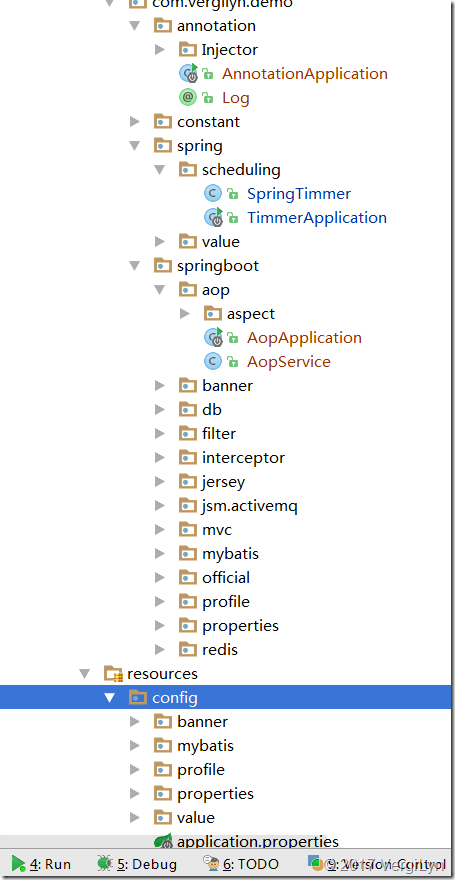
代码目录:

代码说明:
- AopService:被aop增强的class。
AopAspect:aop增强的class。
AopApplication:启动、测试class。
整个demo很简单,实际要用到再去细看AOP也可以。
@Component
public class AopService {
@Value("${aop.name:Dante}")
private String name;
public String getMsg() {return "Hello, " + this.name;
}
}
@Aspect
@Component
public class AopAspect {
@AfterReturning("execution(* com.vergilyn.demo.springboot.aop.Service.(..))")
public void afterReturning(JoinPoint joinPoint) {
System.out.println("aop @AfterReturning: " + joinPoint);
}
}
@SpringBootApplication
//开启aop支持; 可properties配置proxyTargetClass、exposeProxy
//@EnableAspectJAutoProxy //(proxyTargetClass = true,exposeProxy = false)
public class AopApplication implements CommandLineRunner {
@Autowired
private AopService aopService;
public static void main(String[] args) {SpringApplication app = new SpringApplication(AopApplication.class);
app.setAdditionalProfiles("aop");
app.run(args);
}
@Override
public void run(String... args) {
System.out.println(this.aopService.getMsg());
}
}


aop.name=vergilyn#### AOP
# spring.aop.auto=true # Add @EnableAspectJAutoProxy.
# spring.aop.proxy-target-class=false # Whether subclass-based (CGLIB) proxies are to be created (true) as opposed to standard Java interface-based proxies (false).
application-aop.properties
console输出结果:
aop @AfterReturning: execution(String com.vergilyn.demo.springboot.aop.AopService.getMsg())Hello, vergilyn
二、自定义注解
其实我本来是要做的是:自定义注解注入Logger,所以才顺道写了一下AOP的demo。
需求:
- 通过注解,注入Logger(org.apache.log4j.Logger)。
说明:
之前注入日志都是在每个类中写代码,ex:
public class XXclass{ private Logger log = Logger.getLogger(XXclass.class);
}
现在想通过自定义注解注入,ex:
public class XXclass{ private Logger log1 = Logger.getLogger(XXclass.class);
@Log //自定义注解
private Logger log2;
}
其中log2的效果与log1一样。
实现:
可以通过aop注入。
可以通过实现org.springframework.beans.factory.config.BeanPostProcessor注入;
(其实是一样的,了解spring的就知道Bean的注入都会通过BeanPostProcessor)
代码demo:
注解Log的定义
@Retention(RUNTIME)@Target(FIELD)
@Documented
@Inherited
public @interface Log {
}
注解的实现
@Component@Aspect
public class LogInjector implements BeanPostProcessor {
public Object postProcessAfterInitialization(Object bean, String beanName)
throws BeansException {
return bean;
}
public Object postProcessBeforeInitialization(final Object bean,String beanName) throws BeansException {
ReflectionUtils.doWithFields(bean.getClass(), new FieldCallback() {
public void doWith(Field field) throws IllegalArgumentException,
IllegalAccessException {
// System.out.println("Logger Inject into :" + bean.getClass());
// make the field accessible if defined private
ReflectionUtils.makeAccessible(field);
if (field.getAnnotation(Log.class) != null) {
Logger log = Logger.getLogger(bean.getClass());
field.set(bean, log);
}
}
});
return bean;
}
}
启动、测试类
@SpringBootApplicationpublic class AnnotationApplication implements CommandLineRunner{
@Log
private Logger log;
public static void main(String[] args) {
SpringApplication app = new SpringApplication(AnnotationApplication.class);
app.setAdditionalProfiles("log");
app.run(args);
}
@Override
public void run(String... args) throws Exception {
System.out.println("log : " + log);
log.info("log 注解注入成功. log:" + log);
}
}
输出结果:
log : org.apache.log4j.Logger@24d31b862017-03-19 19:44:34.576 INFO 7688 --- [ restartedMain] ication$$EnhancerBySpringCGLIB$$52ae5e8e : log 注解注入成功. log:org.apache.log4j.Logger@24d31b86
三、扩展:spring boot之@Import、@ImportResource
缘由:由于我代码的目录结构是,一个project中根据package不同(因为spring boot默认扫描启动类所在的包,及其子包),测试spring boot的各种功能。

比如图中的*Application.class都是spring boot的启动类。然而我想把前面写的Log注解用在所有的*Application对应的项目中。
这就迁出一个问题:*Application.class只扫描所在的package及其sub-packages。从目录结构可以看到,Log并不能被别的*Application.class扫描到。
所以,要怎么解决呢?
这就需要spring boot提供的注解:@Import、@ImportResource。ex:
@SpringBootApplication@EnableScheduling //通过@EnableScheduling注解开启对计划任务的支持
//@ImportResource(locations = "ConfigXML/annotation-scan.xml" )
@Import(value = LogInjector.class)
public class TimmerApplication {
public static void main(String[] args) {
SpringApplication.run(TimmerApplication.class, args);
}
}
对于@ImportResource需要通过xml注入bean(就是普通的spring),annotation-scan.xml:
<beans xmlns="http://www.springframework.org/schema/beans" xmlns:xsi="http://www.w3.org/2001/XMLSchema-instance" xmlns:context="http://www.springframework.org/schema/context"
xmlns:mvc="http://www.springframework.org/schema/mvc" xmlns:jee="http://www.springframework.org/schema/jee"
xmlns:jdbc="http://www.springframework.org/schema/jdbc" xmlns:tx="http://www.springframework.org/schema/tx"
xsi:schemaLocation="http://www.springframework.org/schema/beans http://www.springframework.org/schema/beans/spring-beans-3.1.xsd
http://www.springframework.org/schema/context http://www.springframework.org/schema/context/spring-context-3.1.xsd
http://www.springframework.org/schema/mvc http://www.springframework.org/schema/mvc/spring-mvc-3.1.xsd
http://www.springframework.org/schema/jee http://www.springframework.org/schema/jee/spring-jee-3.1.xsd
http://www.springframework.org/schema/jdbc http://www.springframework.org/schema/jdbc/spring-jdbc-3.1.xsd
http://www.springframework.org/schema/tx http://www.springframework.org/schema/tx/spring-tx-3.1.xsd">
<!-- 扫描公共组件 -->
<context:component-scan base-package="com.vergilyn.demo.annotation" />
</beans>
本文内容总结:【spring boot】SpringBoot初学(6)– aop与自定义注解
原文链接:https://www.cnblogs.com/VergiLyn/p/6581961.html
以上是 【spring boot】SpringBoot初学(6)– aop与自定义注解 的全部内容, 来源链接: utcz.com/z/296932.html


