Spring框架IOC和AOP介绍
本文内容纲要:
- Spring的优点- 一、Spring中的IoC操作
- 1. IoC入门案例
- 2. Spring的bean管理(配置文件)
- Bean实例化的方式
- Bean标签的常用属性
- 3. DI的依赖注入
- 属性依赖注入
- 3.1 使用有参构造函数注入属性
- 3.2 使用set方法注入属性
- 3.3 注入对象类型属性
- 3.4 p名称空间注入属性
- 3.5 注入复杂类型属性
- IoC和DI的区别
- 4. Spring的bean管理(注解)
- 4.1 Spring注解开发准备
- 4.2 注解创建对象
- 4.3 注解注入属性
- 二、Spring框架—面向切面编程(AOP)
- 1. 什么是AOP
- 2. AOP实现原理
- 3. AOP术语【掌握】
- 4. AOP实现方式
- 4.1 手动方式
- 4.1.1 JDK动态代理
- 4.1.2 CGLIB字节码增强
- 4.2 半自动
- 4.2.1 目标类
- 4.2.2 切面类
- 4.2.3 Spring 配置
- 4.2.4 测试
- 4.3 全自动
- 4.3.1 切面类
- 4.3.2 Spring 配置
- 4.3.3 测试
- 4.4 注解方式
说明:本文部分内容参考其他优秀博客后结合自己实战例子改编如下
Spring框架是个轻量级的Java EE框架。所谓轻量级,是指不依赖于容器就能运行的。Struts、Hibernate也是轻量级的。
轻量级框架是相对于重量级框架而言的,重量级框架必须依赖特定的容器,例如EJB框架就必须运行在Glassfish、JBoss等支持EJB的容器中,而不能运行在Tomcat中。——《Java Web整合开发 王者归来》
Spring以IoC、AOP为主要思想,其中IoC,Inversion of Control 指控制反转或反向控制。在Spring框架中我们通过配置创建类对象,由Spring在运行阶段实例化、组装对象。
AOP,Aspect Oriented Programming,面向切面编程,其思想是在执行某些代码前执行另外的代码,使程序更灵活、扩展性更好,可以随便地添加、删除某些功能。Servlet中的Filter便是一种AOP思想的实现。
Spring的核心是控制反转(IoC)和面向切面(AOP)。简单来说,Spring是一个分层的JavaSE/EE full-stack(一站式) 轻量级开源框架。
即Spring在JavaEE的三层架构[表现层(Web层)、业务逻辑层(Service层)、数据访问层(DAO层)]中,每一层均提供了不同的解决技术。如下:
• 表现层(Web层):Spring MVC
• 业务逻辑层(Service层):Spring的IoC
• 数据访问层(DAO层):Spring的jdbcTemplate
Spring的优点
方便解耦,简化开发 (高内聚低耦合)
Spring就是一个大工厂(容器),可以将所有对象创建和依赖关系维护,交给Spring管理
spring工厂是用于生成bean
AOP编程的支持
Spring提供面向切面编程,可以方便的实现对程序进行权限拦截、运行监控等功能
声明式事务的支持
只需要通过配置就可以完成对事务的管理,而无需手动编程
方便程序的测试
Spring对Junit4支持,可以通过注解方便的测试Spring程序
方便集成各种优秀框架
Spring不排斥各种优秀的开源框架,其内部提供了对各种优秀框架(如:Struts、Hibernate、MyBatis、Quartz等)的直接支持
降低JavaEE API的使用难度
Spring 对JavaEE开发中非常难用的一些API(JDBC、JavaMail、远程调用等),都提供了封装,使这些API应用难度大大降低
一、Spring中的IoC操作
将对象的创建交由Spring框架进行管理。
IoC操作分为:IoC配置文件方式和IoC的注解方式。
1. IoC入门案例
(1)导入Spring框架中的相关jar包,这里只导入Spring的Core模块(Core模块是框架的核心类库)下的jar包(使用IoC的基本操作,并不需要导入spring-framework-4.2.0的所有jar包,
只导入spring-beans、spring-core、spring-context、spring-expression、spring-aop这5个jar包),以及 支持日志输出的 commons-logging 和 log4j 的jar包;
(2)创建一个普通的Java类,并在该类中创建方法,如下:
package com.wm103.ioc;/**
* Created by DreamBoy on 2018/3/17.
*/
public class User {
public void add() {
System.out.println("User Add Method.");
}
@Override
public String toString() {
return "This is a user object.";
}
}
(3)创建Spring的配置文件,进行Bean的配置
Spring的核心配置文件名称和位置不是固定的。但官方件建议将该核心配置文件放在src目录下,且命名为 applicationContext.xml。
这里为了方便,将核心配置文件放在src目录下,并命名为 applicationContext.xml,内容如下:
<?xml version="1.0" encoding="UTF-8"?><beans xmlns="http://www.springframework.org/schema/beans"
xmlns:xsi="http://www.w3.org/2001/XMLSchema-instance"
xsi:schemaLocation="http://www.springframework.org/schema/beans
http://www.springframework.org/schema/beans/spring-beans.xsd">
<!-- 配置service
<bean> 配置需要创建的对象
id :用于之后从spring容器获得实例时使用的
class :需要创建实例的全限定类名
-->
<bean id="user" class="com.wm103.ioc.User"></bean>
</beans>
(4)编写测试类进行测试,通过配置文件创建类对象
package com.wm103.ioc;import org.junit.Test;
import org.springframework.context.ApplicationContext;
import org.springframework.context.support.ClassPathXmlApplicationContext;
/**
* Created by DreamBoy on 2018/3/17.
*/
public class TestIoc {
@Test
public void runUser() {
// 1. 加载Spring配置文件,根据创建对象
ApplicationContext context = new ClassPathXmlApplicationContext("applicationContext.xml");
// 2. 得到配置创建的对象
User user = (User) context.getBean("user");
System.out.println(user);
user.add();
}
}
2. Spring的bean管理(配置文件)
Bean实例化的方式
在Spring中通过配置文件创建对象。
Bean实例化三种方式实现:
(1)使用类的无参数构造创建,如:
<!-- 等同于 user = new com.wm103.ioc.User(); --><bean id="user" class="com.wm103.ioc.User"></bean>
(2)使用静态工厂创建
如果一个Bean不能通过new直接实例化,而是通过工厂类的某个静态方法创建的,需要把<bean>的class属性配置为工厂类。如:
<!-- 等同于 user = com.wm103.ioc.UserFactory.createInstance(); --><bean id="user" class="com.wm103.ioc.UserFactory" factory-method="createInstance"></bean>
(3)使用实例工厂创建
如果一个Bean不能通过new直接实例化,而是通过工厂类的某个实例方法创建的,需要先配置工厂的<bean>标签,然后在需要创建的对象的bean标签的factory-bean属性配置为工厂类对象,factory-method属性配置为产生实例的方法。如:
<!-- 等同于 userFactory = new com.wm103.ioc.UserFactory(); --><bean id="userFactory" class="com.wm103.ioc.UserFactory"></bean>
<!-- 等同于 user = userFactory.createInstance(); -->
<bean id="user" factory-bean="userFactory" factory-method="createInstance"></bean>
``Bean标签的常用属性
(1)id属性:用于指定配置对象的名称,不能包含特殊符号。
(2)class属性:创建对象所在类的全路径。
(3)name属性:功能同id属性一致。但是在name属性值中可以包含特殊符号。
(4)scope属性
singleton:默认值,单例
单例模式下,在程序下只有一个实例。非单态模式下,每次请求该Bean,都会生成一个新的对象。
prototype:多例
request:创建对象后将对象存放到request域
session:创建对象后将对象存放到session域
globalSession:创建对象后将对象存放到globalSession域
3. DI的依赖注入
属性依赖注入
依赖注入方式:手动装配 和 自动装配
手动装配:一般进行配置信息都采用手动
基于xml装配:构造方法、setter方法
自动装配(基于注解装配):
属性注入指创建对象时,向类对象的属性设置属性值。
在Spring框架中支持set方法注入和有参构造函数注入,即创建对象后通过set方法设置属性或采用有参构造函数创建对象并初始化属性。
3.1 使用有参构造函数注入属性
案例:Student.java 提供有单参的构造方法
package com.wm103.ioc;public class Student {
private String name;
public Student(String name) {
this.name = name;
}
@Override
public String toString() {
return "Student{" +
"name='" + name + '\'' +
'}';
}
}
spring bean的配置:
<bean id="student" class="com.wm103.ioc.Student"> <constructor-arg name="name" value="DreamBoy"></constructor-arg>
</bean>
提供有多参的构造方法
public class User { private Integer uid;
private String username;
private Integer age;
public User(Integer uid, String username) {
super();
this.uid = uid;
this.username = username;
}
public User(String username, Integer age) {
super();
this.username = username;
this.age = age;
}
spring bean的配置:
<!-- 构造方法注入 * <constructor-arg> 用于配置构造方法一个参数argument
name :参数的名称
value:设置普通数据
ref:引用数据,一般是另一个bean id值
index :参数的索引号,从0开始 。如果只有索引,匹配到了多个构造方法时,默认使用第一个。
type :确定参数类型
例如:使用名称name
<constructor-arg name="username" value="jack"></constructor-arg>
<constructor-arg name="age" value="18"></constructor-arg>
例如2:【类型type 和 索引 index】
<constructor-arg index="0" type="java.lang.String" value="1"></constructor-arg>
<constructor-arg index="1" type="java.lang.Integer" value="2"></constructor-arg>
-->
<bean id="userId" class="com.itheima.f_xml.a_constructor.User" >
<constructor-arg index="0" type="java.lang.String" value="1"></constructor-arg>
<constructor-arg index="1" type="java.lang.Integer" value="2"></constructor-arg>
</bean>
创建Student对象进行测试:
@Testpublic void runStudent() {
// 1. 加载Spring配置文件,根据创建对象
ApplicationContext context = new ClassPathXmlApplicationContext("applicationContext.xml");
// 2. 得到配置创建的对象
Student student = (Student) context.getBean("student");
System.out.println(student);
}
3.2 使用set方法注入属性
案例:Teacher.java 提供属性的set方法
package com.wm103.ioc;public class Teacher {
private String name;
public void setName(String name) {
this.name = name;
}
@Override
public String toString() {
return "Teacher{" +
"name='" + name + '\'' +
'}';
}
}
bean的配置:
<bean id="teacher" class="com.wm103.ioc.Teacher"> <property name="name" value="Teacher Wu"></property>
</bean>
创建Teacher对象进行测试:
public void runTeacher() { // 1. 加载Spring配置文件,根据创建对象
ApplicationContext context = new ClassPathXmlApplicationContext("applicationContext.xml");
// 2. 得到配置创建的对象
Teacher teacher = (Teacher) context.getBean("teacher");
System.out.println(teacher);
}
3.3 注入对象类型属性
以三层架构中的service层和dao层为例,为了让service层使用dao层的类创建的对象,需要将dao对象注入到service层类中。具体实现过程中如下:
(1)创建service类、dao层接口、dao类,如下: UserService.java
package com.wm103.exp;public class UserService {
private UserDao userDao; // 声明为接口类型,降低service层与dao层的耦合度,不依赖于dao层的具体实现
public void setUserDao(UserDao userDao) {
this.userDao = userDao;
}
public void add() {
System.out.println("UserService Add...");
this.userDao.add();
}
}
UserDao.java
package com.wm103.exp;/**
* 暴露给service层的接口
* Created by DreamBoy on 2018/3/17.
*/
public interface UserDao {
void add();
}
UserDaoImpl.java
package com.wm103.exp;/**
* 接口UserDao的具体实现
* Created by DreamBoy on 2018/3/17.
*/
public class UserDaoImpl implements UserDao {
@Override
public void add() {
System.out.println("UserDaoImpl Add...");
}
}
(2)在配置文件中注入关系,如下:
<!-- 配置service和dao对象 --><!-- 因为service依赖于dao,所以先进行dao对象的bean配置 -->
<bean id="userDaoImpl" class="com.wm103.exp.UserDaoImpl"></bean>
<bean id="userService" class="com.wm103.exp.UserService">
<!--
注入dao对象
name属性值为:service中的某一属性名称
ref属性值为:被引用的对象对应的bean标签的id属性值
-->
<property name="userDao" ref="userDaoImpl"></property>
</bean>
(3)创建测试方法进行测试,如下:
@Testpublic void runUserService() {
// 1. 加载Spring配置文件,根据创建对象
ApplicationContext context = new ClassPathXmlApplicationContext("applicationContext.xml");
// 2. 得到配置创建的对象
UserService userService = (UserService) context.getBean("userService");
userService.add();
}
3.4 p名称空间注入属性
之前提到了一种set方法的属性注入方式,这里将介绍另一种属性注入的方式,名为 p名称空间注入。对比set方法的属性注入方式,核心配置文件配置修改如下:
<?xml version="1.0" encoding="UTF-8"?><beans xmlns="http://www.springframework.org/schema/beans"
xmlns:xsi="http://www.w3.org/2001/XMLSchema-instance"
xmlns:p="http://www.springframework.org/schema/p"
xsi:schemaLocation="http://www.springframework.org/schema/beans
http://www.springframework.org/schema/beans/spring-beans.xsd">
<bean id="teacher" class="com.wm103.ioc.Teacher" p:name="Teacher Wu"></bean>
</beans>
3.5 注入复杂类型属性
对象注入复杂类型属性,如数组、List、Map、Properties。
案例:PropertyDemo.java
package com.wm103.ioc;import java.util.List;
import java.util.Map;
import java.util.Properties;
public class PropertyDemo {
private String[] arrs;
private List<String> list;
private Map<String, String> map;
private Properties properties;
public String[] getArrs() {
return arrs;
}
public void setArrs(String[] arrs) {
this.arrs = arrs;
}
public List<String> getList() {
return list;
}
public void setList(List<String> list) {
this.list = list;
}
public Map<String, String> getMap() {
return map;
}
public void setMap(Map<String, String> map) {
this.map = map;
}
public Properties getProperties() {
return properties;
}
public void setProperties(Properties properties) {
this.properties = properties;
}
}
bean配置文件,内容如下:
<?xml version="1.0" encoding="UTF-8"?><beans xmlns="http://www.springframework.org/schema/beans"
xmlns:xsi="http://www.w3.org/2001/XMLSchema-instance"
xsi:schemaLocation="http://www.springframework.org/schema/beans
http://www.springframework.org/schema/beans/spring-beans.xsd">
<bean id="prop" class="com.wm103.ioc.PropertyDemo">
<!-- 注入数组 -->
<property name="arrs">
<list>
<value>Value 1 of Array</value>
<value>Value 2 of Array</value>
<value>Value 3 of Array</value>
</list>
</property>
<!-- 注入List集合 -->
<property name="list">
<list>
<value>Value 1 of List</value>
<value>Value 2 of List</value>
<value>Value 3 of List</value>
</list>
</property>
<!-- 注入Map集合 -->
<property name="map">
<map>
<entry key="key1" value="Value 1 of Map"></entry>
<entry key="key2" value="Value 2 of Map"></entry>
<entry key="key3" value="Value 3 of Map"></entry>
</map>
</property>
<!-- 注入Properties -->
<property name="properties">
<props>
<prop key="username">root</prop>
<prop key="password">123456</prop>
</props>
</property>
</bean>
</beans>
创建PropertyDemo对象进行测试:
@Testpublic void runPropertyDemo() {
// 1. 加载Spring配置文件,根据创建对象
ApplicationContext context = new ClassPathXmlApplicationContext("applicationContext.xml");
// 2. 得到配置创建的对象
PropertyDemo pd = (PropertyDemo) context.getBean("prop");
System.out.println(pd);
System.out.println(Arrays.toString(pd.getArrs()));
System.out.println(pd.getList());
System.out.println(pd.getMap());
System.out.println(pd.getProperties());
}
IoC和DI的区别
IoC,控制反转,将传统的对象创建流程转变为交由框架进行创建和管理。在Spring中,对象的创建交给Spring进行配置。它包括依赖注入。
DI,依赖注入,向类的属性设置值。
IoC与DI的关系:依赖注入不能单独存在,需要在IoC基础之上完成操作。
4. Spring的bean管理(注解)
注解是代码中特殊的标记,使用注解可以完成特定的功能。注解可以使用在类、方法或属性上,写法如:@注解名称(属性名称=属性值)。
Spring的bean管理注解方式,案例如下。
注解:就是一个类,使用@注解名称
开发中:使用注解 取代 xml配置文件。
@Component取代<bean class="">@Component("id") 取代 <bean id="" class="">- web开发,提供3个@Component注解衍生注解(功能一样)取代
@Repository :dao层@Service:service层@Controller:web层 - 依赖注入,给私有字段设值,也可以给setter方法设值
- 普通值:
@Value(" ") - 引用值:
方式1:按照【类型】注入 @Autowired 方式2:按照【名称】注入1 @Autowired @Qualifier("名称") 方式3:按照【名称】注入2 @Resource("名称")4.生命周期
初始化:@PostConstruct 销毁:@PreDestroy5.作用域
@Scope("prototype") 多例注解使用前提,添加命名空间,让spring扫描含有注解类
4.1 Spring注解开发准备
(1)导入jar包:
- 导入基本的jar包:
commons-logging、log4j、spring-beans、spring-context、spring-core、spring-expression相关jar包。 - 导入AOP的jar包:
spring-aopjar包。
(2)创建类、方法
User.java
package com.wm103.anno;import org.springframework.stereotype.Component;
public class User {
public void add() {
System.out.println("User Add Method.");
}
}
(3)创建Spring配置文件,引入约束;并开启注解扫描
<?xml version="1.0" encoding="UTF-8"?><beans xmlns="http://www.springframework.org/schema/beans"
xmlns:xsi="http://www.w3.org/2001/XMLSchema-instance"
xmlns:context="http://www.springframework.org/schema/context"
xsi:schemaLocation="http://www.springframework.org/schema/beans
http://www.springframework.org/schema/beans/spring-beans.xsd
http://www.springframework.org/schema/context
http://www.springframework.org/schema/context/spring-context.xsd">
<!--
开启注解扫描
(1)到包中扫描类、方法、属性上是否有注解
-->
<context:component-scan base-package="com.wm103"></context:component-scan>
<!--
(2)只扫描属性上的注解
-->
<!--<context:annotation-config></context:annotation-config>-->
</beans>
4.2 注解创建对象
在创建对象的类上面使用注解实现,如:
@Component(value="user")public class User {
创建测试类 TestAnno.java和测试方法,如:
package com.wm103.anno;import org.junit.Test;
import org.springframework.context.ApplicationContext;
import org.springframework.context.support.ClassPathXmlApplicationContext;
public class TestAnno {
@Test
public void runUser() {
// 1. 加载Spring配置文件,根据创建对象
ApplicationContext context = new ClassPathXmlApplicationContext("applicationContext.xml");
// 2. 得到配置创建的对象
User user = (User) context.getBean("user");
user.add();
}
}
除了上述提到的 @Component注解外,Spring中还提供了@Component的3个衍生注解,其功能就目前来说是一致的,均是为了创建对象。
@Controller :WEB层
@Service :业务层
@Repository :持久层
以单例或多实例方式创建对象,默认为单例,多例对象设置注解如下:
@Component(value="user")
@Scope(value="prototype")
public class User {
4.3 注解注入属性
案例:创建Service类和Dao类,并在Service中注入Dao对象。如下:
(1)创建Dao和Service对象
UserDao.java
package com.wm103.anno;import org.springframework.stereotype.Repository;
@Repository(value="userDao")
public class UserDao {
public void add() {
System.out.println("UserDao Add Method.");
}
}
UserService.java
package com.wm103.anno;import org.springframework.stereotype.Service;
import javax.annotation.Resource;
@Service(value="userService")
public class UserService {
public void add() {
System.out.println("UserService Add Method.");
userDao.add();
}
}
(2)在Service类中定义UserDao类型的属性,并使用注解完成对象的注入
```@Autowired`:自动注入或自动装配,是根据类名去找到类对应的对象来完成注入的。
@Autowiredprivate UserDao userDao;
或者 @Resource
@Resource(name="userDao")private UserDao userDao;
其中该注解的name属性值为注解创建Dao对象的value属性的值。
这两种注解方式都不一定要为需要注入的属性定义set方法。
(3)创建测试方法
@Testpublic void runUserService() {
// 1. 加载Spring配置文件,根据创建对象
ApplicationContext context = new ClassPathXmlApplicationContext("applicationContext.xml");
// 2. 得到配置创建的对象
UserService userService = (UserService) context.getBean("userService");
userService.add();
}
注:配置文件和注解混合使用
1)创建对象的操作一般使用配置文件方式实现;
2)注入属性的操作一般使用注解方式实现。
二、Spring框架—面向切面编程(AOP)
1. 什么是AOP
- 在软件业,AOP为Aspect Oriented Programming的缩写,意为:面向切面编程,通过预编译方式和运行期动态代理实现程序功能的统一维护的一种技术。AOP是OOP(面向对象编程)的延续,是软件开发中的一个热点,也是Spring框架中的一个重要内容,是函数式编程的一种衍生范型。利用AOP可以对业务逻辑的各个部分进行隔离,从而使得业务逻辑各部分之间的耦合度降低,提高程序的可重用性,同时提高了开发的效率。
- AOP采取横向抽取机制,取代了传统纵向继承体系重复性代码
- 经典应用:事务管理、性能监视、安全检查、缓存 、日志等
- Spring AOP使用纯Java实现,不需要专门的编译过程和类加载器,在运行期通过代理方式向目标类织入增强代码
- AspectJ是一个基于Java语言的AOP框架,Spring2.0开始,Spring AOP引入对Aspect的支持,AspectJ扩展了Java语言,提供了一个专门的编译器,在编译时提供横向代码的织入
2. AOP实现原理
- aop底层将采用代理机制进行实现。
- 接口 + 实现类 :spring采用 jdk 的动态代理Proxy。
- 实现类:spring 采用 cglib字节码增强。
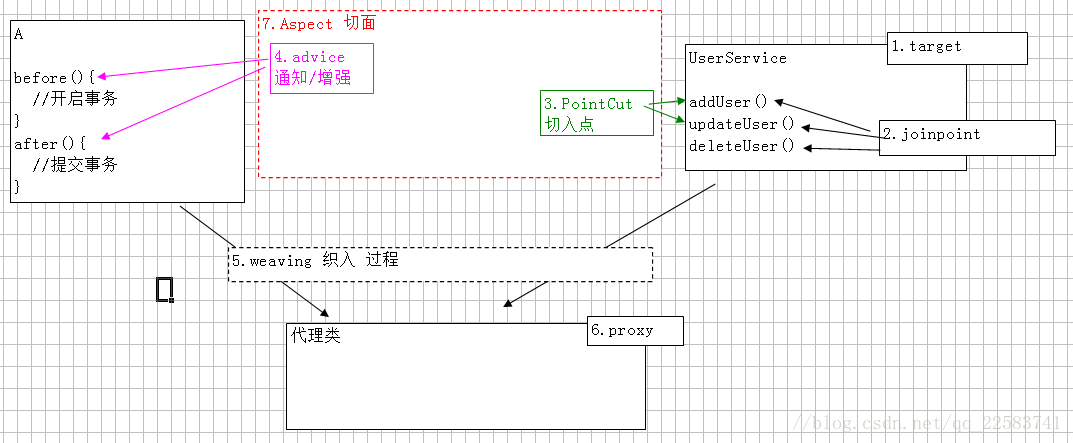
3. AOP术语【掌握】
- target:目标类,需要被代理的类。例如:UserService
- Joinpoint(连接点):所谓连接点是指那些可能被拦截到的方法。例如:所有的方法
- PointCut 切入点:已经被增强的连接点。例如:addUser()
- advice 通知/增强,增强代码。例如:after、before
- Weaving(织入):是指把增强advice应用到目标对象target来创建新的代理对象proxy的过程.
- proxy 代理类
- Aspect(切面): 是切入点pointcut和通知advice的结合
一个线是一个特殊的面。
一个切入点和一个通知,组成成一个特殊的面。
4. AOP实现方式
有四种实现方式:手动方式,半自动方式,全自动方式,注解方式
4.1 手动方式
4.1.1 JDK动态代理
- JDK动态代理 对“装饰者”设计模式 简化。使用前提:必须有接口
目标类:接口 + 实现类(UserServiceImpl)
public interface UserService {
public void addUser();
public void updateUser();
public void deleteUser();
}
切面类:用于存通知 MyAspect
public class MyAspect {
public void before(){
System.out.println("鸡首");
}
public void after(){
System.out.println("牛后");
}
}
工厂类:编写工厂生成代理
public class MyBeanFactory {
public static UserService createService(){//1 目标类
final UserService userService = new UserServiceImpl();
//2切面类
final MyAspect myAspect = new MyAspect();
/* 3 代理类:将目标类(切入点)和 切面类(通知) 结合 --> 切面
* Proxy.newProxyInstance
* 参数1:loader ,类加载器,动态代理类 运行时创建,任何类都需要类加载器将其加载到内存。
* 一般情况:当前类.class.getClassLoader();
* 目标类实例.getClass().get...
* 参数2:Class[] interfaces 代理类需要实现的所有接口
* 方式1:目标类实例.getClass().getInterfaces() ;注意:只能获得自己接口,不能获得父元素接口
* 方式2:new Class[]{UserService.class}
* 例如:jdbc 驱动 --> DriverManager 获得接口 Connection
* 参数3:InvocationHandler 处理类,接口,必须进行实现类,一般采用匿名内部
* 提供 invoke 方法,代理类的每一个方法执行时,都将调用一次invoke
* 参数31:Object proxy :代理对象
* 参数32:Method method : 代理对象当前执行的方法的描述对象(反射)
* 执行方法名:method.getName()
* 执行方法:method.invoke(对象,实际参数)
* 参数33:Object[] args :方法实际参数
*
*/
UserService proxService = (UserService)Proxy.newProxyInstance(
MyBeanFactory.class.getClassLoader(),
userService.getClass().getInterfaces(),
new InvocationHandler() {
@Override
public Object invoke(Object proxy, Method method, Object[] args) throws Throwable {
//前执行
myAspect.before();
//执行目标类的方法
Object obj = method.invoke(userService, args);
//后执行
myAspect.after();
return obj;
}
});
return proxService;
}
}
测试
@Test
public void demo01(){
UserService userService = MyBeanFactory.createService();
userService.addUser();
userService.updateUser();
userService.deleteUser();
}
4.1.2 CGLIB字节码增强
- 没有接口,只有实现类。
- 采用字节码增强框架 cglib,在运行时 创建目标类的子类,从而对目标类进行增强。
工厂类
public class MyBeanFactory { public static UserServiceImpl createService(){
//1 目标类
final UserServiceImpl userService = new UserServiceImpl();
//2切面类
final MyAspect myAspect = new MyAspect();
// 3.代理类 ,采用cglib,底层创建目标类的子类
//3.1 核心类
Enhancer enhancer = new Enhancer();
//3.2 确定父类
enhancer.setSuperclass(userService.getClass());
/* 3.3 设置回调函数 , MethodInterceptor接口 等效 jdk InvocationHandler接口
* intercept() 等效 jdk invoke()
* 参数1、参数2、参数3:以invoke一样
* 参数4:methodProxy 方法的代理
*
*
*/
enhancer.setCallback(new MethodInterceptor(){
@Override
public Object intercept(Object proxy, Method method, Object[] args, MethodProxy methodProxy) throws Throwable {
//前
myAspect.before();
//执行目标类的方法
Object obj = method.invoke(userService, args);
// * 执行代理类的父类 ,执行目标类 (目标类和代理类 父子关系)
methodProxy.invokeSuper(proxy, args);
//后
myAspect.after();
return obj;
}
});
//3.4 创建代理
UserServiceImpl proxService = (UserServiceImpl) enhancer.create();
return proxService;
}
}
4.2 半自动
- 让spring 容器创建代理对象,从spring容器中手动的获取代理对象
4.2.1 目标类
public interface UserService { public void addUser();
public void updateUser();
public void deleteUser();
}
4.2.2 切面类
package com.spring.aop;import org.aopalliance.intercept.MethodInterceptor;
import org.aopalliance.intercept.MethodInvocation;
/**
* 切面类:用于存通知
* 切面类中确定通知,需要实现不同接口,接口就是规范,从而就确定方法名称。
* 采用“环绕通知” MethodInterceptor
*
*/
public class MyAspect implements MethodInterceptor {
@Override
public Object invoke(MethodInvocation invocation) throws Throwable {
Object result = null;
try {
System.out.println("--环绕通知开始--开启事务--自动--");
long start = System.currentTimeMillis();
//手动执行目标方法(有返回参数 则需返回值)
result = invocation.proceed();
long end = System.currentTimeMillis();
System.out.println("总共执行时长" + (end - start) + " 毫秒");
System.out.println("--环绕通知结束--提交事务--自动--");
} catch (Throwable t) {
System.out.println("--环绕通知--出现错误");
}
return result;
}
}
4.2.3 Spring 配置
<!-- 1 创建目标类 --> <bean id="userServiceId" class="com.spring.aop.UserServiceImpl"></bean>
<bean id="orderServiceId" class="com.spring.aop.OrderService"></bean>
<!-- 2 创建切面类(通知) -->
<bean id="myAspectId" class="com.spring.aop.MyAspect"></bean>
<!-- 3 创建代理类
* 使用工厂bean FactoryBean ,底层调用 getObject() 返回特殊bean
* ProxyFactoryBean 用于创建代理工厂bean,生成特殊代理对象
interfaces : 确定接口们
通过<array>可以设置多个值
只有一个值时,value=""
target : 确定目标类
interceptorNames : 通知 切面类的名称,类型String[],如果设置一个值 value=""
optimize :强制使用cglib
<property name="optimize" value="true"></property>
底层机制
如果目标类有接口,采用jdk动态代理
如果没有接口,采用cglib 字节码增强
如果声明 optimize = true ,无论是否有接口,都采用cglib
-->
<bean id="proxyServiceId" class="org.springframework.aop.framework.ProxyFactoryBean">
<property name="interfaces" value="com.spring.aop.UserService"></property>
<property name="target" ref="userServiceId"></property>
<property name="interceptorNames" value="myAspectId"></property>
</bean>
4.2.4 测试
@Test public void demo01(){
// 1. 加载Spring配置文件,根据创建对象
ApplicationContext applicationContext = new ClassPathXmlApplicationContext("applicationContext.xml");
//获得代理类
UserService userService = (UserService) applicationContext.getBean("proxyServiceId");
userService.addUser();
userService.updateUser();
userService.deleteUser();
}
4.3 全自动
- 从spring 容器获得目标类,如果配置aop,spring将自动生成代理。
4.3.1 切面类
package com.spring.aop;import org.aopalliance.intercept.MethodInterceptor;
import org.aopalliance.intercept.MethodInvocation;
/**
* 切面类:用于存通知
* 切面类中确定通知,需要实现不同接口,接口就是规范,从而就确定方法名称。
* 采用“环绕通知” MethodInterceptor
*
*/
public class MyAspectZD implements MethodInterceptor {
@Override
public Object invoke(MethodInvocation invocation) throws Throwable {
Object result = null;
try {
System.out.println("--环绕通知开始--开启事务--自动--");
long start = System.currentTimeMillis();
//手动执行目标方法(有返回参数 则需返回值)
result = invocation.proceed();
long end = System.currentTimeMillis();
System.out.println("总共执行时长" + (end - start) + " 毫秒");
System.out.println("--环绕通知结束--提交事务--自动--");
} catch (Throwable t) {
System.out.println("--环绕通知--出现错误");
}
return result;
}
}
切面类中根据获取到的注解来通知,示例如下:
package com.demo.aop;import com.demo.annotation.DataSourceChange;
import com.demo.datasource.DynamicDataSourceHolder;
import lombok.extern.slf4j.Slf4j;
import org.aopalliance.intercept.MethodInterceptor;
import org.aopalliance.intercept.MethodInvocation;
import java.lang.reflect.Method;
@Slf4j
public class DynamicDataSourceAspectDao implements MethodInterceptor {
/**
* 切面类:用于存通知
* 切面类中确定通知,需要实现不同接口,接口就是规范,从而就确定方法名称。
* 采用“环绕通知” MethodInterceptor
* @param invocation
* @return
* @throws Throwable
*/
@Override
public Object invoke(MethodInvocation invocation) throws Throwable {
log.info("around");
Object result = null;
//获取代理接口或者类
Object target = joinPoint.getTarget();
String methodName = joinPoint.getSignature().getName();
//获取目标类的接口,所以注解@DataSourceChange需要写在接口上
//Class<?>[] clazz = target.getClass().getInterfaces();
//获取目标类,所以注解@DataSourceChange需要写在类里面
Class<?>[] clazz = new Class<?>[]{target.getClass()};
Class<?>[] parameterTypes = invocation.getMethod().getParameterTypes();
try {
Method method = clazz[0].getMethod(methodName, parameterTypes);
//判断是否使用了该注解
if (method != null && method.isAnnotationPresent(DataSourceChange.class)) {
DataSourceChange data = method.getAnnotation(DataSourceChange.class);
if (data.slave()) {
DynamicDataSourceHolder.setDataSource(DynamicDataSourceHolder.DB_SLAVE);
} else {
DynamicDataSourceHolder.setDataSource(DynamicDataSourceHolder.DB_MASTER);
}
}
System.out.println("--环绕通知开始--开启事务--自动--");
long start = System.currentTimeMillis();
//手动执行目标方法(有返回参数 则需返回值)
result = invocation.proceed();
long end = System.currentTimeMillis();
System.out.println("总共执行时长" + (end - start) + " 毫秒");
System.out.println("--环绕通知结束--提交事务--自动--");
}
catch (Throwable ex) {
System.out.println("--环绕通知--出现错误");
log.error(String.format("Choose DataSource error, method:%s, msg:%s", methodName, ex.getMessage()));
}
finally {
DynamicDataSourceHolder.clearDataSource();
}
return result;
}
}
4.3.2 Spring 配置
<?xml version="1.0" encoding="UTF-8"?><beans xmlns="http://www.springframework.org/schema/beans"
xmlns:xsi="http://www.w3.org/2001/XMLSchema-instance"
xmlns:context="http://www.springframework.org/schema/context"
xmlns:aop="http://www.springframework.org/schema/aop"
xsi:schemaLocation="http://www.springframework.org/schema/beans
http://www.springframework.org/schema/beans/spring-beans.xsd
http://www.springframework.org/schema/context
http://www.springframework.org/schema/context/spring-context.xsd
http://www.springframework.org/schema/aop
http://www.springframework.org/schema/aop/spring-aop.xsd">
<!-- 1 创建目标类 -->
<bean id="userServiceId" class="com.spring.aop.UserServiceImpl"></bean>
<bean id="orderServiceId" class="com.spring.aop.OrderService"></bean>
<!-- 2 创建切面类(通知) -->
<bean id="myAspectId" class="com.spring.aop.MyAspectZD"></bean>
<!-- 3 aop编程
3.1 导入命名空间
3.2 使用 <aop:config>进行配置
默认情况下会采用JDK的动态代理实现AOP(只能对实现了接口的类生成代理,而不能针对类)
如果proxy-target-class="true" 声明时强制使用cglib代理(针对类实现代理)
<aop:pointcut> 切入点 ,从目标对象获得具体方法
<aop:advisor> 特殊的切面,只有一个通知 和 一个切入点
advice-ref 通知引用
pointcut-ref 切入点引用
order 切面顺序
3.3 切入点表达式
execution(* com.spring.aop..*.*(..))
选择方法 返回值任意 包及所有子包 类名任意 方法名任意 参数任意
例如:匹配所有”set”开头的方法:execution(* set*(..))
-->
<aop:config proxy-target-class="true">
<aop:pointcut id="myPointCut" expression="execution(* com.spring.aop..*.update*(..))" />
<aop:advisor advice-ref="myAspectId" pointcut-ref="myPointCut" order="1" />
</aop:config>
</beans>
4.3.3 测试
@Test public void demo01(){
// 1. 加载Spring配置文件,根据创建对象
ApplicationContext applicationContext = new ClassPathXmlApplicationContext("applicationContext.xml");
// 获得目标类
UserService userService = (UserService) applicationContext.getBean("userServiceId");
userService.addUser();
userService.updateUser();
userService.deleteUser();
// 获得目标类
OrderService orderService = (OrderService) applicationContext.getBean("orderServiceId");
orderService.addOrder();
orderService.updateOrder();
orderService.deleteOrder();
}
4.4 注解方式
Spring AOP基于注解的“零配置”方式实现
为了在Spring中启动@AspectJ支持,需要在类加载路径下新增两个AspectJ库:aspectjweaver-1.74.jar和aspectjrt-1.74.jar。除此之外,Spring AOP还需要依赖一个aopalliance-1.0.jar包
定义一个类似XmlAopDemoOrder.java这样的切面


package com.spring.aop;import org.aspectj.lang.ProceedingJoinPoint;
import org.aspectj.lang.annotation.*;
import org.springframework.stereotype.Component;
/*
* 声明一个切面
* 自动注解AOP
*/
@Aspect
@Component(value="xmlAopDemoOrder")
public class XmlAopDemoOrder {
// 配置切点 及要传的参数
@Pointcut("execution(* com.spring.aop.OrderService.GetDemoOrder(..)) && args(id)")
public void pointCut(int id)
{
}
// 配置连接点 方法开始执行前通知
@Before("pointCut(id)")
public void beforeLog(int id) {
System.out.println("开始执行前置通知 日志记录:"+id);
}
// 方法执行完后通知
@After("pointCut(id)")
public void afterLog(int id) {
System.out.println("方法执行完后置通知 日志记录:"+id);
}
// 执行成功后通知
@AfterReturning("pointCut(id)")
public void afterReturningLog(int id) {
System.out.println("方法成功执行后通知 日志记录:"+id);
}
// 抛出异常后通知
@AfterThrowing("pointCut(id)")
public void afterThrowingLog(int id) {
System.out.println("方法抛出异常后通知 日志记录"+id);
}
// 环绕通知
@Around("pointCut(id)")
public Object aroundLog(ProceedingJoinPoint joinpoint, int id) {
Object result = null;
try {
System.out.println("环绕通知开始 日志记录"+id);
long start = System.currentTimeMillis();
//有返回参数 则需返回值
result = joinpoint.proceed();
long end = System.currentTimeMillis();
System.out.println("总共执行时长" + (end - start) + " 毫秒");
System.out.println("环绕通知结束 日志记录"+id);
} catch (Throwable t) {
System.out.println("出现错误");
}
return result;
}
}
View Code
- 定义一个业务组件,如:


package com.spring.aop;import org.springframework.stereotype.Component;
/*
* 使用注解创建对象
* @Component取代<bean class="">
* @Component("id") 取代 <bean id="" class="">
*/
@Component(value="orderService")
public class OrderService {
public void addOrder()
{
System.out.println("添加订单");
}
public void updateOrder()
{
System.out.println("更新订单");
}
public void deleteOrder()
{
System.out.println("删除订单");
}
public void GetDemoOrder(int id)
{
System.out.println("使用注解获取订单" + id);
}
}
View Code
在bean.xml中加入下面配置
<context:component-scan base-package="com.spring.helloworld,com.spring.aop"></context:component-scan>
aop:aspectj-autoproxy/
测试
@Test
public void demo01(){
//获得目标类
UserService userService = (UserService) applicationContext.getBean("userServiceId");
userService.addUser();
userService.updateUser();
userService.deleteUser();
//获得目标类
OrderService orderService = (OrderService) applicationContext.getBean("orderServiceId");
orderService.addOrder();
orderService.updateOrder();
orderService.deleteOrder();
//AOP使用注解
orderService.GetDemoOrder(1);
}
本人推荐使用注解方式实现AOP或者全自动方式
本文内容总结:Spring的优点,一、Spring中的IoC操作,1. IoC入门案例,2. Spring的bean管理(配置文件),Bean实例化的方式,Bean标签的常用属性,3. DI的依赖注入,属性依赖注入,3.1 使用有参构造函数注入属性,3.2 使用set方法注入属性,3.3 注入对象类型属性,3.4 p名称空间注入属性,3.5 注入复杂类型属性,IoC和DI的区别,4. Spring的bean管理(注解),4.1 Spring注解开发准备,4.2 注解创建对象,4.3 注解注入属性,二、Spring框架—面向切面编程(AOP),1. 什么是AOP,2. AOP实现原理,3. AOP术语【掌握】,4. AOP实现方式,4.1 手动方式,4.1.1 JDK动态代理,4.1.2 CGLIB字节码增强,4.2 半自动,4.2.1 目标类,4.2.2 切面类,4.2.3 Spring 配置,4.2.4 测试,4.3 全自动,4.3.1 切面类,4.3.2 Spring 配置,4.3.3 测试,4.4 注解方式,
原文链接:https://www.cnblogs.com/li150dan/p/9524305.html
以上是 Spring框架IOC和AOP介绍 的全部内容, 来源链接: utcz.com/z/296748.html