spring-session(一)揭秘
本文内容纲要:
- 前言- Spring Session探索
- 总结
前言
在开始spring-session揭秘之前,先做下热脑(活动活动脑子)运动。主要从以下三个方面进行热脑:
- 为什么要spring-session
- 比较traditional-session方案和spring-session方案
- JSR340规范与spring-session的透明继承
一.为什么要spring-session
在传统单机web应用中,一般使用tomcat/jetty等web容器时,用户的session都是由容器管理。浏览器使用cookie中记录sessionId,容器根据sessionId判断用户是否存在会话session。这里的限制是,session存储在web容器中,被单台服务器容器管理。
但是网站主键演变,分布式应用和集群是趋势(提高性能)。此时用户的请求可能被负载分发至不同的服务器,此时传统的web容器管理用户会话session的方式即行不通。除非集群或者分布式web应用能够共享session,尽管tomcat等支持这样做。但是这样存在以下两点问题:
- 需要侵入web容器,提高问题的复杂
- web容器之间共享session,集群机器之间势必要交互耦合
基于这些,必须提供新的可靠的集群分布式/集群session的解决方案,突破traditional-session单机限制(即web容器session方式,下面简称traditional-session),spring-session应用而生。
二.比较traditional-session方案和spring-session方案
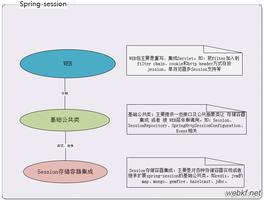
下图展示了traditional-session和spring-session的区别
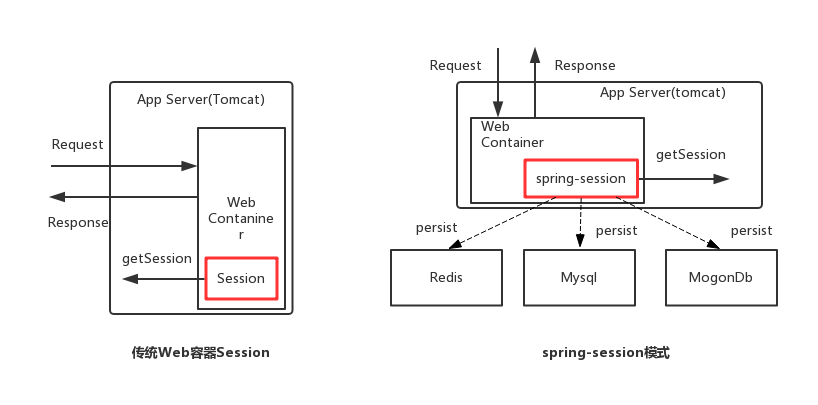
传统模式中,当request进入web容器,根据reqest获取session时,如果web容器中存在session则返回,如果不存在,web容器则创建一个session。然后返回response时,将sessonId作为response的head一并返回给客户端或者浏览器。
但是上节中说明了traditional-session的局限性在于:单机session。在此限制的相反面,即将session从web容器中抽出来,形成独立的模块,以便分布式应用或者集群都能共享,即能解决。
spring-session的核心思想在于此:将session从web容器中剥离,存储在独立的存储服务器中。目前支持多种形式的session存储器:Redis、Database、MogonDB等。session的管理责任委托给spring-session承担。当request进入web容器,根据request获取session时,由spring-session负责存存储器中获取session,如果存在则返回,如果不存在则创建并持久化至存储器中。
三.JSR340规范与spring-session的透明继承
JSR340是Java Servlet 3.1的规范提案,其中定义了大量的api,包括:servlet、servletRequest/HttpServletRequest/HttpServletRequestWrapper、servletResponse/HttpServletResponse/HttpServletResponseWrapper、Filter、Session等,是标准的web容器需要遵循的规约,如tomcat/jetty/weblogic等等。
在日常的应用开发中,develpers也在频繁的使用servlet-api,比如:
以下的方式获取请求的session:
HttpServletRequest request = ...HttpSession session = request.getSession(false);
其中HttpServletRequest和HttpSession都是servlet规范中定义的接口,web容器实现的标准。那如果引入spring-session,要如何获取session?
- 遵循servlet规范,同样方式获取session,对应用代码无侵入且对于developers透明化
- 全新实现一套session规范,定义一套新的api和session管理机制
两种方案都可以实现,但是显然第一种更友好,且具有兼容性。spring-session正是第一种方案的实现。
实现第一种方案的关键点在于做到透明和兼容
- 接口适配:仍然使用HttpServletRequest获取session,获取到的session仍然是HttpSession类型——适配器模式
- 类型包装增强:Session不能存储在web容器内,要外化存储——装饰模式
让人兴奋的是,以上的需求在Servlet规范中的扩展性都是予以支持!Servlet规范中定义一系列的接口都是支持扩展,同时提供Filter支撑扩展点。建议阅读《JavaTM Servlet Specification》。
热脑活动结束,下面章节正式进入今天的主题:spring-session揭秘
Spring Session探索
主要从以下两个方面来说spring-session:
- 特点
- 工作原理
一.特点
spring-session在无需绑定web容器的情况下提供对集群session的支持。并提供对以下情况的透明集成:
- HttpSession:容许替换web容器的HttpSession
- WebSocket:使用WebSocket通信时,提供Session的活跃
- WebSession:容许以应用中立的方式替换webflux的webSession
二.工作原理
再详细阅读源码之前先来看张图,介绍下spring-session中的核心模块以及之间的交互。
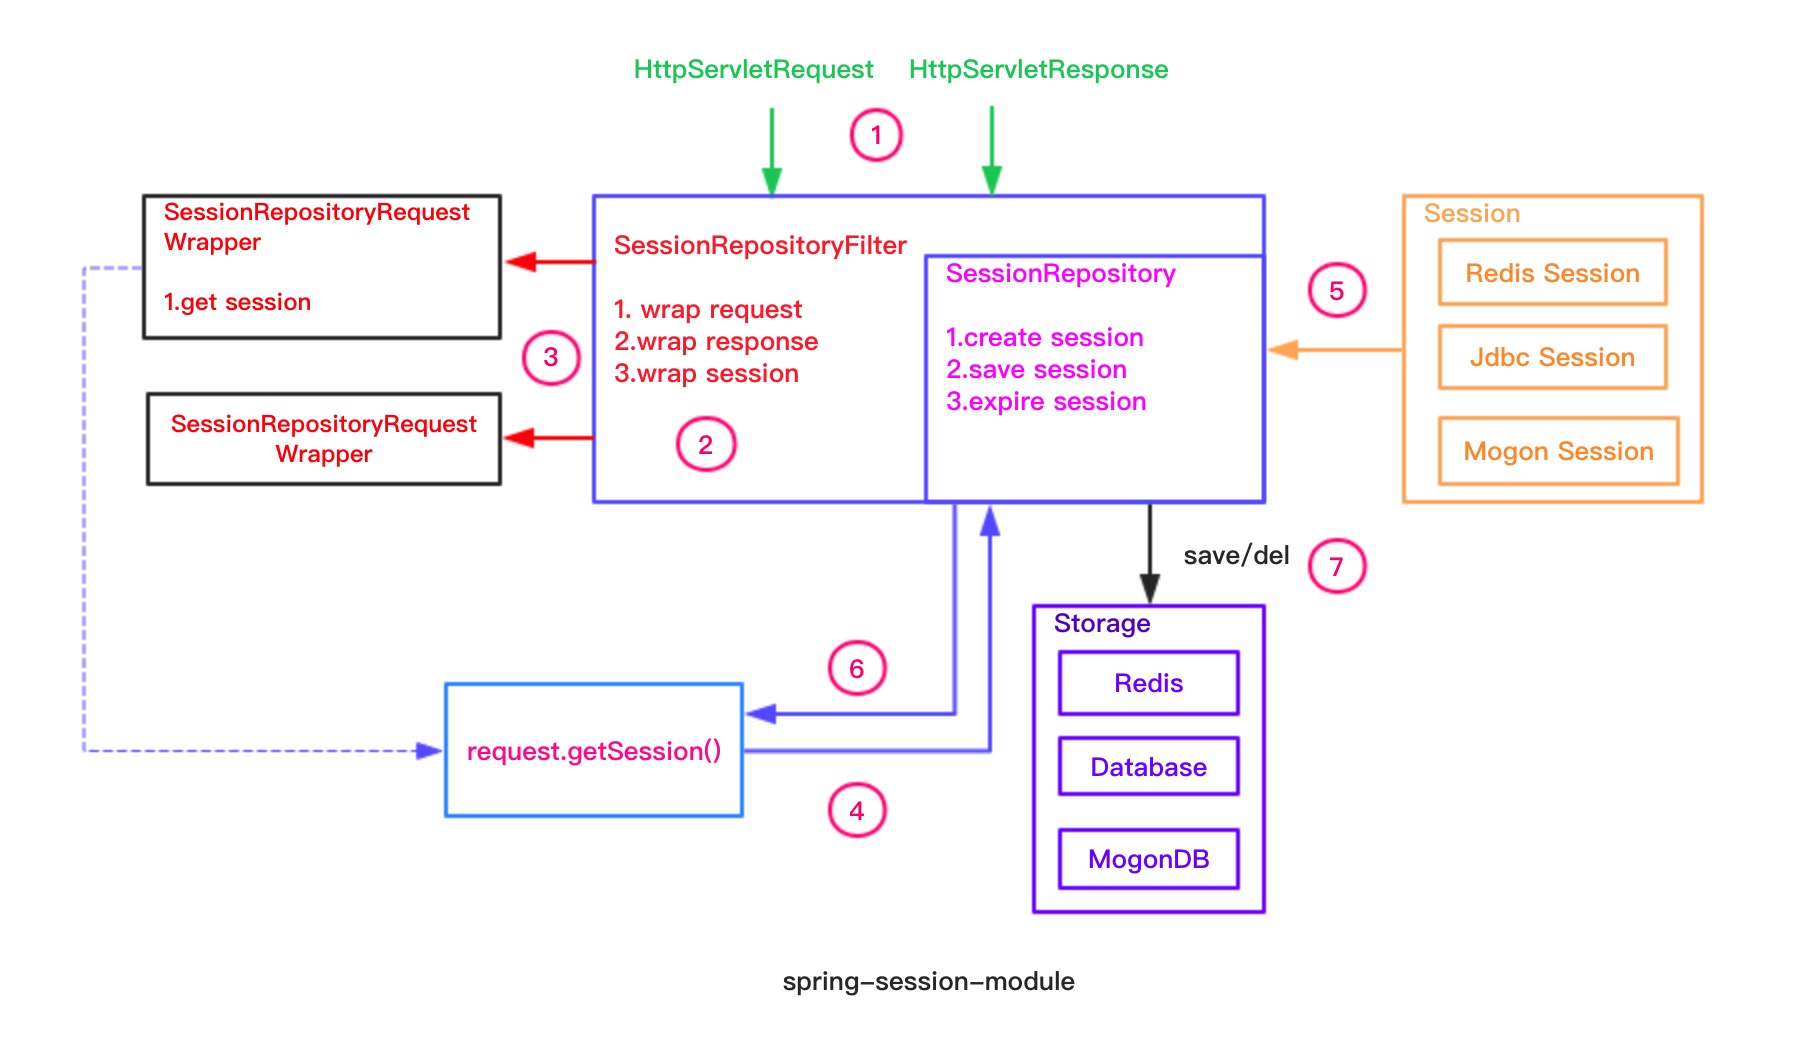
spring-session分为以下核心模块:
- SessionRepositoryFilter:Servlet规范中Filter的实现,用来切换HttpSession至Spring Session,包装HttpServletRequest和HttpServletResponse
- HttpServerletRequest/HttpServletResponse/HttpSessionWrapper包装器:包装原有的HttpServletRequest、HttpServletResponse和Spring Session,实现切换Session和透明继承HttpSession的关键之所在
- Session:Spring Session模块
- SessionRepository:管理Spring Session的模块
- HttpSessionStrategy:映射HttpRequst和HttpResponse到Session的策略
1. SessionRepositoryFilter
SessionRepositoryFilter是一个Filter过滤器,符合Servlet的规范定义,用来修改包装请求和响应。这里负责包装切换HttpSession至Spring Session的请求和响应。
@Overrideprotected void doFilterInternal(HttpServletRequest request,
HttpServletResponse response, FilterChain filterChain)
throws ServletException, IOException {
// 设置SessionRepository至Request的属性中
request.setAttribute(SESSION_REPOSITORY_ATTR, this.sessionRepository);
// 包装原始HttpServletRequest至SessionRepositoryRequestWrapper
SessionRepositoryRequestWrapper wrappedRequest = new SessionRepositoryRequestWrapper(
request, response, this.servletContext);
// 包装原始HttpServletResponse响应至SessionRepositoryResponseWrapper
SessionRepositoryResponseWrapper wrappedResponse = new SessionRepositoryResponseWrapper(
wrappedRequest, response);
// 设置当前请求的HttpSessionStrategy策略
HttpServletRequest strategyRequest = this.httpSessionStrategy
.wrapRequest(wrappedRequest, wrappedResponse);
// 设置当前响应的HttpSessionStrategy策略
HttpServletResponse strategyResponse = this.httpSessionStrategy
.wrapResponse(wrappedRequest, wrappedResponse);
try {
filterChain.doFilter(strategyRequest, strategyResponse);
}
finally {
// 提交session
wrappedRequest.commitSession();
}
}
以上是SessionRepositoryFilter的核心操作,每个HttpRequest进入,都会被该Filter包装成切换Session的请求很响应对象。
Tips:责任链模式
Filter是Servlet规范中的非常重要的组件,在tomcat的实现中使用了责任链模式,将多个Filter组织成链式调用。Filter的作用就是在业务逻辑执行前后对请求和响应做修改配置。配合HttpServletRequestWrapper和HttpServletResponseWrapper使用,可谓威力惊人!
2. SessionRepositoryRequestWrapper
对于developers获取HttpSession的api
HttpServletRequest request = ...;HttpSession session = request.getSession(true);
在spring session中request的实际类型SessionRepositoryRequestWrapper。调用SessionRepositoryRequestWrapper的getSession方法会触发创建spring session,而非web容器的HttpSession。
SessionRepositoryRequestWrapper用来包装原始的HttpServletRequest实现HttpSession切换至Spring Session。是透明Spring Session透明集成HttpSession的关键。
private final class SessionRepositoryRequestWrapper extends HttpServletRequestWrapper {
private final String CURRENT_SESSION_ATTR = HttpServletRequestWrapper.class
.getName();
// 当前请求sessionId有效
private Boolean requestedSessionIdValid;
// 当前请求sessionId无效
private boolean requestedSessionInvalidated;
private final HttpServletResponse response;
private final ServletContext servletContext;
private SessionRepositoryRequestWrapper(HttpServletRequest request,
HttpServletResponse response, ServletContext servletContext) {
// 调用HttpServletRequestWrapper构造方法,实现包装
super(request);
this.response = response;
this.servletContext = servletContext;
}
}
SessionRepositoryRequestWrapper继承Servlet规范中定义的包装器HttpServletRequestWrapper。HttpServletRequestWrapper是Servlet规范api提供的用于扩展HttpServletRequest的扩张点——即装饰器模式,可以通过重写一些api达到功能点的增强和自定义。
Tips:装饰器模式
装饰器模式(包装模式)是对功能增强的一种绝佳模式。实际利用的是面向对象的多态性实现扩展。Servlet规范中开放此HttpServletRequestWrapper接口,是让developers自行扩展实现。这种使用方式和jdk中的FilterInputStream/FilterInputStream如出一辙。
HttpServletRequestWrapper中持有一个HttpServletRequest对象,然后实现HttpServletRequest接口的所有方法,所有方法实现中都是调用持有的HttpServletRequest对象的相应的方法。继承HttpServletRequestWrapper 可以对其重写。SessionRepositoryRequestWrapper继承HttpServletRequestWrapper,在构造方法中将原有的HttpServletRequest通过调用super完成对HttpServletRequestWrapper中持有的HttpServletRequest初始化赋值,然后重写和session相关的方法。这样就保证SessionRepositoryRequestWrapper的其他方法调用都是使用原有的HttpServletRequest的数据,只有session相关的是重写的逻辑。
Tips:
这里的设计是否很精妙!一切都多亏与Servlet规范设计的的巧妙啊!
@Overridepublic HttpSessionWrapper getSession() {
return getSession(true);
}
重写HttpServletRequest的getSession()方法,调用有参数getSession(arg)方法,默认为true,表示当前reques没有session时创建session。继续看下有参数getSession(arg)的重写逻辑.
@Overridepublic HttpSessionWrapper getSession(boolean create) {
// 从当前请求的attribute中获取session,如果有直接返回
HttpSessionWrapper currentSession = getCurrentSession();
if (currentSession != null) {
return currentSession;
}
// 获取当前request的sessionId,这里使用了HttpSessionStrategy
// 决定怎样将Request映射至Session,默认使用Cookie策略,即从cookies中解析sessionId
String requestedSessionId = getRequestedSessionId();
// 请求的如果sessionId存在且当前request的attribute中的没有session失效属性
// 则根据sessionId获取spring session
if (requestedSessionId != null
&& getAttribute(INVALID_SESSION_ID_ATTR) == null) {
S session = getSession(requestedSessionId);
// 如果spring session不为空,则将spring session包装成HttpSession并
// 设置到当前Request的attribute中,防止同一个request getsession时频繁的到存储器
//中获取session,提高性能
if (session != null) {
this.requestedSessionIdValid = true;
currentSession = new HttpSessionWrapper(session, getServletContext());
currentSession.setNew(false);
setCurrentSession(currentSession);
return currentSession;
}
// 如果根据sessionId,没有获取到session,则设置当前request属性,此sessionId无效
// 同一个请求中获取session,直接返回无效
else {
// This is an invalid session id. No need to ask again if
// request.getSession is invoked for the duration of this request
if (SESSION_LOGGER.isDebugEnabled()) {
SESSION_LOGGER.debug(
"No session found by id: Caching result for getSession(false) for this HttpServletRequest.");
}
setAttribute(INVALID_SESSION_ID_ATTR, "true");
}
}
// 判断是否创建session
if (!create) {
return null;
}
if (SESSION_LOGGER.isDebugEnabled()) {
SESSION_LOGGER.debug(
"A new session was created. To help you troubleshoot where the session was created we provided a StackTrace (this is not an error). You can prevent this from appearing by disabling DEBUG logging for "
+ SESSION_LOGGER_NAME,
new RuntimeException(
"For debugging purposes only (not an error)"));
}
// 根据sessionRepository创建spring session
S session = SessionRepositoryFilter.this.sessionRepository.createSession();
// 设置session的最新访问时间
session.setLastAccessedTime(System.currentTimeMillis());
// 包装成HttpSession透明化集成
currentSession = new HttpSessionWrapper(session, getServletContext());
// 设置session至Requset的attribute中,提高同一个request访问session的性能
setCurrentSession(currentSession);
return currentSession;
}
再来看下spring session的持久化。上述SessionRepositoryFilter在包装HttpServletRequest后,执行FilterChain中使用finally保证请求的Session始终session会被提交,此提交操作中将sesionId设置到response的head中并将session持久化至存储器中。
持久化只持久spring session,并不是将spring session包装后的HttpSession持久化,因为HttpSession不过是包装器,持久化没有意义。
/** * Uses the HttpSessionStrategy to write the session id to the response and
* persist the Session.
*/
private void commitSession() {
// 获取当前session
HttpSessionWrapper wrappedSession = getCurrentSession();
// 如果当前session为空,则删除cookie中的相应的sessionId
if (wrappedSession == null) {
if (isInvalidateClientSession()) {
SessionRepositoryFilter.this.httpSessionStrategy
.onInvalidateSession(this, this.response);
}
}
else {
// 从HttpSession中获取当前spring session
S session = wrappedSession.getSession();
// 持久化spring session至存储器
SessionRepositoryFilter.this.sessionRepository.save(session);
// 如果是新创建spring session,sessionId到response的cookie
if (!isRequestedSessionIdValid()
|| !session.getId().equals(getRequestedSessionId())) {
SessionRepositoryFilter.this.httpSessionStrategy.onNewSession(session,
this, this.response);
}
}
}
再来看下包装的响应SessionRepositoryResponseWrapper。
3.SessionRepositoryResponseWrapper
/** * Allows ensuring that the session is saved if the response is committed.
*
* @author Rob Winch
* @since 1.0
*/
private final class SessionRepositoryResponseWrapper
extends OnCommittedResponseWrapper {
private final SessionRepositoryRequestWrapper request;
/**
* Create a new {@link SessionRepositoryResponseWrapper}.
* @param request the request to be wrapped
* @param response the response to be wrapped
*/
SessionRepositoryResponseWrapper(SessionRepositoryRequestWrapper request,
HttpServletResponse response) {
super(response);
if (request == null) {
throw new IllegalArgumentException("request cannot be null");
}
this.request = request;
}
@Override
protected void onResponseCommitted() {
this.request.commitSession();
}
}
上面的注释已经非常详细,这里不再赘述。这里只讲述为什么需要包装原始的响应。从注释上可以看出包装响应时为了:确保如果响应被提交session能够被保存。
这里我有点疑惑:在上述的SessionRepositoryFilter.doFilterInternal方法中不是已经request.commitSession()了吗,FilterChain执行完或者异常后都会执行Finally中的request.commitSession。为什么这里仍然需要包装响应,为了确保session能够保存,包装器中的onResponseCommitted方法可以看出也是做了一次request.commitSession()。难道这不是多此一举?
Tips
如果有和我相同疑问的同学,那就说明我们的基础都不扎实,对Servlet仍然没有一个清楚全面的认识。对于此问题,我特意在github上提了issuse:Why is the request.commitSession() method called repeatedly?。
但是在提完issue后的回家路上,我思考了下response可以有流方式的写,会不会在response.getOutStream写的时候已经将响应全部返回到客户端,这时响应结束。
在家中是,spring sesion作者大大已经回复了我的issue:
Is this causing you problems? The reason is that we need to ensure that the session is created before the response is committed. If the response is already committed there will be no way to track the session (i.e. a cookie cannot be written to the response to keep track of which session id).
他的意思是:我们需要在response被提交之前确保session被创建。如果response已经被提交,将没有办法追踪session(例如:无法将cookie写入response以跟踪哪个session id)。
在此之前我又阅读了JavaTM Servlet Specification,规范中这样解释Response的flushBuffer接口:
The isCommitted method returns a boolean value indicating whether any response bytes have been returned to the client. The flushBuffer method forces content in the buffer to be written to the client.
并且看了ServletResponse的flushBuffer的javadocs:
/** * Forces any content in the buffer to be written to the client. A call to
* this method automatically commits the response, meaning the status code
* and headers will be written.
*
* @throws IOException if an I/O occurs during the flushing of the response
*
* @see #setBufferSize
* @see #getBufferSize
* @see #isCommitted
* @see #reset
*/
public void flushBuffer() throws IOException;
结合以上两点,一旦response执行flushBuffer方法,迫使Response中在Buffer中任何数据都会被返回至client端。这个方法自动提交响应中的status code和head。那么如果不包装请求,监听flushBuffer事件在提交response前,将session写入response和持久化session,将导致作者大大说的无法追踪session。
SessionRepositoryResponseWrapper继承父类OnCommittedResponseWrapper,其中flushBuffer方法如下:
/** * Makes sure {@link OnCommittedResponseWrapper#onResponseCommitted()} is invoked
* before calling the superclass <code>flushBuffer()</code>.
* @throws IOException if an input or output exception occurred
*/
@Override
public void flushBuffer() throws IOException {
doOnResponseCommitted();
super.flushBuffer();
}
/**
* Calls <code>onResponseCommmitted()</code> with the current contents as long as
* {@link #disableOnResponseCommitted()} was not invoked.
*/
private void doOnResponseCommitted() {
if (!this.disableOnCommitted) {
onResponseCommitted();
disableOnResponseCommitted();
}
}
重写HttpServletResponse方法,监听response commit,当发生response commit时,可以在commit之前写session至response中并持久化session。
Tips:
spring mvc中HttpMessageConverters使用到的jackson即调用了outstream.flushBuffer(),当使用@ResponseBody时。
以上做法固然合理,但是如此重复操作两次commit,存在两次persist session?
这个问题后面涉及SessionRepository时再详述!
再看SessionRepository之前,先来看下spring session中的session接口。
3.Session接口
spring-session和tomcat中的Session的实现模式上有很大不同,tomcat中直接对HttpSession接口进行实现,而spring-session中则抽象出单独的Session层接口,让后再使用适配器模式将Session适配层Servlet规范中的HttpSession。spring-sesion中关于session的实现和适配整个UML类图如下:

Tips:适配器模式
spring-session单独抽象出Session层接口,可以应对多种场景下不同的session的实现,然后通过适配器模式将Session适配成HttpSession的接口,精妙至极!
Session是spring-session对session的抽象,主要是为了鉴定用户,为Http请求和响应提供上下文过程,该Session可以被HttpSession、WebSocket Session,非WebSession等使用。定义了Session的基本行为:
- getId:获取sessionId
- setAttribute:设置session属性
- getAttribte:获取session属性
ExipringSession:提供Session额外的过期特性。定义了以下关于过期的行为:
- setLastAccessedTime:设置最近Session会话过程中最近的访问时间
- getLastAccessedTime:获取最近的访问时间
- setMaxInactiveIntervalInSeconds:设置Session的最大闲置时间
- getMaxInactiveIntervalInSeconds:获取最大闲置时间
- isExpired:判断Session是否过期
MapSession:基于java.util.Map的ExpiringSession的实现
RedisSession:基于MapSession和Redis的ExpiringSession实现,提供Session的持久化能力
先来看下MapSession的代码源码片段
public final class MapSession implements ExpiringSession, Serializable { /**
* Default {@link #setMaxInactiveIntervalInSeconds(int)} (30 minutes).
*/
public static final int DEFAULT_MAX_INACTIVE_INTERVAL_SECONDS = 1800;
private String id;
private Map<String, Object> sessionAttrs = new HashMap<String, Object>();
private long creationTime = System.currentTimeMillis();
private long lastAccessedTime = this.creationTime;
/**
* Defaults to 30 minutes.
*/
private int maxInactiveInterval = DEFAULT_MAX_INACTIVE_INTERVAL_SECONDS;
MapSession中持有HashMap类型的变量sessionAtts用于存储Session设置属性,比如调用的setAttribute方法的k-v就存储在该HashMap中。这个和tomcat内部实现HttpSession的方式类似,tomcat中使用了ConcurrentHashMap存储。
其中lastAccessedTime用于记录最近的一次访问时间,maxInactiveInterval用于记录Session的最大闲置时间(过期时间-针对没有Request活跃的情况下的最大时间,即相对于最近一次访问后的最大闲置时间)。
public void setAttribute(String attributeName, Object attributeValue) { if (attributeValue == null) {
removeAttribute(attributeName);
}
else {
this.sessionAttrs.put(attributeName, attributeValue);
}
}
setAttribute方法极其简单,null时就移除attributeName,否则put存储。
重点熟悉RedisSession如何实现Session的行为:setAttribute、persistence等。
/** * A custom implementation of {@link Session} that uses a {@link MapSession} as the
* basis for its mapping. It keeps track of any attributes that have changed. When
* {@link org.springframework.session.data.redis.RedisOperationsSessionRepository.RedisSession#saveDelta()}
* is invoked all the attributes that have been changed will be persisted.
*
* @author Rob Winch
* @since 1.0
*/
final class RedisSession implements ExpiringSession {
private final MapSession cached;
private Long originalLastAccessTime;
private Map<String, Object> delta = new HashMap<String, Object>();
private boolean isNew;
private String originalPrincipalName;
首先看javadocs,对于阅读源码,学会看javadocs非常重要!
基于MapSession的基本映射实现的Session,能够追踪发生变化的所有属性,当调用saveDelta方法后,变化的属性将被持久化!
在RedisSession中有两个非常重要的成员属性:
- cached:实际上是一个MapSession实例,用于做本地缓存,每次在getAttribute时无需从Redis中获取,主要为了improve性能
- delta:用于跟踪变化数据,做持久化
再来看下RedisSession中最为重要的行为saveDelta——持久化Session至Redis中:
/** * Saves any attributes that have been changed and updates the expiration of this
* session.
*/
private void saveDelta() {
// 如果delta为空,则Session中没有任何数据需要存储
if (this.delta.isEmpty()) {
return;
}
String sessionId = getId();
// 使用spring data redis将delta中的数据保存至Redis中
getSessionBoundHashOperations(sessionId).putAll(this.delta);
String principalSessionKey = getSessionAttrNameKey(
FindByIndexNameSessionRepository.PRINCIPAL_NAME_INDEX_NAME);
String securityPrincipalSessionKey = getSessionAttrNameKey(
SPRING_SECURITY_CONTEXT);
if (this.delta.containsKey(principalSessionKey)
|| this.delta.containsKey(securityPrincipalSessionKey)) {
if (this.originalPrincipalName != null) {
String originalPrincipalRedisKey = getPrincipalKey(
this.originalPrincipalName);
RedisOperationsSessionRepository.this.sessionRedisOperations
.boundSetOps(originalPrincipalRedisKey).remove(sessionId);
}
String principal = PRINCIPAL_NAME_RESOLVER.resolvePrincipal(this);
this.originalPrincipalName = principal;
if (principal != null) {
String principalRedisKey = getPrincipalKey(principal);
RedisOperationsSessionRepository.this.sessionRedisOperations
.boundSetOps(principalRedisKey).add(sessionId);
}
}
// 清空delta,代表没有任何需要持久化的数据。同时保证
//SessionRepositoryFilter和SessionRepositoryResponseWrapper的onResponseCommitted
//只会持久化一次Session至Redis中,解决前面提到的疑问
this.delta = new HashMap<String, Object>(this.delta.size());
// 更新过期时间,滚动至下一个过期时间间隔的时刻
Long originalExpiration = this.originalLastAccessTime == null ? null
: this.originalLastAccessTime + TimeUnit.SECONDS
.toMillis(getMaxInactiveIntervalInSeconds());
RedisOperationsSessionRepository.this.expirationPolicy
.onExpirationUpdated(originalExpiration, this);
}
从javadoc中可以看出,saveDelta用于存储Session的属性:
- 保存Session中的属性数据至Redis中
- 清空delta中数据,防止重复提交Session中的数据
- 更新过期时间至下一个过期时间间隔的时刻
再看下RedisSession中的其他行为
// 设置session的存活时间,即最大过期时间。先保存至本地缓存,然后再保存至deltapublic void setMaxInactiveIntervalInSeconds(int interval) {
this.cached.setMaxInactiveIntervalInSeconds(interval);
this.delta.put(MAX_INACTIVE_ATTR, getMaxInactiveIntervalInSeconds());
flushImmediateIfNecessary();
}
// 直接从本地缓存获取过期时间
public int getMaxInactiveIntervalInSeconds() {
return this.cached.getMaxInactiveIntervalInSeconds();
}
// 直接从本地缓存中获取Session中的属性
@SuppressWarnings("unchecked")
public Object getAttribute(String attributeName) {
return this.cached.getAttribute(attributeName);
}
// 保存Session属性至本地缓存和delta中
public void setAttribute(String attributeName, Object attributeValue) {
this.cached.setAttribute(attributeName, attributeValue);
this.delta.put(getSessionAttrNameKey(attributeName), attributeValue);
flushImmediateIfNecessary();
}
除了MapSession和RedisSession还有JdbcSession、MongoExpiringSession,感兴趣的读者可以自行阅读。
下面看SessionRepository的逻辑。SessionRepository是spring session中用于管理spring session的核心组件。
4. SessionRepository
A repository interface for managing {@link Session} instances.
javadoc中描述SessionRepository为管理spring-session的接口实例。抽象出:
S createSession();void save(S session);
S getSession(String id);
void delete(String id);
创建、保存、获取、删除Session的接口行为。根据Session的不同,分为很多种Session操作仓库。
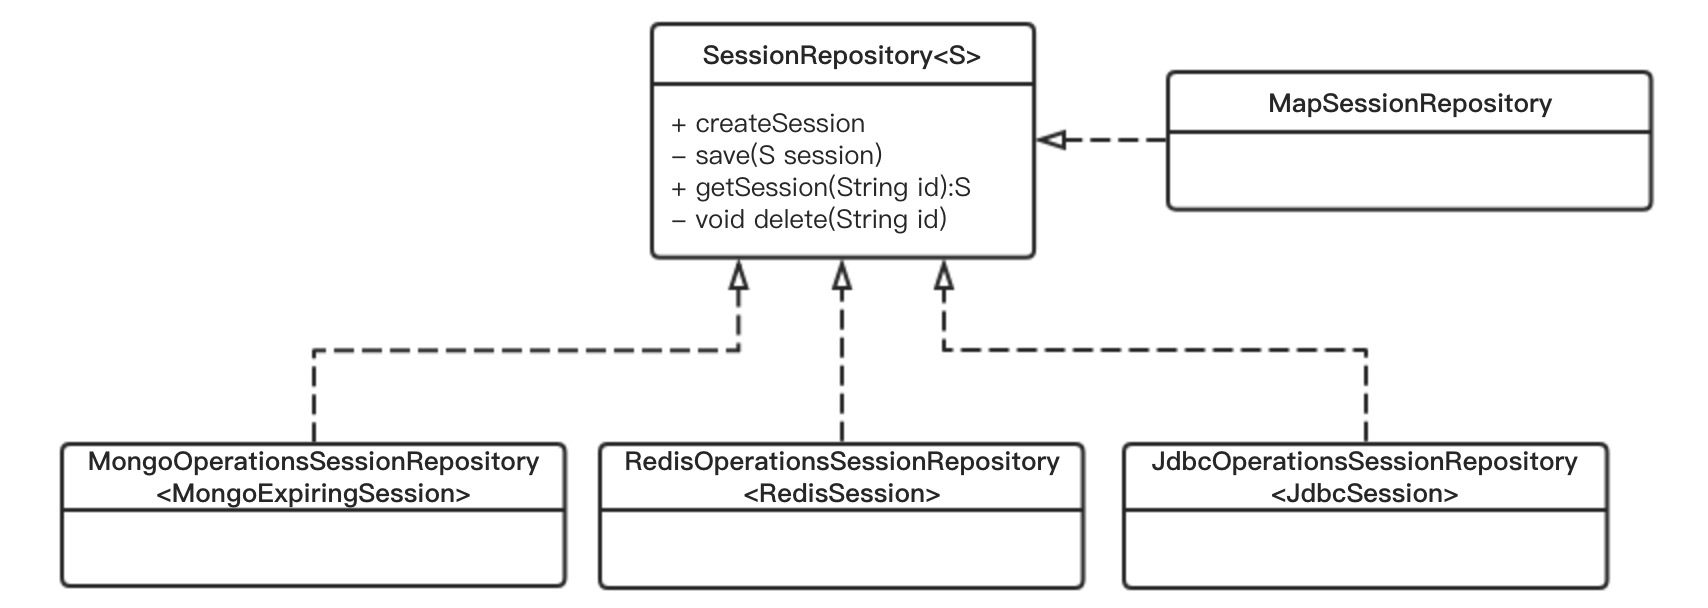
这里重点介绍下RedisOperationsSessionRepository。在详细介绍其之前,了解下RedisOperationsSessionRepository的数据存储细节。
当创建一个RedisSession,然后存储在Redis中时,RedisSession的存储细节如下:
spring:session:sessions:33fdd1b6-b496-4b33-9f7d-df96679d32fe
spring:session:sessions:expires:33fdd1b6-b496-4b33-9f7d-df96679d32fe
spring:session:expirations:1439245080000
Redis会为每个RedisSession存储三个k-v。
- 第一个k-v用来存储Session的详细信息,包括Session的过期时间间隔、最近的访问时间、attributes等等。这个k的过期时间为Session的最大过期时间 + 5分钟。如果默认的最大过期时间为30分钟,则这个k的过期时间为35分钟
- 第二个k-v用来表示Session在Redis中的过期,这个k-v不存储任何有用数据,只是表示Session过期而设置。这个k在Redis中的过期时间即为Session的过期时间间隔
- 第三个k-v存储这个Session的id,是一个Set类型的Redis数据结构。这个k中的最后的1439245080000值是一个时间戳,根据这个Session过期时刻滚动至下一分钟而计算得出。
这里不由好奇,为什么一个RedisSession却如此复杂的存储。关于这个可以参考spring-session作者本人在github上的两篇回答:
Why does Spring Session use spring:session:expirations?
Clarify Redis expirations and cleanup task
简单描述下,为什么RedisSession的存储用到了三个Key,而非一个Redis过期Key。
对于Session的实现,需要支持HttpSessionEvent,即Session创建、过期、销毁等事件。当应用用监听器设置监听相应事件,Session发生上述行为时,监听器能够做出相应的处理。
Redis的强大之处在于支持KeySpace Notifiction——键空间通知。即可以监视某个key的变化,如删除、更新、过期。当key发生上述行为是,以便可以接受到变化的通知做出相应的处理。具体详情可以参考:
Redis Keyspace Notifications
但是Redis中带有过期的key有两种方式:
- 当访问时发现其过期
- Redis后台逐步查找过期键
当访问时发现其过期,会产生过期事件,但是无法保证key的过期时间抵达后立即生成过期事件。具体可以参考:Timing of expired events
spring-session为了能够及时的产生Session的过期时的过期事件,所以增加了:
spring:session:sessions:expires:33fdd1b6-b496-4b33-9f7d-df96679d32fe
spring:session:expirations:1439245080000
spring-session中有个定时任务,每个整分钟都会查询相应的spring:session:expirations:整分钟的时间戳中的过期SessionId,然后再访问一次这个SessionId,即spring:session:sessions:expires:SessionId,以便能够让Redis及时的产生key过期事件——即Session过期事件。
接下来再看下RedisOperationsSessionRepository中的具体实现原理
createSession方法:
public RedisSession createSession() { // new一个RedisSession实例
RedisSession redisSession = new RedisSession();
// 如果设置的最大过期时间不为空,则设置RedisSession的过期时间
if (this.defaultMaxInactiveInterval != null) {
redisSession.setMaxInactiveIntervalInSeconds(this.defaultMaxInactiveInterval);
}
return redisSession;
}
再来看下RedisSession的构造方法:
/** * Creates a new instance ensuring to mark all of the new attributes to be
* persisted in the next save operation.
*/
RedisSession() {
// 设置本地缓存为MapSession
this(new MapSession());
// 设置Session的基本属性
this.delta.put(CREATION_TIME_ATTR, getCreationTime());
this.delta.put(MAX_INACTIVE_ATTR, getMaxInactiveIntervalInSeconds());
this.delta.put(LAST_ACCESSED_ATTR, getLastAccessedTime());
// 标记Session的是否为新创建
this.isNew = true;
// 持久化
flushImmediateIfNecessary();
}
save方法:
public void save(RedisSession session) { // 调用RedisSession的saveDelta持久化Session
session.saveDelta();
// 如果Session为新创建,则发布一个Session创建的事件
if (session.isNew()) {
String sessionCreatedKey = getSessionCreatedChannel(session.getId());
this.sessionRedisOperations.convertAndSend(sessionCreatedKey, session.delta);
session.setNew(false);
}
}
getSession方法:
// 根据SessionId获取Session,这里的false代表的参数// 指:如果Session已经过期,是否仍然获取返回
public RedisSession getSession(String id) {
return getSession(id, false);
}
在有些情况下,Session过期,仍然需要能够获取到Session。这里先来看下getSession(String id, boolean allowExpired):
private RedisSession getSession(String id, boolean allowExpired) { // 根据SessionId,从Redis获取到持久化的Session信息
Map<Object, Object> entries = getSessionBoundHashOperations(id).entries();
// 如果Redis中没有,则返回null
if (entries.isEmpty()) {
return null;
}
// 根据Session信息,加载创建一个MapSession对象
MapSession loaded = loadSession(id, entries);
// 判断是否允许过期获取和Session是否过期
if (!allowExpired && loaded.isExpired()) {
return null;
}
// 根据MapSession new一个信息的RedisSession,此时isNew为false
RedisSession result = new RedisSession(loaded);
// 设置最新的访问时间
result.originalLastAccessTime = loaded.getLastAccessedTime();
return result;
}
这里需要注意的是loaded.isExpired()和loadSession。loaded.isExpired判断Session是否过期,如果过期返回null:
public boolean isExpired() { // 根据当前时间判断是否过期
return isExpired(System.currentTimeMillis());
}
boolean isExpired(long now) {
// 如果maxInactiveInterval小于0,表示Session永不过期
if (this.maxInactiveInterval < 0) {
return false;
}
// 最大过期时间单位转换为毫秒
// 当前时间减去Session的最大有效期间隔以获取理论上有效的上一次访问时间
// 然后在与实际的上一次访问时间进行比较
// 如果大于,表示理论上的时间已经在实际的访问时间之后,那么表示Session已经过期
return now - TimeUnit.SECONDS
.toMillis(this.maxInactiveInterval) >= this.lastAccessedTime;
}
loadSession中,将Redis中存储的Session信息转换为MapSession对象,以便从Session中获取属性时能够从内存直接获取提高性能:
private MapSession loadSession(String id, Map<Object, Object> entries) { MapSession loaded = new MapSession(id);
for (Map.Entry<Object, Object> entry : entries.entrySet()) {
String key = (String) entry.getKey();
if (CREATION_TIME_ATTR.equals(key)) {
loaded.setCreationTime((Long) entry.getValue());
}
else if (MAX_INACTIVE_ATTR.equals(key)) {
loaded.setMaxInactiveIntervalInSeconds((Integer) entry.getValue());
}
else if (LAST_ACCESSED_ATTR.equals(key)) {
loaded.setLastAccessedTime((Long) entry.getValue());
}
else if (key.startsWith(SESSION_ATTR_PREFIX)) {
loaded.setAttribute(key.substring(SESSION_ATTR_PREFIX.length()),
entry.getValue());
}
}
return loaded;
}
至此,可以看出spring-session中request.getSession(false)的过期实现原理。
delete方法:
public void delete(String sessionId) { // 获取Session
RedisSession session = getSession(sessionId, true);
if (session == null) {
return;
}
cleanupPrincipalIndex(session);
// 从过期集合中移除sessionId
this.expirationPolicy.onDelete(session);
String expireKey = getExpiredKey(session.getId());
// 删除session的过期键
this.sessionRedisOperations.delete(expireKey);
// 设置session过期
session.setMaxInactiveIntervalInSeconds(0);
save(session);
}
至此RedisOperationsSessionRepository的核心原理就介绍完毕。但是RedisOperationsSessionRepository中还包括关于Session事件的处理和清理Session的定时任务。这部分内容在后述的SessionEvent部分介绍。
5. HttpSessionStrategy
A strategy for mapping HTTP request and responses to a {@link Session}.
从javadoc中可以看出,HttpSessionStrategy是建立Request/Response和Session之间的映射关系的策略。
Tips:策略模式
策略模式是一个传神的神奇模式,是java的多态非常典型应用,是开闭原则、迪米特法则的具体体现。将同类型的一系列的算法封装在不同的类中,通过使用接口注入不同类型的实现,以达到的高扩展的目的。一般是定义一个策略接口,按照不同的场景实现各自的策略。
该策略接口中定义一套策略行为:
// 根据请求获取SessionId,即建立请求至Session的映射关系String getRequestedSessionId(HttpServletRequest request);
// 对于新创建的Session,通知客户端
void onNewSession(Session session, HttpServletRequest request,
HttpServletResponse response);
// 对于session无效,通知客户端
void onInvalidateSession(HttpServletRequest request, HttpServletResponse response);
如下UML类图:
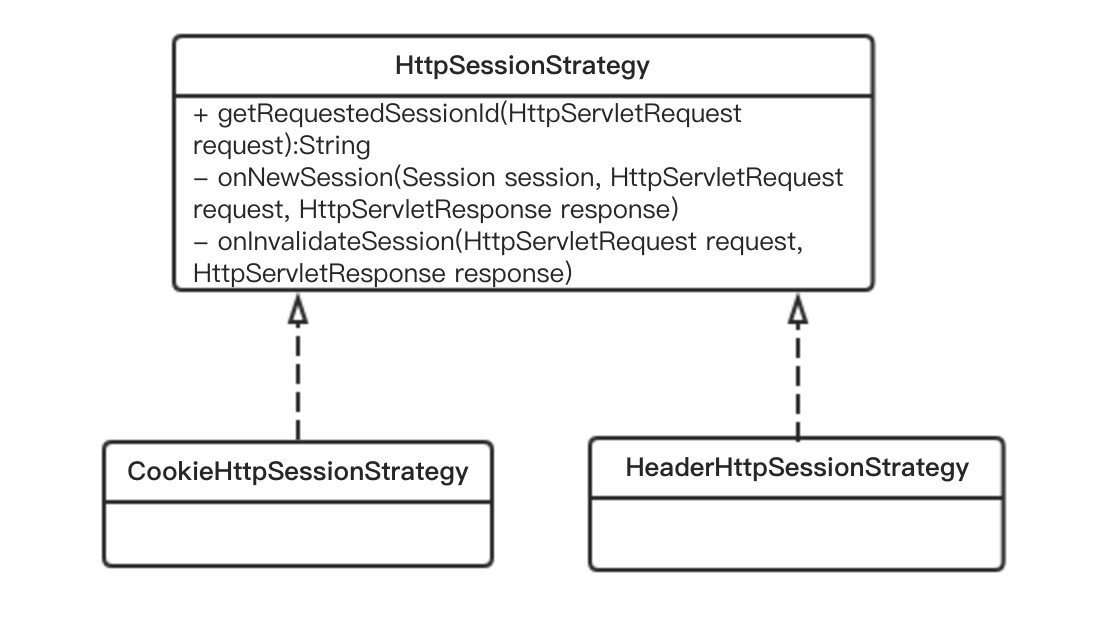
这里主要介绍CookieHttpSessionStrategy,这个也是默认的策略,可以查看spring-session中类SpringHttpSessionConfiguration,在注册SessionRepositoryFilter Bean时默认采用CookieHttpSessionStrategy:
@Beanpublic <S extends ExpiringSession> SessionRepositoryFilter<? extends ExpiringSession> springSessionRepositoryFilter(
SessionRepository<S> sessionRepository) {
SessionRepositoryFilter<S> sessionRepositoryFilter = new SessionRepositoryFilter<S>(
sessionRepository);
sessionRepositoryFilter.setServletContext(this.servletContext);
if (this.httpSessionStrategy instanceof MultiHttpSessionStrategy) {
sessionRepositoryFilter.setHttpSessionStrategy(
(MultiHttpSessionStrategy) this.httpSessionStrategy);
}
else {
sessionRepositoryFilter.setHttpSessionStrategy(this.httpSessionStrategy);
}
return sessionRepositoryFilter;
}
下面来分析CookieHttpSessionStrategy的原理。该策略使用Cookie来映射Request/Response至Session。即request/requset的head中cookie存储SessionId,当请求至web服务器,可以解析请求head中的cookie,然后获取sessionId,根据sessionId获取spring-session。当创建新的session或者session过期,将相应的sessionId写入response的set-cookie或者从respose中移除sessionId。
getRequestedSessionId方法
public String getRequestedSessionId(HttpServletRequest request) { // 获取当前请求的sessionId:session别名和sessionId映射
Map<String, String> sessionIds = getSessionIds(request);
// 获取当前请求的Session别名
String sessionAlias = getCurrentSessionAlias(request);
// 获取相应别名的sessionId
return sessionIds.get(sessionAlias);
}
接下来看下具体获取SessionIds的具体过程:
public String getRequestedSessionId(HttpServletRequest request) { // 获取当前请求的sessionId:session别名和sessionId映射
Map<String, String> sessionIds = getSessionIds(request);
// 获取当前请求的Session别名
String sessionAlias = getCurrentSessionAlias(request);
// 获取相应别名的sessionId
return sessionIds.get(sessionAlias);
}
public Map<String, String> getSessionIds(HttpServletRequest request) {
// 解析request中的cookie值
List<String> cookieValues = this.cookieSerializer.readCookieValues(request);
// 获取sessionId
String sessionCookieValue = cookieValues.isEmpty() ? ""
: cookieValues.iterator().next();
Map<String, String> result = new LinkedHashMap<String, String>();
// 根据分词器对sessionId进行分割,因为spring-session支持多session。默认情况只有一个session
StringTokenizer tokens = new StringTokenizer(sessionCookieValue, this.deserializationDelimiter);
// 如果只有一个session,则设置默认别名为0
if (tokens.countTokens() == 1) {
result.put(DEFAULT_ALIAS, tokens.nextToken());
return result;
}
// 如果有多个session,则建立别名和sessionId的映射
while (tokens.hasMoreTokens()) {
String alias = tokens.nextToken();
if (!tokens.hasMoreTokens()) {
break;
}
String id = tokens.nextToken();
result.put(alias, id);
}
return result;
}
public List<String> readCookieValues(HttpServletRequest request) {
// 获取request的cookie
Cookie[] cookies = request.getCookies();
List<String> matchingCookieValues = new ArrayList<String>();
if (cookies != null) {
for (Cookie cookie : cookies) {
// 如果是以SESSION开头,则表示是SessionId,毕竟cookie不只有sessionId,还有可能存储其他内容
if (this.cookieName.equals(cookie.getName())) {
// 决策是否需要base64 decode
String sessionId = this.useBase64Encoding
? base64Decode(cookie.getValue()) : cookie.getValue();
if (sessionId == null) {
continue;
}
if (this.jvmRoute != null && sessionId.endsWith(this.jvmRoute)) {
sessionId = sessionId.substring(0,
sessionId.length() - this.jvmRoute.length());
}
// 存入list中
matchingCookieValues.add(sessionId);
}
}
}
return matchingCookieValues;
}
再来看下获取当前request对应的Session的别名方法getCurrentSessionAlias
public String getCurrentSessionAlias(HttpServletRequest request) { // 如果session参数为空,则返回默认session别名
if (this.sessionParam == null) {
return DEFAULT_ALIAS;
}
// 从request中获取session别名,如果为空则返回默认别名
String u = request.getParameter(this.sessionParam);
if (u == null) {
return DEFAULT_ALIAS;
}
if (!ALIAS_PATTERN.matcher(u).matches()) {
return DEFAULT_ALIAS;
}
return u;
}
spring-session为了支持多session,才弄出多个session别名。当时一般应用场景都是一个session,都是默认的session别名0。
上述获取sessionId和别名映射关系中,也是默认别名0。这里返回别名0,所以返回当前请求对应的sessionId。
onNewSession方法
public void onNewSession(Session session, HttpServletRequest request, HttpServletResponse response) {
// 从当前request中获取已经写入Cookie的sessionId集合
Set<String> sessionIdsWritten = getSessionIdsWritten(request);
// 判断是否包含,如果包含,表示该sessionId已经写入过cookie中,则直接返回
if (sessionIdsWritten.contains(session.getId())) {
return;
}
// 如果没有写入,则加入集合,后续再写入
sessionIdsWritten.add(session.getId());
Map<String, String> sessionIds = getSessionIds(request);
String sessionAlias = getCurrentSessionAlias(request);
sessionIds.put(sessionAlias, session.getId());
// 获取cookieValue
String cookieValue = createSessionCookieValue(sessionIds);
//将cookieValue写入Cookie中
this.cookieSerializer
.writeCookieValue(new CookieValue(request, response, cookieValue));
}
sessionIdsWritten主要是用来记录已经写入Cookie的SessionId,防止SessionId重复写入Cookie中。
onInvalidateSession方法
public void onInvalidateSession(HttpServletRequest request, HttpServletResponse response) {
// 从当前request中获取sessionId和别名映射
Map<String, String> sessionIds = getSessionIds(request);
// 获取别名
String requestedAlias = getCurrentSessionAlias(request);
// 移除sessionId
sessionIds.remove(requestedAlias);
String cookieValue = createSessionCookieValue(sessionIds);
// 写入移除后的sessionId
this.cookieSerializer
.writeCookieValue(new CookieValue(request, response, cookieValue));
}
继续看下具体的写入writeCookieValue原理:
public void writeCookieValue(CookieValue cookieValue) { // 获取request/respose和cookie值
HttpServletRequest request = cookieValue.getRequest();
HttpServletResponse response = cookieValue.getResponse();
String requestedCookieValue = cookieValue.getCookieValue();
String actualCookieValue = this.jvmRoute == null ? requestedCookieValue
: requestedCookieValue + this.jvmRoute;
// 构造servlet规范中的Cookie对象,注意这里cookieName为:SESSION,表示为Session,
// 上述的从Cookie中读取SessionId,也是使用该cookieName
Cookie sessionCookie = new Cookie(this.cookieName, this.useBase64Encoding
? base64Encode(actualCookieValue) : actualCookieValue);
// 设置cookie的属性:secure、path、domain、httpOnly
sessionCookie.setSecure(isSecureCookie(request));
sessionCookie.setPath(getCookiePath(request));
String domainName = getDomainName(request);
if (domainName != null) {
sessionCookie.setDomain(domainName);
}
if (this.useHttpOnlyCookie) {
sessionCookie.setHttpOnly(true);
}
// 如果cookie值为空,则失效
if ("".equals(requestedCookieValue)) {
sessionCookie.setMaxAge(0);
}
else {
sessionCookie.setMaxAge(this.cookieMaxAge);
}
// 写入cookie到response中
response.addCookie(sessionCookie);
}
至此,CookieHttpSessionStrategy介绍结束。
由于篇幅过长,关于spring-session event和RedisOperationSessionRepository清理session并且产生过期事件的部分后续文章介绍。
总结
spring-session提供集群环境下HttpSession的透明集成。spring-session的优势在于开箱即用,具有较强的设计模式。且支持多种持久化方式,其中RedisSession较为成熟,与spring-data-redis整合,可谓威力无穷。
本文内容总结:前言,Spring Session探索,总结,
原文链接:https://www.cnblogs.com/lxyit/p/9672097.html
以上是 spring-session(一)揭秘 的全部内容, 来源链接: utcz.com/z/296585.html

