一步步剖析spring bean生命周期
本文内容纲要:一步步剖析spring bean生命周期
关于spring bean的生命周期,是深入学习spring的基础,也是难点,本篇文章将采用代码+图文结论的方式来阐述spring bean的生命周期,
本篇文章将阐述清楚下图。

一 项目结构及源码
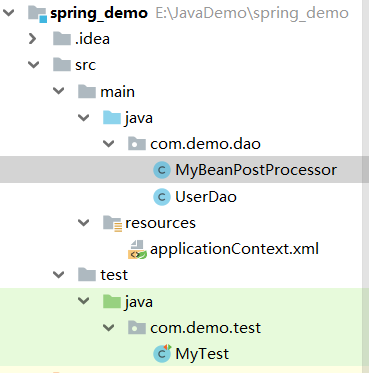
1.程序目录结构
2.applicationContext.xml
<?xml version="1.0" encoding="UTF-8"?><beans xmlns="http://www.springframework.org/schema/beans"
xmlns:xsi="http://www.w3.org/2001/XMLSchema-instance"
xsi:schemaLocation="http://www.springframework.org/schema/beans http://www.springframework.org/schema/beans/spring-beans.xsd">
<bean class="com.demo.dao.UserDao" id="userDao" scope="singleton" init-method="myInit" destroy-method="myDestroy">
<property name="userName" value="Alan_beijing"/>
</bean>
<bean class="com.demo.dao.MyBeanPostProcessor" id="myBeanPostProcessor"/>
</beans>
3.UserDao.java
package com.demo.dao;import org.springframework.beans.BeansException;
import org.springframework.beans.factory.*;
import org.springframework.beans.factory.config.BeanPostProcessor;
import org.springframework.context.ApplicationContext;
import org.springframework.context.ApplicationContextAware;
import org.apache.log4j.Logger;
public class UserDao implements BeanNameAware, BeanFactoryAware, ApplicationContextAware, InitializingBean,
DisposableBean{
private String userName;
private int count = 0;
public String getUserName() {
return userName;
}
//2.属性注入,注入属性为userName
public void setUserName(String userName) {
count++;
System.out.println(count + ":注入属性userName="+userName);
this.userName = userName;
}
//1.无参构造函数,实例化时调用该构造函数
public UserDao() {
count++;
System.out.println(count + ":调用构造函数UserDao()");
}
//3.实现BeanNameAware,获取bean id
public void setBeanName(String s) {
count++;
System.out.println(count + ":调用setBeanName()获取bean id,bean id=" + s);
}
//4.实现BeanFactoryAware,获取bean工厂
public void setBeanFactory(BeanFactory beanFactory) throws BeansException {
count++;
System.out.println(count + ":调用setBeanFactory()获取bean工厂,beanFactory=" + beanFactory);
}
//5.实现ApplicationContextAware,获取bean上下文
public void setApplicationContext(ApplicationContext applicationContext) throws BeansException {
count++;
System.out.println(count + ":调用setApplicationContext()获取bean上下文,applicationContext=" + applicationContext);
}
//6.实现InitializingBean,获取afterPropertiesSet
public void afterPropertiesSet() throws Exception {
count++;
System.out.println(count + ":调用afterPropertiesSet()");
}
//7.自定义初始化方法myInit()
public void myInit() {
count++;
System.out.println(count + ":调用自定义myInit()");
}
//8.实现DisposableBean,获取destroy()
public void destroy() throws Exception {
count++;
System.out.println(count + ":destroy()");
}
//9.自定义销毁方法myDestroy()
public void myDestroy() {
count++;
System.out.println(count + ":调用自定义destroy()");
}
}
4.MyBeanPostProcessor.java
package com.demo.dao;
import org.springframework.beans.BeansException;
import org.springframework.beans.factory.config.BeanPostProcessor;
public class MyBeanPostProcessor implements BeanPostProcessor {
public Object postProcessBeforeInitialization(Object bean, String beanName) throws BeansException {
System.out.println("=====调用postProcessBeforeInitialization()=====");
return bean;
}
public Object postProcessAfterInitialization(Object bean, String beanName) throws BeansException {
System.out.println("=====调用postProcessAfterInitialization()=====");
return bean;
}
}
二 测试代码及测试结果
1.test.java
package com.demo.test;import com.demo.dao.UserDao;
import org.junit.Test;
import org.springframework.context.support.AbstractApplicationContext;
import org.springframework.context.support.ClassPathXmlApplicationContext;
public class MyTest {
@Test
public void test() {
//定义容器并初始化
//ApplicationContext applicationContext = new ClassPathXmlApplicationContext("applicationContext.xml");
AbstractApplicationContext applicationContext = new ClassPathXmlApplicationContext("applicationContext.xml");
applicationContext.getBean(UserDao.class);
//只有关闭容器时,才会调用destroy方法
applicationContext.registerShutdownHook();
}
}
2.测试结果

三 分析
通过如上测试结果,bean生命周期流程大致如下:
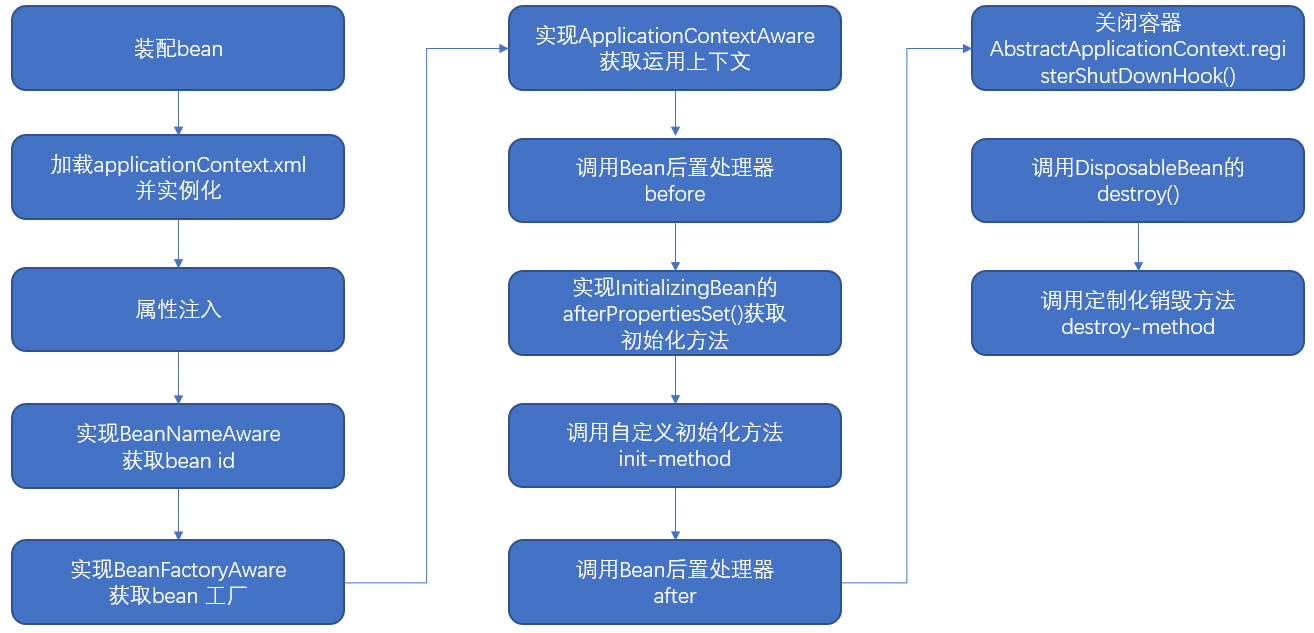
1.装配bean
bean装配为bean生命周期第一环节。所谓装配bean,指将java对象转换为bean的过程。在该示例中,UserDao.jave和MyBeanPostProcessor通过xml方式转化为bean。
注意:spring框架支持四种方式装配bean:xml方式,java代码方式,自动装配和混合装配方式

2.加载applicationContext.xml并实例化
加载并实例化bean为bean生命周期的第二环节。本文示例通过ClassPathXmlApplicationContext()来加载并,当bean为singleton时,该过程就实例化对象,而不需要等待
调用applicationContext.getBean()获取bean时才实例化对象,这与prototype是不一样的。

3.属性注入
bean属性注入为bean生命周期第三环节,采用反射方式注入bean.

4.实现BeanNameAware,获取bean id
该过程为bean生命周期的第四环节,实现该接口,可以获取bean的id

5.实现BeanFactoryAware,获取bean 工厂
该过程为bean生命周期第五环节,通过实现BeanFactoryAware获取bean工厂

6.实现ApplicationContextAware,获取运用上下文
该过程为bean生命周期第六环节,通过实现ApplicationContextAware接口,获取bean上下文

7.调用Bean后置处理器,before
该过程为bean生命周期第七环节,通过实现后置处理器BeanPostProcessor获取before和after,该过程是通过AOP方式实现的,在before和after之间,发生如下8,9过程。

8.实现InitializingBean的afterPropertiesSet(),获取初始化方法
该过程为bean生命周期第八环节,通过实现InitializingBean,获取afterPropertiesSet()

9.调用自定义初始化方法,init-method
该过程为bean生命周期第九环节,实现自定义初始化方法

10.调用Bean后置处理器after
该过程为bean生命周期第十环节,后置处理器最后环节
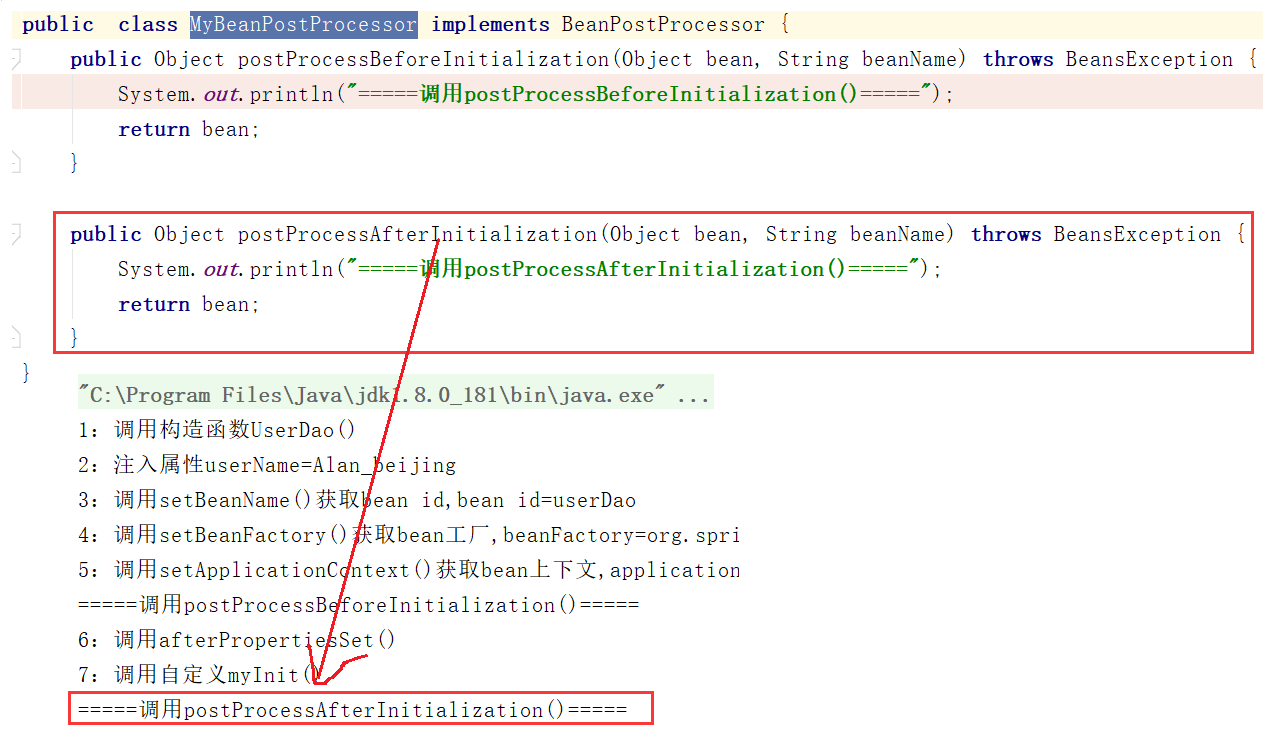
11.关闭容器AbstractApplicationContext.registerShutDownHook()
该环节为bean生命周期第十一环节,关闭容器

12.调用DisposableBean的destroy()
该过程为bean生命周期第十二环节,实现DisposableBean接口,调用destroy()

13.调用定制化销毁方法destroy-method
该过程为bean生命周期最后环节,调用自定义销毁方法destroy-method

三 版权区
- 转载博客,必须注明博客出处
- 博主网址:http://www.cnblogs.com/wangjiming/
- 如您有新想法,欢迎提出,邮箱:2098469527@qq.com
- 专业.NET之家技术QQ群:490539956
- 专业化Java之家QQ群:924412846
- 有问必答QQ群:2098469527
- 一对一技术辅导QQ:2098469527
本文内容总结:一步步剖析spring bean生命周期
原文链接:https://www.cnblogs.com/wangjiming/p/11669091.html
以上是 一步步剖析spring bean生命周期 的全部内容, 来源链接: utcz.com/z/296166.html

