【Java】Nacos - 启动
看了Eureka系列、Ribbon系列、Feign系列、Zuul系列,我相信大家应该知道怎么找到看源码的入口了,一个是需要用的注解,一个是spring.factories。我们还是从注解先来。
@EnableDiscoveryClient
这个注解做了两件事,一个是import了EnableDiscoveryClientImportSelector,另外一个就是默认autoRegister为true,开启自动注册。
@Target(ElementType.TYPE)@Retention(RetentionPolicy.RUNTIME)
@Documented
@Inherited
@Import(EnableDiscoveryClientImportSelector.class)
public @interface EnableDiscoveryClient {
boolean autoRegister() default true;
}
EnableDiscoveryClientImportSelector的selectImports方法,通过上面的autoRegister来判断,如果为true,则import了AutoServiceRegistrationConfiguration,如果为false,pring.cloud.service-registry.auto-registration.enabled设置为false。这个参数决定了是否引入自动注册。
@Overridepublic String[] selectImports(AnnotationMetadata metadata) {
// 其他略
boolean autoRegister = attributes.getBoolean("autoRegister");
if (autoRegister) {
List<String> importsList = new ArrayList<>(Arrays.asList(imports));
importsList.add(
"org.springframework.cloud.client.serviceregistry.AutoServiceRegistrationConfiguration");
imports = importsList.toArray(new String[0]);
}
else {
// 其他略
// spring.cloud.service-registry.auto-registration.enabled设置为false
map.put("spring.cloud.service-registry.auto-registration.enabled", false);
// 其他略
}
return imports;
}
NacosServiceAutoConfiguration
注解的部分看完了,我们开始看spring.factories。首先是NacosServiceAutoConfiguration。
这里只加载了NacosServiceManager,是service核心管理类,NamingService就是他管理的。
NacosDiscoveryAutoConfiguration
这个是用于服务发现的,他加载了两个类,NacosDiscoveryProperties和NacosServiceDiscovery。
NacosDiscoveryProperties是配置类,我们配置注册中心的信息就是在这里配置。
NacosServiceDiscovery主要是用于服务发现。
NacosServiceRegistryAutoConfiguration
NacosServiceRegistryAutoConfiguration,这个是用于自动注册的。
我们看到他上面的注解信息,@AutoConfigureAfter确保AutoServiceRegistrationConfiguration先加载,然后判断spring.cloud.service-registry.auto-registration.enabled是否为true,为true才可以加载。所以上面@EnableDiscoveryClient的autoRegister如果设置为false,则不加载。
因为spring.cloud.service-registry.auto-registration.enabled默认是true的,所以@EnableDiscoveryClient其实不引入,也是可以加载NacosServiceRegistryAutoConfiguration。
@Configuration(proxyBeanMethods = false)@EnableConfigurationProperties
@ConditionalOnNacosDiscoveryEnabled
@ConditionalOnProperty(value = "spring.cloud.service-registry.auto-registration.enabled",
matchIfMissing = true)
@AutoConfigureAfter({ AutoServiceRegistrationConfiguration.class,
AutoServiceRegistrationAutoConfiguration.class,
NacosDiscoveryAutoConfiguration.class })
public class NacosServiceRegistryAutoConfiguration
这个类会加载NacosServiceRegistry、NacosRegistration、NacosAutoServiceRegistration。NacosServiceRegistry、NacosRegistration会注入到NacosAutoServiceRegistration。
NacosServiceRegistry主要用于注册、取消注册。
NacosRegistration是当前实例的信息,比如实例名称、实例id、端口、ip等。
NacosAutoServiceRegistration继承了NacosAutoServiceRegistration,NacosAutoServiceRegistration又继承了AbstractAutoServiceRegistration。AbstractAutoServiceRegistration实现了ApplicationListener<WebServerInitializedEvent>接口,通过WebServerInitializedEvent就知道了,当tomcat启动成功后,会调用onApplicationEvent(WebServerInitializedEvent event)方法。这个方法会实现注册操作,后面再来讲解。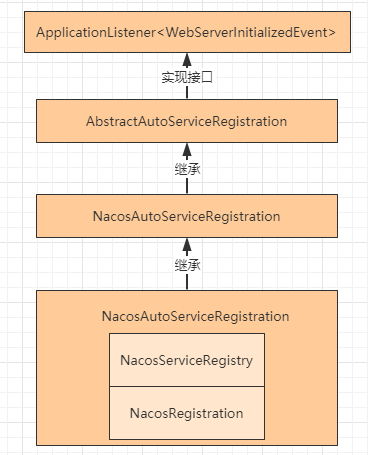
NacosDiscoveryClientConfiguration
这里加载了两个类,DiscoveryClient和NacosWatch。
DiscoveryClient主要用于示例获取和服务获取。
NacosWatch实现了SmartLifecycle接口,所以会调用start和stop方法。
start方法主要是加入NamingEvent监听、获取NamingService、注册监听、发布HeartbeatEvent事件。
@Overridepublic void start() {
// 启动的时候,加入NamingEvent监听
if (this.running.compareAndSet(false, true)) {
EventListener eventListener = listenerMap.computeIfAbsent(buildKey(),
event -> new EventListener() {
@Override
public void onEvent(Event event) {
if (event instanceof NamingEvent) {
List<Instance> instances = ((NamingEvent) event)
.getInstances();
Optional<Instance> instanceOptional = selectCurrentInstance(
instances);
instanceOptional.ifPresent(currentInstance -> {
resetIfNeeded(currentInstance);
});
}
}
});
// 获取NamingService
NamingService namingService = nacosServiceManager
.getNamingService(properties.getNacosProperties());
try {
// 注册监听
namingService.subscribe(properties.getService(), properties.getGroup(),
Arrays.asList(properties.getClusterName()), eventListener);
}
catch (Exception e) {
log.error("namingService subscribe failed, properties:{}", properties, e);
}
//发布HeartbeatEvent事件
this.watchFuture = this.taskScheduler.scheduleWithFixedDelay(
this::nacosServicesWatch, this.properties.getWatchDelay());
}
}
以上是 【Java】Nacos - 启动 的全部内容, 来源链接: utcz.com/a/92170.html

