SNMP介绍及使用,超会用,建议收藏家!
写在前面
如果你是对SNMP完全不了解,或者只想学习如何使用现成的SNMP工具,那你找对了文章,但如果你希望学习SNMP具体协议内容,推荐阅读官方的RFC文档。
1. 简介
SNMP(Simple Network Management Protocol) 设计在TCP/IP协议簇上的,为网络节点提供了一个通用的管理方法。对于系统维护人员,SNMP是其必须要掌握的一个工具。同时,如果你是一名BMC工程师,那你也必须掌握这门技术,SNMP常常会被部署在其Linux系统中,专门用于管理BMC所监视的所有系统硬件资源。
2. MIB介绍
在你要了解SNMP前,你必须先要了解一下MIB是什么。MIB全程Management Information Base,其主要负责为所有的被管理网络节点建立一个“接口”,本质是类似IP地址的一串数字。例如我们会在使用SNMP的时候见到这样一组数字串:
.1.3.6.1.2.1.1.5.0在这串数字中,每个数字都代表一个节点,其含义可以参考下表:
| 1 | 3 | 6 | 1 | 2 | 1 | 1 | 5 | 0 |
|---|---|---|---|---|---|---|---|---|
| iso | org | dod | internet | mgmt | mib-2 | system | sysName | end |
显然,这个数字串可以直接理解为系统的名字。在实际使用中,我们将其作为参数可以读取该节点的值,如果有写权限的话还可以更改该节点的值,因此,SNMP对于系统管理员提供了一套极为便利的工具。但,在一般使用中,我们一般不使用这种节点的表达方式,而是使用更为容易理解的方式,对于上面的这个例子,其往往可以使用SNMPv2-MIB::sysName.0所替代。你可能会想,系统能理解它的含义吗?那你就多虑了,一般在下载SNMP工具包的时候还会下载一个MIB包,其提供了所有节点的树形结构。在该结构中可以方便的查找对应的替换表达。或者,如果你不嫌麻烦还可以到OID查询网站查找对应的替换表达。
3. SNMP原理介绍
SNMP有两个内容,其一是其本身,专门负责管理节点,其二是一个Trap,用于监测报警。
通俗的理解,SNMP可以看作是一个C/S结构。在客户机中,一般会部署一个snmpd的守护进程,而在服务端(管理端)会下载一个snmp工具包,这个包中包含了许多用于管理客户端网络节点的的工具,例如get,set,translate等等。下图可能会帮你更加清晰的理解这个概念:
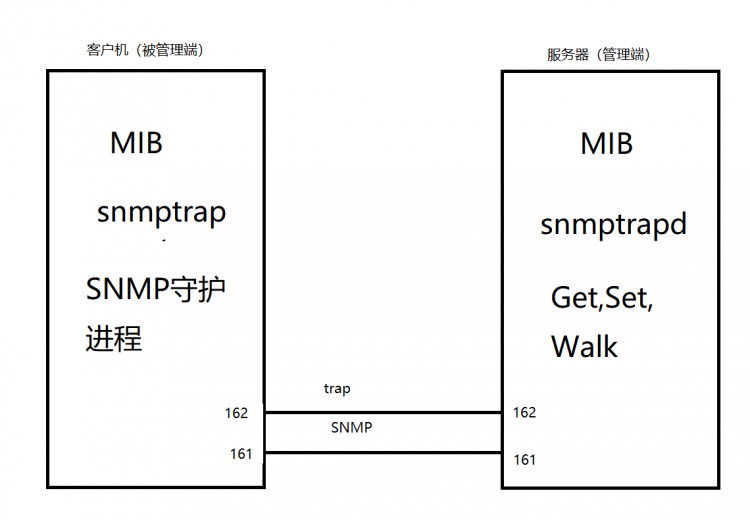
上图中,161表示的是双方进行通信时所用的默认端口号,被管理端会打开一个守护进程,负责监听161端口发来的请求;管理端会提供一个SNMP工具包,利用工具包中的命令可以向
被管理端的161端口发送请求包,以获取响应。
除此之外,管理端还会开启一个SNMPTrapd守护进程,用于接受被管理端向自己的162端口发送来的snmptrap请求,这一机制主要用于被管理端的自动报警中,一旦被管理端的某个节点出现故障,系统自动会发送snmptrap包,从而远端的系统管理员可以及时的知道问题。更为详细的介绍推荐阅读《TCP/IP详解 卷一》及博文。
4. 实际运用
目前较为流行的一些SNMP工具有Net-SNMP,其专门运行在Linux系统中,以及可以运行在Windows系统的iReasoning MIB Browser。
4.1. Net-SNMP
Net-SNMP获取的方式有很多种,可以在其官方网站下载,或者直接使用Linux发行版的包获取命令都可以,这里极为推荐一篇Net-SNMP的下载及配置博客 ,因为网上好多的博客写的安装配置方法照着做下来都不尽人意。安装好之后,你可以通过修改/etc/snmp/snmpd.conf文件来进行配置你的Net-SNMP。接下来我们会对常用的一些SNMP工具包做一些介绍:
snmpd:
这是一个SNMP的守护进程,用于部署在客户机端,可以通过修改/etc/snmp/snmpd.conf文件来配置community(通俗点说就是密码),监听IP及端口及其他内容,你可以使用 sudo /etc/init.d/snmpd restart/start/stop 重启/开启/关闭该进程。
snmpget:
这个命令可以用于获取被管理端某个节点的值,用法很简单,例如我们可以使用snmpget -v 2c -c public localhost SNMPv2-MIB::sysName.0 来获取被管理端系统名称,运行之后你会得到这样一条信息SNMPv2-MIB::sysName.0 = STRING: ubuntu。当然了,如果你的Linux主机是Redhat,那你的结果肯定会和我不大一样。除此之外,我们再来看一下参数,-v 表示的是SNMP的版本号,到目前为止一共有三个版本(1|2c|3),最常用的后面两个版本,而本文所讲的都是2c版本;-c表示的是community,其参数应该填写你在snmpd配置文件中设定的值;localhost 表示的是被管理端的IP地址,此处我是在自己电脑上测的,所以是localhost;最后面的一项内容是要访问的节点,你既可以输入OID,即那一串数字,也可以输入其代表的内容,更多信息可以使用snmpget -h 查看。
snmpset:
这个命令用于设置某个节点的值,用法与get类似,snmpset -v 2c -c public localhost SNMPv2-MIB::sysContact.0 s 'test'会设该节点的值为test(不知道为什么,我的电脑上提示该节点notwritable,总之这个指令我目前位置还没用到过),s表示的是字符串赋值类型,test的赋值内容。
snmpwalk:
这个指令很有用,可以将某一个节点下的所有被管理的子节点内容都打印出来,例如我们使用 snmpwalk -v 2c -c public localhost SNMPv2-MIB::system 可以打印system节点所有被管理子节点的信息。
snmptranslate:
用于翻译OID,例如我们使用 snmptranslate -Td SNMPv2-MIB::system 可以知道system节点所使用的数字OID,反之亦然。
snmptrap:
可以向管理端发送trap包,主要用于报警,例如我们可以使用sudo snmptrap -v 2c -c public localhost "cxy" .1.3.6.1.2.1.1 SNMPv2-MIB::sysContact.0 s 'test' 向管理端发送一个trap包,管理端即可直接查获并通知管理员,这就为被管理端提供了一种主动向管理端通讯的机制。另外,可以看到参数中多了一些内容,"cxy"是管理端的用户名,.1.3.6.1.2.1.1是主OID,而后面的则是具体的OID及其内容。
snmptrapd:
部署在管理端,可以通过修改/etc/snmp/snmptrapd.conf来配置其认证方式,一般使用命令sudo snmptrapd -df -Lo 启动该服务,可以通过检查162端口确认其启动。
4.2. MIB-Browser
你可以在官网下载地址处获取该应用,由于是图形化界面,所以使用极为简单,下图是SNMP工具的主界面。
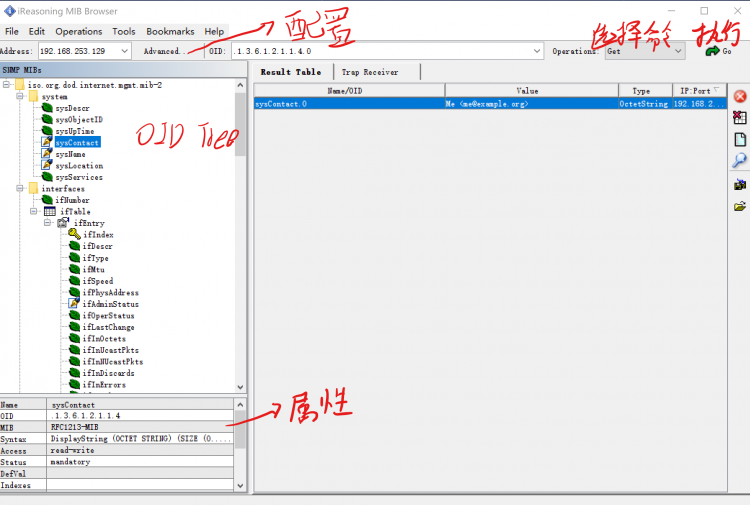
当然,你还可以在Tools中找到Trap Reciever与Trap Sender,其分别对应snmptrapd与snmptrap。
5. Q&A
- 获取信息时出现超时或被拒绝
你应该检查snmpd.conf文件的community是否和你命令的-c选项对应,或者是否监听端口是否对所有IP开放,但更多的时候是因为防火墙的原因,只要关掉就好了。
- snmpset时出现无权限的问题
需要设置snmpd.conf文件中的rwcommunity。
- snmptrap失败
查看snmptrapd.conf文件的配置。
- OID查找不到的情况
需要下载snmp-mibs-downloader包,并且将/etc/snmp/snmp.conf中的第一行
mib:注释掉。
6. configuration example
下面是我在Ubuntu16.04中的一些关于Net-SNMP的相关配置文件:
/etc/snmp/snmp.conf
# As the snmp packages come without MIB files due to license reasons, loading# of MIBs is disabled by default. If you added the MIBs you can reenable
# loading them by commenting out the following line.
#mibs :
/etc/snmp/snmpd.conf
## EXAMPLE-trap.conf:
# An example configuration file for configuring the Net-SNMP snmptrapd agent.
#
###############################################################################
#
# This file is intended to only be an example.
# When the snmptrapd agent starts up, this is where it will look for it.
#
# All lines beginning with a '#' are comments and are intended for you
# to read. All other lines are configuration commands for the agent.
#
# PLEASE: read the snmptrapd.conf(5) manual page as well!
#
#authCommunity log,execute,net private
authCommunity log,execute,net public
#
## send mail when get any events
#traphandle default /usr/bin/traptoemail -s smtp.qq.com 1484652026@qq.com
#
## send mail when get linkDown
#traphandle .1.3.6.1.6.3.1.1.5.3 /usr/bin/traptoemail -s smtp.example.org foobar@example.org
/etc/snmp/snmpd.conf
################################################################################
# EXAMPLE.conf:
# An example configuration file for configuring the Net-SNMP agent ('snmpd')
# See the 'snmpd.conf(5)' man page for details
#
# Some entries are deliberately commented out, and will need to be explicitly activated
#
###############################################################################
#
# AGENT BEHAVIOUR
#
# Listen for connections from the local system only
#agentAddress udp:127.0.0.1:161
# Listen for connections on all interfaces (both IPv4 *and* IPv6)
#agentAddress udp:161,udp6:[::1]:161
###############################################################################
#
# SNMPv3 AUTHENTICATION
#
# Note that these particular settings don't actually belong here.
# They should be copied to the file /var/lib/snmp/snmpd.conf
# and the passwords changed, before being uncommented in that file *only*.
# Then restart the agent
# createUser authOnlyUser MD5 "remember to change this password"
# createUser authPrivUser SHA "remember to change this one too" DES
# createUser internalUser MD5 "this is only ever used internally, but still change the password"
# If you also change the usernames (which might be sensible),
# then remember to update the other occurances in this example config file to match.
###############################################################################
#
# ACCESS CONTROL
#
# system + hrSystem groups only
#view systemonly included .1.3.6.1.2.1.1
#view systemonly included .1.3.6.1.2.1.25.1
view systemonly included .1
# Full access from the local host
#rocommunity public localhost
# Default access to basic system info
rwcommunity public default -V systemonly
# rocommunity6 is for IPv6
rwcommunity6 public default -V systemonly
# Full access from an example network
# Adjust this network address to match your local
# settings, change the community string,
# and check the 'agentAddress' setting above
#rocommunity secret 10.0.0.0/16
# Full read-only access for SNMPv3
rouser authOnlyUser
# Full write access for encrypted requests
# Remember to activate the 'createUser' lines above
#rwuser authPrivUser priv
# It's no longer typically necessary to use the full 'com2sec/group/access' configuration
# r[ow]user and r[ow]community, together with suitable views, should cover most requirements
###############################################################################
#
# SYSTEM INFORMATION
#
# Note that setting these values here, results in the corresponding MIB objects being 'read-only'
# See snmpd.conf(5) for more details
sysLocation Sitting on the Dock of the Bay
sysContact Me <me@example.org>
# Application + End-to-End layers
sysServices 72
#
# Process Monitoring
#
# At least one 'mountd' process
proc mountd
# No more than 4 'ntalkd' processes - 0 is OK
proc ntalkd 4
# At least one 'sendmail' process, but no more than 10
proc sendmail 10 1
# Walk the UCD-SNMP-MIB::prTable to see the resulting output
# Note that this table will be empty if there are no "proc" entries in the snmpd.conf file
#
# Disk Monitoring
#
# 10MBs required on root disk, 5% free on /var, 10% free on all other disks
disk / 10000
disk /var 5%
includeAllDisks 10%
# Walk the UCD-SNMP-MIB::dskTable to see the resulting output
# Note that this table will be empty if there are no "disk" entries in the snmpd.conf file
#
# System Load
#
# Unacceptable 1-, 5-, and 15-minute load averages
load 12 10 5
# Walk the UCD-SNMP-MIB::laTable to see the resulting output
# Note that this table *will* be populated, even without a "load" entry in the snmpd.conf file
###############################################################################
#
# ACTIVE MONITORING
#
# send SNMPv1 traps
trapsink localhost public
# send SNMPv2c traps
#trap2sink localhost public
# send SNMPv2c INFORMs
#informsink localhost public
# Note that you typically only want *one* of these three lines
# Uncommenting two (or all three) will result in multiple copies of each notification.
#
# Event MIB - automatically generate alerts
#
# Remember to activate the 'createUser' lines above
iquerySecName internalUser
rouser internalUser
# generate traps on UCD error conditions
defaultMonitors yes
# generate traps on linkUp/Down
linkUpDownNotifications yes
###############################################################################
#
# EXTENDING THE AGENT
#
#
# Arbitrary extension commands
#
extend test1 /bin/echo Hello, world!
extend-sh test2 echo Hello, world! ; echo Hi there ; exit 35
#extend-sh test3 /bin/sh /tmp/shtest
# Note that this last entry requires the script '/tmp/shtest' to be created first,
# containing the same three shell commands, before the line is uncommented
# Walk the NET-SNMP-EXTEND-MIB tables (nsExtendConfigTable, nsExtendOutput1Table
# and nsExtendOutput2Table) to see the resulting output
# Note that the "extend" directive supercedes the previous "exec" and "sh" directives
# However, walking the UCD-SNMP-MIB::extTable should still returns the same output,
# as well as the fuller results in the above tables.
#
# "Pass-through" MIB extension command
#
#pass .1.3.6.1.4.1.8072.2.255 /bin/sh PREFIX/local/passtest
#pass .1.3.6.1.4.1.8072.2.255 /usr/bin/perl PREFIX/local/passtest.pl
# Note that this requires one of the two 'passtest' scripts to be installed first,
# before the appropriate line is uncommented.
# These scripts can be found in the 'local' directory of the source distribution,
# and are not installed automatically.
# Walk the NET-SNMP-PASS-MIB::netSnmpPassExamples subtree to see the resulting output
#
# AgentX Sub-agents
#
# Run as an AgentX master agent
master agentx
# Listen for network connections (from localhost)
# rather than the default named socket /var/agentx/master
#agentXSocket tcp:localhost:705
以上是 SNMP介绍及使用,超会用,建议收藏家! 的全部内容, 来源链接: utcz.com/a/67360.html

