你真的了解mongoose吗?
引言
继上篇文章「Koa2+MongoDB+JWT实战--Restful API最佳实践」后,收到许多小伙伴的反馈,表示自己对于mongoose不怎么了解,上手感觉有些难度,看官方文档又基本都是英文(宝宝心里苦,但宝宝不说)。
为了让各位小伙伴快速上手,加深对于 mongoose 的了解,我特地结合之前的项目整理了一下关于 mongoose 的一些基础知识,这些对于实战都是很有用的。相信看了这篇文章,一定会对你快速上手,了解使用 mongoose 有不小的帮助。
mongoose 涉及到的概念和模块还是很多的,大体有下面这些:
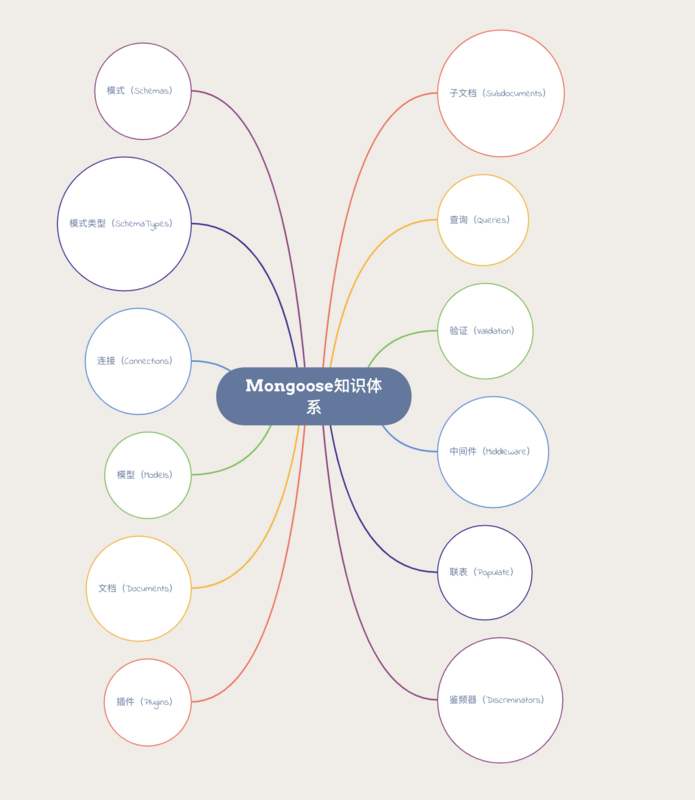
本篇文章并不会逐个去展开详细讲解,主要是讲述在实战中比较重要的几个模块:模式(schemas)、模式类型(SchemaTypes)、连接(Connections)、模型(Models)和联表(Populate)。
模式(schemas)
定义你的 schema
Mongoose的一切都始于一个Schema。每个 schema 映射到 MongoDB 的集合(collection)和定义该集合(collection)中的文档的形式。
const mongoose = require("mongoose");const { Schema, model } = mongoose;
const userSchema = new Schema(
{
__v: { type: Number, select: false },
name: { type: String, required: true },
password: { type: String, required: true, select: false },
avatar_url: { type: String },
gender: {
type: String,
enum: ["male", "female"],
default: "male",
required: true
},
headline: { type: String },
},
{ timestamps: true }
);
module.exports = model("User", userSchema);
创建模型
使用我们的 schema 定义,我们需要将我们的userSchema转成我们可以用的模型。也就是mongoose.model(modelName, schema) 。也就是上面代码中的:
module.exports = model("User", userSchema);选项(options)
Schemas 有几个可配置的选项,可以直接传递给构造函数或设置:
new Schema({..}, options);// or
var schema = new Schema({..});
schema.set(option, value);
可用选项:
autoIndexbufferCommandscappedcollectionid_idminimizereadshardKeystricttoJSONtoObjecttypeKeyvalidateBeforeSaveversionKeyskipVersioningtimestamps
这里我只是列举了常用的配置项,完整的配置项可查看官方文档https://mongoosejs.com/docs/guide.html#options。
这里我主要说一下versionKey和timestamps:
versionKey(上文有提到) 是 Mongoose 在文件创建时自动设定的。 这个值包含文件的内部修订号。 versionKey 是一个字符串,代表版本号的属性名, 默认值为__v- 如果设置了
timestamps选项, mongoose 会在你的 schema 自动添加createdAt和updatedAt字段, 其类型为Date。
到这里,已经基本介绍完了Schema,接下来看一下SchemaTypes
模式类型(SchemaTypes)
SchemaTypes为查询和其他处理路径默认值,验证,getter,setter,字段选择默认值,以及字符串和数字的特殊字符。 在 mongoose 中有效的 SchemaTypes 有:
StringNumberDateBufferBooleanMixedObjectIdArrayDecimal128Map
看一个简单的示例:
const answerSchema = new Schema({
__v: { type: Number, select: false },
content: { type: String, required: true },
answerer: {
type: Schema.Types.ObjectId,
ref: "User",
required: true,
select: false
},
questionId: { type: String, required: true },
voteCount: { type: Number, required: true, default: 0 }
},
{ timestamps: true }
);
所有的 Schema 类型
required: 布尔值或函数,如果为 true,则为此属性添加必须的验证。default: 任意类型或函数,为路径设置一个默认的值。如果值是一个函数,则函数的返回值用作默认值。select: 布尔值 指定 query 的默认projectionsvalidate: 函数,对属性添加验证函数。get: 函数,使用Object.defineProperty()定义自定义 getterset: 函数,使用Object.defineProperty()定义自定义 setteralias: 字符串,只对mongoose>=4.10.0有效。定义一个具有给定名称的虚拟属性,该名称可以获取/设置这个路径
索引
你可以用 schema 类型选项声明 MongoDB 的索引。
index: 布尔值,是否在属性中定义一个索引。unique: 布尔值,是否在属性中定义一个唯一索引。sparse: 布尔值,是否在属性中定义一个稀疏索引。
var schema2 = new Schema({test: {
type: String,
index: true,
unique: true // 如果指定`unique`为true,则为唯一索引
}
});
字符串
lowercase: 布尔值,是否在保存前对此值调用toLowerCase()uppercase: 布尔值,是否在保存前对此值调用toUpperCase()trim: 布尔值,是否在保存前对此值调用trim()match: 正则,创建一个验证器,验证值是否匹配给定的正则表达式enum: 数组,创建一个验证器,验证值是否是给定数组中的元素
数字
min: 数字,创建一个验证器,验证值是否大于等于给定的最小值max: 数字,创建一个验证器,验证值是否小于等于给定的最大的值
日期
min: Datemax: Date
现在已经介绍完Schematype,接下来让我们看一下Connections。
连接(Connections)
我们可以通过利用mongoose.connect()方法连接 MongoDB 。
mongoose.connect('mongodb://localhost:27017/myapp');这是连接运行在本地myapp数据库最小的值(27017)。如果连接失败,尝试用127.0.0.1代替localhost。
当然,你可在 uri 中指定更多的参数:
mongoose.connect('mongodb://username:[email protected]:port/database?options...');操作缓存
意思就是我们不必等待连接建立成功就可以使用 models,mongoose 会先缓存 model 操作
let TestModel = mongoose.model('Test', new Schema({ name: String }));// 连接成功前操作会被挂起
TestModel.findOne(function(error, result) { /* ... */ });
setTimeout(function() {
mongoose.connect('mongodb://localhost/myapp');
}, 60000);
如果要禁用缓存,可修改bufferCommands配置,也可以全局禁用 bufferCommands
mongoose.set('bufferCommands', false);选项
connect 方法也接收一个 options 对象:
mongoose.connect(uri, options);这里我列举几个在日常使用中比较重要的选项,完整的连接选项看这里
bufferCommands:这是 mongoose 中一个特殊的选项(不传递给 MongoDB 驱动),它可以禁用 mongoose 的缓冲机制。user/pass:身份验证的用户名和密码。这是 mongoose 中特殊的选项,它们可以等同于 MongoDB 驱动中的auth.user和auth.password选项。dbName:指定连接哪个数据库,并覆盖连接字符串中任意的数据库。useNewUrlParser:底层 MongoDB 已经废弃当前连接字符串解析器。因为这是一个重大的改变,添加了 useNewUrlParser 标记如果在用户遇到 bug 时,允许用户在新的解析器中返回旧的解析器。poolSize:MongoDB 驱动将为这个连接保持的最大 socket 数量。默认情况下,poolSize 是 5。useUnifiedTopology:默认情况下为false。设置为 true 表示选择使用 MongoDB 驱动程序的新连接管理引擎。您应该将此选项设置为 true,除非极少数情况会阻止您保持稳定的连接。
示例:
const options = {useNewUrlParser: true,
useUnifiedTopology: true,
autoIndex: false, // 不创建索引
reconnectTries: Number.MAX_VALUE, // 总是尝试重新连接
reconnectInterval: 500, // 每500ms重新连接一次
poolSize: 10, // 维护最多10个socket连接
// 如果没有连接立即返回错误,而不是等待重新连接
bufferMaxEntries: 0,
connectTimeoutMS: 10000, // 10s后放弃重新连接
socketTimeoutMS: 45000, // 在45s不活跃后关闭sockets
family: 4 // 用IPv4, 跳过IPv6
};
mongoose.connect(uri, options);
回调
connect()函数也接收一个回调参数,其返回一个 promise。
mongoose.connect(uri, options, function(error) {// 检查错误,初始化连接。回调没有第二个参数。
});
// 或者用promise
mongoose.connect(uri, options).then(
() => { /** ready to use. The `mongoose.connect()` promise resolves to undefined. */ },
err => { /** handle initial connection error */ }
);
说完Connections,下面让我们来看一个重点Models
模型(Models)
Models 是从 Schema 编译来的构造函数。 它们的实例就代表着可以从数据库保存和读取的 documents。 从数据库创建和读取 document 的所有操作都是通过 model 进行的。
const mongoose = require("mongoose");const { Schema, model } = mongoose;
const answerSchema = new Schema(
{
__v: { type: Number, select: false },
content: { type: String, required: true },
},
{ timestamps: true }
);
module.exports = model("Answer", answerSchema);
定义好 model 之后,就可以进行一些增删改查操作了
创建
如果是Entity,使用save方法;如果是Model,使用create方法或insertMany方法。
// save([options], [options.safe], [options.validateBeforeSave], [fn])let Person = mongoose.model("User", userSchema);
let person1 = new Person({ name: '森林' });
person1.save()
// 使用save()方法,需要先实例化为文档,再使用save()方法保存文档。而create()方法,则直接在模型Model上操作,并且可以同时新增多个文档
// Model.create(doc(s), [callback])
Person.create({ name: '森林' }, callback)
// Model.insertMany(doc(s), [options], [callback])
Person.insertMany([{ name: '森林' }, { name: '之晨' }], function(err, docs) {
})
说到这里,我们先要补充说明一下 mongoose 里面的三个概念:schema、model和entity:
schema: 一种以文件形式存储的数据库模型骨架,不具备数据库的操作能力model: 由 schema 发布生成的模型,具有抽象属性和行为的数据库操作对entity: 由 Model 创建的实体,他的操作也会影响数据库
查询
对于 Mongoosecha 的查找文档很容易,它支持丰富的查询 MongoDB 语法。包括find、findById、findOne等。
find()
第一个参数表示查询条件,第二个参数用于控制返回的字段,第三个参数用于配置查询参数,第四个参数是回调函数,回调函数的形式为function(err,docs){}
Model.find(conditions, [projection], [options], [callback])下面让我们依次看下 find()的各个参数在实际场景中的应用:
conditions- 查找全部
Model.find({})- 精确查找
Model.find({name:'森林'})- 使用操作符
对比相关操作符
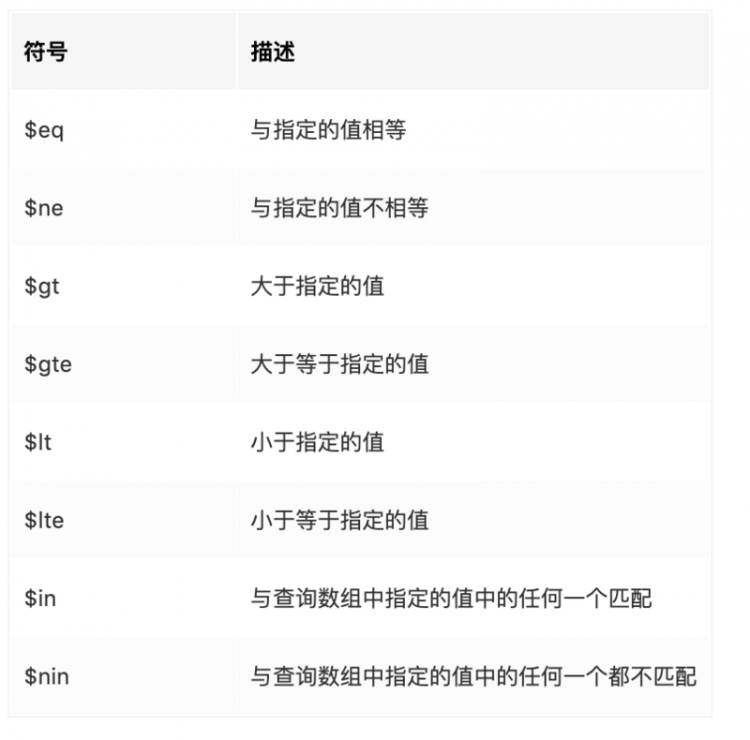
Model.find({ age: { $in: [18, 24]} })返回 age 字段等于 18 或者 24 的所有 document。
逻辑相关操作符
// 返回 age 字段大于 24 或者 age 字段不存在的文档Model.find( { age: { $not: { $lte: 24 }}})
字段相关操作符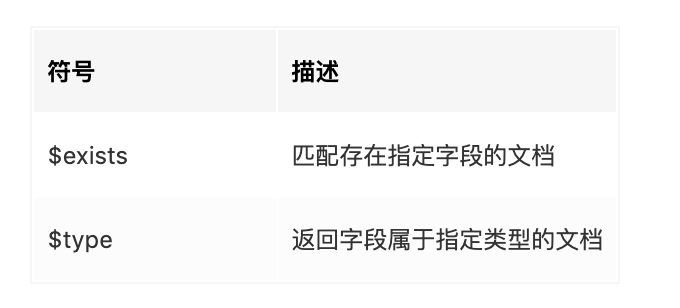
数组字段的查找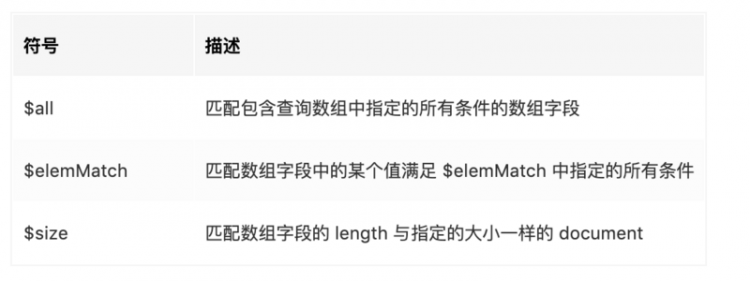
// 使用 $all 查找同时存在 18 和 20 的 documentModel.find({ age: { $all: [ 18, 20 ] } });
projection指定要包含或排除哪些
document字段(也称为查询“投影”),必须同时指定包含或同时指定排除,不能混合指定,_id除外。在 mongoose 中有两种指定方式,
字符串指定和对象形式指定。字符串指定时在排除的字段前加 - 号,只写字段名的是包含。
Model.find({},'age');Model.find({},'-name');
对象形式指定时,
1是包含,0是排除。Model.find({}, { age: 1 });Model.find({}, { name: 0 });
options// 三种方式实现Model.find(filter,null,options)
Model.find(filter).setOptions(options)
Model.find(filter).<option>(xxx)
options 选项见官方文档 Query.prototype.setOptions()。
这里我们只列举常用的:
sort: 按照排序规则根据所给的字段进行排序,值可以是 asc, desc, ascending, descending, 1, 和 -1。limit: 指定返回结果的最大数量skip: 指定要跳过的文档数量lean: 返回普通的 js 对象,而不是Mongoose Documents。建议不需要 mongoose 特殊处理就返给前端的数据都最好使用该方法转成普通 js 对象。
// sort 两种方式指定排序Model.find().sort('age -name'); // 字符串有 - 代表 descending 降序
Model.find().sort({age:'asc', name:-1});
sort 和 limit 同时使用时,调用的顺序并不重要,返回的数据都是先排序后限制数量。
// 效果一样Model.find().limit(2).sort('age');
Model.find().sort('age').limit(2);
callbackMongoose 中所有传入
callback的查询,其格式都是callback(error, result)这种形式。如果出错,则 error 是出错信息,result 是 null;如果查询成功,则 error 是 null, result 是查询结果,查询结果的结构形式是根据查询方法的不同而有不同形式的。find()方法的查询结果是数组,即使没查询到内容,也会返回 [] 空数组。
findById
Model.findById(id,[projection],[options],[callback])Model.findById(id) 相当于 Model.findOne({ _id: id })。
看一下官方对于findOne与findById的对比:
查询结果:
- 返回数据的格式是
{}对象形式。 - id 为
undefined或null,result 返回null。 - 没符合查询条件的数据,result 返回
null。
findOne
该方法返回查找到的所有实例的第一个
Model.findOne(conditions, [projection], [options], [callback])如果查询条件是 _id,建议使用 findById()。
查询结果:
- 返回数据的格式是
{}对象形式。 - 有多个数据满足查询条件的,只返回第一条。
- 查询条件 conditions 为 {}、 null 或 undefined,将任意返回一条数据。
- 没有符合查询条件的数据,result 返回 null。
更新
每个模型都有自己的更新方法,用于修改数据库中的文档,不将它们返回到您的应用程序。常用的有findOneAndUpdate()、findByIdAndUpdate()、update()、updateMany()等。
findOneAndUpdate()
Model.findOneAndUpdate(filter, update, [options], [callback])filter查询语句,和
find()一样。filter 为
{},则只更新第一条数据。update{operator: { field: value, ... }, ... }字段相关操作符
符号 描述 $set 设置字段值 $currentDate 设置字段值为当前时间,可以是 Date或时间戳格式。$min 只有当指定值小于当前字段值时更新 $max 只有当指定值大于当前字段值时更新 $inc 将字段值增加 指定数量,指定数量可以是负数,代表减少。$mul 将字段值乘以指定数量 \$unset 删除指定字段,数组中的值删后改为 null。 数组字段相关操作符
符号 描述 \$ 充当占位符,用来表示匹配查询条件的数组字段中的第一个元素 {operator:{ "arrayField.$" : value }}\$addToSet 向数组字段中添加之前不存在的元素 { $addToSet: {arrayField: value, ... }},value 是数组时可与$each组合使用。\$push 向数组字段的末尾添加元素 { $push: { arrayField: value, ... } },value 是数组时可与$each等修饰符组合使用\$pop 移除数组字段中的第一个或最后一个元素 { $pop: {arrayField: -1(first) / 1(last), ... } }\$pull 移除数组字段中与查询条件匹配的所有元素 { $pull: {arrayField: value / condition, ... } }\$pullAll 从数组中删除所有匹配的值 { $pullAll: { arrayField: [value1, value2 ... ], ... } }修饰符
符号 描述 \$each 修饰 $push和$addToSet操作符,以便为数组字段添加多个元素。\$position 修饰 $push操作符以指定要添加的元素在数组中的位置。\$slice 修饰 $push操作符以限制更新后的数组的大小。\$sort 修饰 $push操作符来重新排序数组字段中的元素。修饰符执行的顺序(与定义的顺序无关):
- 在指定的位置添加元素以更新数组字段
- 按照指定的规则排序
- 限制数组大小
- 存储数组
options- lean: true 返回普通的 js 对象,而不是
Mongoose Documents。 - new: 布尔值,
true返回更新后的数据,false(默认)返回更新前的数据。 - fields/select:指定返回的字段。
- sort:如果查询条件找到多个文档,则设置排序顺序以选择要更新哪个文档。
- maxTimeMS:为查询设置时间限制。
- upsert:布尔值,如果对象不存在,则创建它。默认值为
false。 - omitUndefined:布尔值,如果为
true,则在更新之前删除值为undefined的属性。 - rawResult:如果为
true,则返回来自 MongoDB 的原生结果。
- lean: true 返回普通的 js 对象,而不是
callback- 没找到数据返回
null - 更新成功返回更新前的该条数据(
{}形式) options的{new:true},更新成功返回更新后的该条数据({}形式)- 没有查询条件,即
filter为空,则更新第一条数据
- 没找到数据返回
findByIdAndUpdate()
Model.findByIdAndUpdate(id, update, options, callback)Model.findByIdAndUpdate(id, update) 相当于 Model.findOneAndUpdate({ _id: id }, update)。
result 查询结果:
- 返回数据的格式是
{}对象形式。 - id 为
undefined或null,result 返回null。 - 没符合查询条件的数据,result 返回
null。
update()
Model.update(filter, update, options, callback)options- multi: 默认
false,只更新第一条数据;为true时,符合查询条件的多条文档都会更新。 - overwrite:默认为
false,即update参数如果没有操作符或操作符不是 update 操作符,将会默认添加$set;如果为true,则不添加$set,视为覆盖原有文档。
- multi: 默认
updateMany()
Model.updateMany(filter, update, options, callback)更新符合查询条件的所有文档,相当于 Model.update(filter, update, { multi: true }, callback)
删除
删除常用的有findOneAndDelete()、findByIdAndDelete()、deleteMany()、findByIdAndRemove()等。
findOneAndDelete()
Model.findOneAndDelete(filter, options, callback)filter
查询语句和find()一样options- sort:如果查询条件找到多个文档,则设置排序顺序以选择要删除哪个文档。
- select/projection:指定返回的字段。
- rawResult:如果为
true,则返回来自MongoDB的原生结果。
callback- 没有符合
filter的数据时,返回null。 filter为空或{}时,删除第一条数据。- 删除成功返回
{}形式的原数据。
- 没有符合
findByIdAndDelete()
Model.findByIdAndDelete(id, options, callback)Model.findByIdAndDelete(id) 相当于 Model.findOneAndDelete({ _id: id })。
callback- 没有符合
id的数据时,返回null。 id为空或undefined时,返回null。- 删除成功返回
{}形式的原数据。
- 没有符合
deleteMany()
Model.deleteMany(filter, options, callback)filter
删除所有符合filter条件的文档。
deleteOne()
Model.deleteOne(filter, options, callback)filter
删除符合filter条件的第一条文档。
findOneAndRemove()
Model.findOneAndRemove(filter, options, callback)用法与 findOneAndDelete() 一样,一个小小的区别是 findOneAndRemove() 会调用 MongoDB 原生的 findAndModify() 命令,而不是 findOneAndDelete() 命令。
建议使用 findOneAndDelete() 方法。
findByIdAndRemove()
Model.findByIdAndRemove(id, options, callback)Model.findByIdAndRemove(id) 相当于 Model.findOneAndRemove({ _id: id })。
remove()
Model.remove(filter, options, callback)从集合中删除所有匹配 filter 条件的文档。要删除第一个匹配条件的文档,可将 single 选项设置为 true。
看完Models,最后让我们来看下在实战中比较有用的Populate
联表(Populate)
Mongoose 的 populate() 可以连表查询,即在另外的集合中引用其文档。
Populate() 可以自动替换 document 中的指定字段,替换内容从其他 collection 中获取。
refs
创建 Model 的时候,可给该 Model 中关联存储其它集合 _id 的字段设置 ref 选项。ref 选项告诉 Mongoose 在使用 populate() 填充的时候使用哪个 Model。
const mongoose = require("mongoose");const { Schema, model } = mongoose;
const answerSchema = new Schema(
{
__v: { type: Number, select: false },
content: { type: String, required: true },
answerer: {
type: Schema.Types.ObjectId,
ref: "User",
required: true,
select: false
},
questionId: { type: String, required: true },
voteCount: { type: Number, required: true, default: 0 }
},
{ timestamps: true }
);
module.exports = model("Answer", answerSchema);
上例中 Answer model 的 answerer 字段设为 ObjectId 数组。 ref 选项告诉 Mongoose 在填充的时候使用 User model。所有储存在 answerer 中的 _id 都必须是 User model 中 document 的 _id。
ObjectId、Number、String 以及 Buffer 都可以作为 refs 使用。 但是最好还是使用 ObjectId。
在创建文档时,保存 refs 字段与保存普通属性一样,把 _id 的值赋给它就好了。
const Answer = require("../models/answers");async create(ctx) {
ctx.verifyParams({
content: { type: "string", required: true }
});
const answerer = ctx.state.user._id;
const { questionId } = ctx.params;
const answer = await new Answer({
...ctx.request.body,
answerer,
questionId
}).save();
ctx.body = answer;
}
populate(path,select)
填充document
const Answer = require("../models/answers");const answer = await Answer.findById(ctx.params.id)
.select(selectFields)
.populate("answerer");
被填充的 answerer 字段已经不是原来的 _id,而是被指定的 document 代替。这个 document 由另一条 query 从数据库返回。
返回字段选择
如果只需要填充 document 中一部分字段,可给 populate() 传入第二个参数,参数形式即 返回字段字符串,同 Query.prototype.select()。
const answer = await Answer.findById(ctx.params.id).select(selectFields)
.populate("answerer", "name -_id");
populate 多个字段
const populateStr =fields &&
fields
.split(";")
.filter(f => f)
.map(f => {
if (f === "employments") {
return "employments.company employments.job";
}
if (f === "educations") {
return "educations.school educations.major";
}
return f;
})
.join(" ");
const user = await User.findById(ctx.params.id)
.select(selectFields)
.populate(populateStr);
最后
到这里本篇文章也就结束了,这里主要是结合我平时的项目(https://github.com/Cosen95/rest_node_api)中对于mongoose的使用做的简单的总结。希望能给你带来帮助!
同时你可以关注我的同名公众号【前端森林】,这里我会定期发一些大前端相关的前沿文章和日常开发过程中的实战总结。

以上是 你真的了解mongoose吗? 的全部内容, 来源链接: utcz.com/a/65597.html

