010.OpenShiefc综合实验及应用
实验一 安装OpenShift
1.1 前置准备
[student@workstation ~]$ lab review-install setup
1.2 配置规划
OpenShift集群有三个节点:
- master.lab.example.com:OpenShift master节点,是一个不可调度pod的节点。
- node1.lab.example.com:一个OpenShift节点,它可以同时运行应用程序和基础设施pod。
- node2.lab.example.com:另一个OpenShift节点,它可以同时运行应用程序和基础设施pod。
所有节点都使用带有overlay2驱动程序的OverlayFS来存储Docker,每个节点中的第二个磁盘(vdb)保留给Docker存储。
所有节点都将使用基于rpm的安装,使用release v3.9和OpenShift image tag version v3.9.14。
路由的默认域是apps.lab.example.com。Classroom DNS服务器已经配置为将此域中的所有主机名解析为node1.lab.example.com。
OpenShift集群使用的所有容器image都存储在registry.lab.example.com提供的私有仓库中。
使用两个基于HTPasswd身份验证的初始用户:developer和admin,起密码都是redhat,developer作为普通用户,admin作为集群管理员。
services.lab.example.com中的NFS卷作为OpenShift内部仓库的持久存储支持。
services.lab.example.com也为集群存储提供NFS服务。
etcd也部署在master节点上,同时存储使用services.lab.example.com主机提供的NFS共享存储。
集群必须与Internet断开连接,即使用离线包形式。
内部OpenShift仓库应该由NFS持久存储支持,存储位于services.lab.example.com。
master API和控制台将在端口443上运行。
安装OpenShift所需的RPM包由已经在所有主机上使用Yum配置文件定义完成。
/home/student/DO280/labs/review-install文件夹为OpenShift集群的安装提供了一个部分完成的Ansible目录文件。这个文件夹中包含了执行安装前和安装后步骤所需的Ansible playbook。
测试应用程序由Git服务器http://services.lab.example.com/phphelloworld提供。这是一个简单的“hello, world”应用程序。可以使用Source-to-Image来部署这个应用程序,以验证OpenShift集群是否已部署成功。
1.3 确认Ansible
1 [student@workstation ~]$ cd /home/student/DO280/labs/review-install/2 [student@workstation review-install]$ sudo yum -y install ansible
3 [student@workstation review-install]$ ansible --version
4 [student@workstation review-install]$ cat ansible.cfg
5 [defaults]
6 remote_user = student
7 inventory = ./inventory
8 log_path = ./ansible.log
9
10 [privilege_escalation]
11 become = yes
12 become_user = root
13 become_method = sudo
1.4 检查Inventory
1 [student@workstation review-install]$ cp inventory.preinstall inventory #此为准备工作的Inventory2 [student@workstation review-install]$ cat inventory
3 [workstations]
4 workstation.lab.example.com
5
6 [nfs]
7 services.lab.example.com
8
9 [masters]
10 master.lab.example.com
11
12 [etcd]
13 master.lab.example.com
14
15 [nodes]
16 master.lab.example.com
17 node1.lab.example.com
18 node2.lab.example.com
19
20 [OSEv3:children]
21 masters
22 etcd
23 nodes
24 nfs
25
26#Variables needed by the prepare_install.yml playbook.
27 [nodes:vars]
28 registry_local=registry.lab.example.com
29 use_overlay2_driver=true
30 insecure_registry=false
31 run_docker_offline=true
32 docker_storage_device=/dev/vdb
提示:
Inventory定义了六个主机组:
- nfs:为集群存储提供nfs服务的环境中的vm;
- masters:OpenShift集群中用作master角色的节点;
- etcd:用于OpenShift集群的etcd服务的节点,本环境中使用master节点;
- node:OpenShift集群中的node节点;
- OSEv3:组成OpenShift集群的所有接待,包括master、etcd、node或nfs组中的节点。
注意:默认情况下,docker使用在线仓库下载容器映像。本环境内部无网络,因此将docker仓库配置为内部私有仓库。在yml中使用变量引入仓库配置。
此外,安装会在每个主机上配置docker守护进程,以使用overlay2 image驱动程序存储容器映像。Docker支持许多不同的image驱动。如AUFS、Btrfs、Device mapper、OverlayFS。
1.5 确认节点
1 [student@workstation review-install]$ cat ping.yml2 ---
3 - name: Verify Connectivity
4 hosts: all
5 gather_facts: no
6 tasks:
7 - name: "Test connectivity to machines."
8 shell: "whoami"
9 changed_when: false
10 [student@workstation review-install]$ ansible-playbook -v ping.yml

1.6 准备工作
1 [student@workstation review-install]$ cat prepare_install.yml2 ---
3 - name: "Host Preparation: Docker tasks"
4 hosts: nodes
5 roles:
6 - docker-storage
7 - docker-registry-cert
8 - openshift-node
9
10#Tasks below were not handled by the roles above.
11 tasks:
12 - name: Student Account - Docker Access
13user:
14name: student
15groups: docker
16 append: yes
17
18 ...
19 [student@workstation review-install]$ ansible-playbook prepare_install.yml

提示:如上yml引入了三个role,具体role内容参考《002.OpenShift安装与部署》2.5步骤。
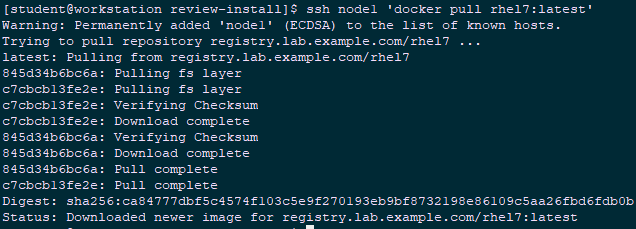
1.7 确认验证
1 [student@workstation review-install]$ ssh node1 'docker pull rhel7:latest' #验证是否可以正常pull image
1.8 检查Inventory
1 [student@workstation review-install]$ cp inventory.partial inventory #此为正常安装的完整Inventory2 [student@workstation review-install]$ cat inventory
3 [workstations]
4 workstation.lab.example.com
5
6 [nfs]
7 services.lab.example.com
8
9 [masters]
10 master.lab.example.com
11
12 [etcd]
13 master.lab.example.com
14
15 [nodes]
16 master.lab.example.com
17 node1.lab.example.com openshift_node_labels="{'region':'infra', 'node-role.kubernetes.io/compute':'true'}"
18 node2.lab.example.com openshift_node_labels="{'region':'infra', 'node-role.kubernetes.io/compute':'true'}"
19
20 [OSEv3:children]
21 masters
22 etcd
23 nodes
24 nfs
25
26#Variables needed by the prepare_install.yml playbook.
27 [nodes:vars]
28 registry_local=registry.lab.example.com
29 use_overlay2_driver=true
30 insecure_registry=false
31 run_docker_offline=true
32 docker_storage_device=/dev/vdb
33
34
35 [OSEv3:vars]
36#General Variables
37 openshift_disable_check=disk_availability,docker_storage,memory_availability
38 openshift_deployment_type=openshift-enterprise
39 openshift_release=v3.9
40 openshift_image_tag=v3.9.14
41
42#OpenShift Networking Variables
43 os_firewall_use_firewalld=true
44 openshift_master_api_port=443
45 openshift_master_console_port=443
46#default subdomain
47 openshift_master_default_subdomain=apps.lab.example.com
48
49#Cluster Authentication Variables
50 openshift_master_identity_providers=[{'name': 'htpasswd_auth', 'login': 'true', 'challenge': 'true', 'kind': 'HTPasswdPasswordIdentityProvider', 'filename': '/etc/origin/master/htpasswd'}]
51 openshift_master_htpasswd_users={'admin': '$apr1$4ZbKL26l$3eKL/6AQM8O94lRwTAu611', 'developer': '$apr1$4ZbKL26l$3eKL/6AQM8O94lRwTAu611'}
52
53#Need to enable NFS
54 openshift_enable_unsupported_configurations=true
55#Registry Configuration Variables
56 openshift_hosted_registry_storage_kind=nfs
57 openshift_hosted_registry_storage_access_modes=['ReadWriteMany']
58 openshift_hosted_registry_storage_nfs_directory=/exports
59 openshift_hosted_registry_storage_nfs_options='*(rw,root_squash)'
60 openshift_hosted_registry_storage_volume_name=registry
61 openshift_hosted_registry_storage_volume_size=40Gi
62
63#etcd Configuration Variables
64 openshift_hosted_etcd_storage_kind=nfs
65 openshift_hosted_etcd_storage_nfs_options="*(rw,root_squash,sync,no_wdelay)"
66 openshift_hosted_etcd_storage_nfs_directory=/exports
67 openshift_hosted_etcd_storage_volume_name=etcd-vol2
68 openshift_hosted_etcd_storage_access_modes=["ReadWriteOnce"]
69 openshift_hosted_etcd_storage_volume_size=1G
70 openshift_hosted_etcd_storage_labels={'storage': 'etcd'}
71
72#Modifications Needed for a Disconnected Install
73 oreg_url=registry.lab.example.com/openshift3/ose-${component}:${version}
74 openshift_examples_modify_imagestreams=true
75 openshift_docker_additional_registries=registry.lab.example.com
76 openshift_docker_blocked_registries=registry.access.redhat.com,docker.io
77 openshift_web_console_prefix=registry.lab.example.com/openshift3/ose-
78 openshift_cockpit_deployer_prefix='registry.lab.example.com/openshift3/'
79 openshift_service_catalog_image_prefix=registry.lab.example.com/openshift3/ose-
80 template_service_broker_prefix=registry.lab.example.com/openshift3/ose-
81 ansible_service_broker_image_prefix=registry.lab.example.com/openshift3/ose-
82 ansible_service_broker_etcd_image_prefix=registry.lab.example.com/rhel7/
83 [student@workstation review-install]$ lab review-install verify #本环境使用脚本验证
1.9 安装OpenShift Ansible playbook
1 [student@workstation review-install]$ rpm -qa | grep atomic-openshift-utils2 [student@workstation review-install]$ sudo yum -y install atomic-openshift-utils
1.10 Ansible安装OpenShift
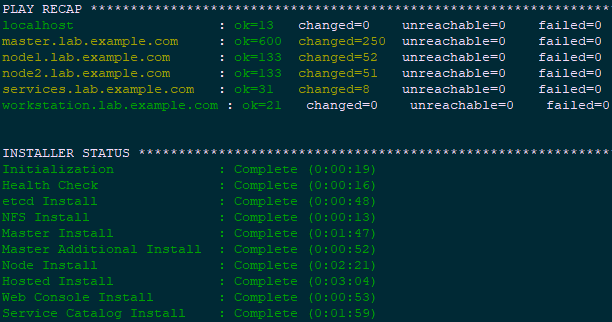
1 [student@workstation review-install]$ ansible-playbook \2 /usr/share/ansible/openshift-ansible/playbooks/prerequisites.yml

1 [student@workstation review-install]$ ansible-playbook \2 /usr/share/ansible/openshift-ansible/playbooks/deploy_cluster.yml
1.11 确认验证
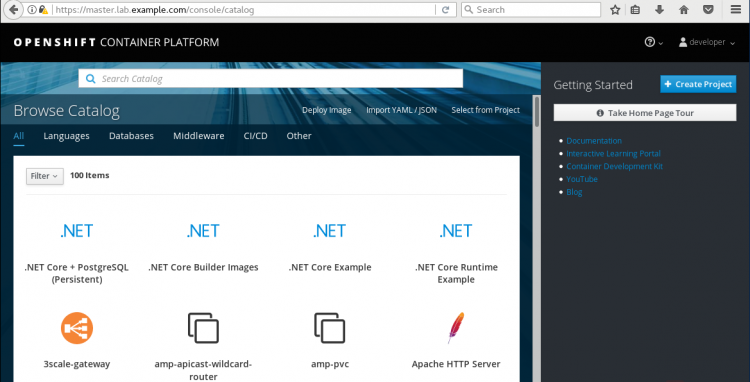
通过web控制台使用developer用户访问https://master.lab.example.com,验证集群已成功配置。
1.12 授权
1 [student@workstation review-install]$ ssh root@master2 [root@master ~]# oc whoami
3 system:admin
4 [root@master ~]# oc adm policy add-cluster-role-to-user cluster-admin admin
提示:master节点的root用户,默认为集群管理员。
1.13 登录测试
1 [student@workstation ~]$ oc login -u admin -p redhat \2 https://master.lab.example.com
3 [student@workstation ~]$ oc get nodes #验证节点情况

1.14 验证pod
1 [student@workstation ~]$ oc get pods -n default #查看内部pod

1.15 测试S2I
1 [student@workstation ~]$ oc login -u developer -p redhat \2 https://master.lab.example.com
3 [student@workstation ~]$ oc new-project test-s2i #创建项目
4 [student@workstation ~]$ oc new-app --name=hello \
5 php:5.6~http://services.lab.example.com/php-helloworld
1.16 测试服务
1 [student@workstation ~]$ oc get pods #查看部署情况2 NAME READY STATUS RESTARTS AGE
3 hello-1-build 1/1 Running 0 39s
4 [student@workstation ~]$ oc expose svc hello #暴露服务
5 [student@workstation ~]$ curl hello-test-s2i.apps.lab.example.com #测试访问
6 Hello, World! php version is 5.6.25
1.17 实验判断
1 [student@workstation ~]$ lab review-install grade #本环境使用脚本判断2 [student@workstation ~]$ oc delete project test-s2i #删除测试项目
实验二 部署一个应用
2.1 前置准备
1 [student@workstation ~]$ lab review-deploy setup2.2 应用规划
部署一个TODO LIST应用,包含以下三个容器:
一个MySQL数据库容器,它在TODO列表中存储关于任务的数据。
一个Apache httpd web服务器前端容器(todoui),它具有应用程序的静态HTML、CSS和Javascript。
基于Node.js的API后端容器(todoapi),将RESTful接口公开给前端容器。todoapi容器连接到MySQL数据库容器来管理应用程序中的数据
2.3 设置策略
1 [student@workstation ~]$ oc login -u admin -p redhat https://master.lab.example.com2 [student@workstation ~]$ oc adm policy remove-cluster-role-from-group \
3 self-provisioner system:authenticated system:authenticated:oauth
4#将项目创建限制为仅集群管理员角色,普通用户不能创建新项目。
2.4 创建项目
1 [student@workstation ~]$ oc new-project todoapp2 [student@workstation ~]$ oc policy add-role-to-user edit developer #授予developer用户可访问权限的角色edit
2.5 设置quota
1 [student@workstation ~]$ oc project todoapp2 [student@workstation ~]$ oc create quota todoapp-quota --hard=pods=1 #设置pod的quota
2.6 创建应用
1 [student@workstation ~]$ oc login -u developer -p redhat \2 https://master.lab.example.com #使用developer登录
3 [student@workstation ~]$ oc new-app --name=hello \
4 php:5.6~http://services.lab.example.com/php-helloworld #创建应用
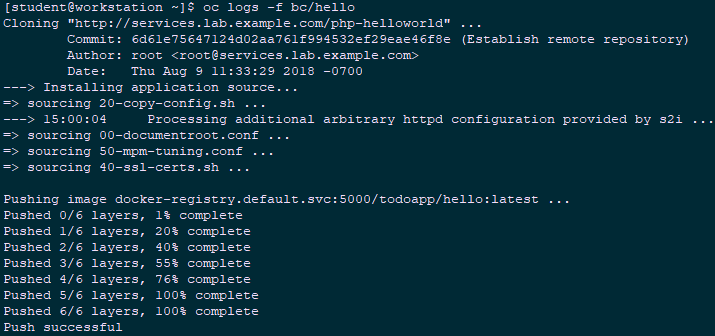
5 [student@workstation ~]$ oc logs -f bc/hello #查看build log
2.7 查看部署
1 [student@workstation ~]$ oc get pods2 NAME READY STATUS RESTARTS AGE
3 hello-1-build 0/1 Completed 0 2m
4 hello-1-deploy 1/1 Running 0 1m
5 [student@workstation ~]$ oc get events
6 ……
7 2m 2m 7 hello.15b54ba822fc1029 DeploymentConfig
8 Warning FailedCreate deployer-controller Error creating deployer pod: pods "hello-1-deploy" is forbidden: exceeded quota: todoapp-quota, requested: pods=1, used: pods=1, limited: pods=
9 [student@workstation ~]$ oc describe quota
10 Name: todoapp-quota
11 Namespace: todoapp
12 Resource Used Hard
13 -------- ---- ----
14 pods 1 1
结论:由于pod的硬quota限制,导致部署失败。
2.8 扩展quota
1 [student@workstation ~]$ oc rollout cancel dc hello #修正quota前取消dc2 [student@workstation ~]$ oc login -u admin -p redhat
3 [student@workstation ~]$ oc project todoapp
4 [student@workstation ~]$ oc patch resourcequota/todoapp-quota --patch '{"spec":{"hard":{"pods":"10"}}}'
提示:也可以使用oc edit resourcequota todoapp-quota命令修改quota配置。
1 [student@workstation ~]$ oc login -u developer -p redhat2 [student@workstation ~]$ oc describe quota #确认quota
3 Name: todoapp-quota
4 Namespace: todoapp
5 Resource Used Hard
6 -------- ---- ----
7 pods 0 10
2.9 重新部署
1 [student@workstation ~]$ oc rollout latest dc/hello2 [student@workstation ~]$ oc get pods #确认部署成功
3 NAME READY STATUS RESTARTS AGE
4 hello-1-build 0/1 Completed 0 9m
5 hello-2-qklrr 1/1 Running 0 12s
6 [student@workstation ~]$ oc delete all -l app=hello #删除hello
2.10 配置NFS
1 [kiosk@foundation0 ~]$ ssh root@services2 [root@services ~]# mkdir -p /var/export/dbvol
3 [root@services ~]# chown nfsnobody:nfsnobody /var/export/dbvol
4 [root@services ~]# chmod 700 /var/export/dbvol
5 [root@services ~]# echo "/var/export/dbvol *(rw,async,all_squash)" > /etc/exports.d/dbvol.exports
6 [root@services ~]# exportfs -a
7 [root@services ~]# showmount -e
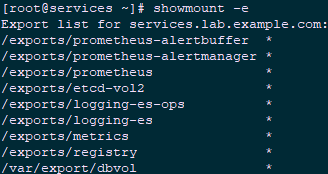
提示:本实验使用services上的NFS提供的共享存储为后续实验提供持久性存储。
2.11 测试NFS
1 [kiosk@foundation0 ~]$ ssh root@node12 [root@node1 ~]# mount -t nfs services.lab.example.com:/var/export/dbvol /mnt
3 [root@node1 ~]# ls -la /mnt ; mount | grep /mnt #测试是否能正常挂载
提示:建议node2做同样测试,测试完毕需要卸载,后续使用持久卷会自动进行挂载。
2.12 创建PV
1 [student@workstation ~]$ vim /home/student/DO280/labs/review-deploy/todoapi/openshift/mysql-pv.yaml2 apiVersion: v1
3 kind: PersistentVolume
4 metadata:
5name: mysql-pv
6 spec:
7 capacity:
8 storage: 2G
9 accessModes:
10 - ReadWriteMany
11 nfs:
12path: /var/export/dbvol
13 server: services.lab.example.com
14 [student@workstation ~]$ oc login -u admin -p redhat
15 [student@workstation ~]$ oc create -f /home/student/DO280/labs/review-deploy/todoapi/openshift/mysql-pv.yaml
16 [student@workstation ~]$ oc get pv

2.13 导入模板
1 [student@workstation ~]$ oc apply -n openshift -f /home/student/DO280/labs/review-deploy/todoapi/openshift/nodejs-mysql-template.yaml提示:模板文件见附件。
2.14 使用dockerfile创建image
1 [student@workstation ~]$ vim /home/student/DO280/labs/review-deploy/todoui/Dockerfile2 FROM rhel7:7.5
3
4 MAINTAINER Red Hat Training <training@redhat.com>
5
6# DocumentRoot for Apache
7 ENV HOME /var/www/html
8
9# Need this for installing HTTPD from classroom yum repo
10 ADD training.repo /etc/yum.repos.d/training.repo
11 RUN yum downgrade -y krb5-libs libstdc++ libcom_err && \
12 yum install -y --setopt=tsflags=nodocs \
13 httpd \
14 openssl-devel \
15 procps-ng \
16 which && \
17 yum clean all -y && \
18 rm -rf /var/cache/yum
19
20# Custom HTTPD conf file to log to stdout as well as change port to 8080
21 COPY conf/httpd.conf /etc/httpd/conf/httpd.conf
22
23# Copy front end static assets to HTTPD DocRoot
24 COPY src/ ${HOME}/
25
26# We run on port 8080 to avoid running container as root
27 EXPOSE 8080
28
29# This stuff is needed to make HTTPD run on OpenShift and avoid
30# permissions issues
31 RUN rm -rf /run/httpd && mkdir /run/httpd && chmod -R a+rwx /run/httpd
32
33# Run as apache user and not root
34 USER 1001
35
36# Launch apache daemon
37 CMD /usr/sbin/apachectl -DFOREGROUND
38 [student@workstation ~]$ cd /home/student/DO280/labs/review-deploy/todoui/
39 [student@workstation todoui]$ docker build -t todoapp/todoui .
40 [student@workstation todoui]$ docker images
41 REPOSITORY TAG IMAGE ID CREATED SIZE
42 todoapp/todoui latest 0249e1c69e38 39 seconds ago 239 MB
43 registry.lab.example.com/rhel7 7.5 4bbd153adf84 12 months ago 201 MB
2.15 推送仓库
1 [student@workstation todoui]$ docker tag todoapp/todoui:latest \2 registry.lab.example.com/todoapp/todoui:latest
3 [student@workstation todoui]$ docker push \
4 registry.lab.example.com/todoapp/todoui:latest
提示:将从dockerfile创建的image打标,然后push至内部仓库。
2.16 导入IS
1 [student@workstation todoui]$ oc whoami -c2 todoapp/master-lab-example-com:443/admin
3 [student@workstation todoui]$ oc import-image todoui \
4 --from=registry.lab.example.com/todoapp/todoui \
5 --confirm -n todoapp #将docker image导入OpenShift的Image Streams
6 [student@workstation todoui]$ oc get is -n todoapp
7 NAME DOCKER REPO TAGS UPDATED
8 todoui docker-registry.default.svc:5000/todoapp/todoui latest 13 seconds ago
9 [student@workstation todoui]$ oc describe is todoui -n todoapp #查看is

2.17 创建应用
浏览器登录https://master.lab.example.com,选择todoapp的项目。
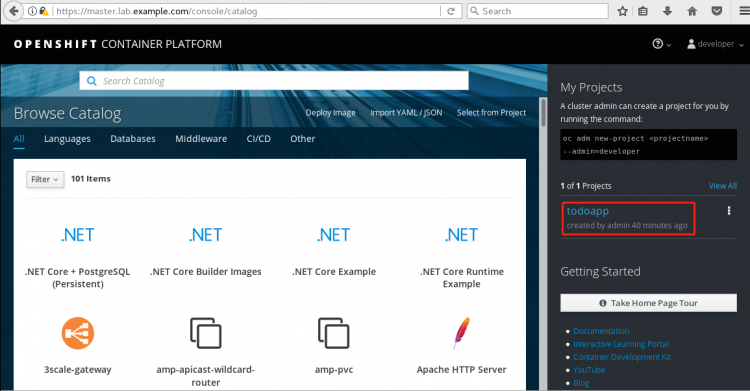
查看目录。
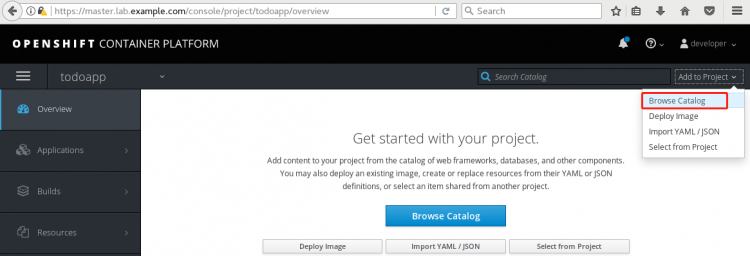
语言——>JavaScript——Node.js + MySQL (Persistent)。
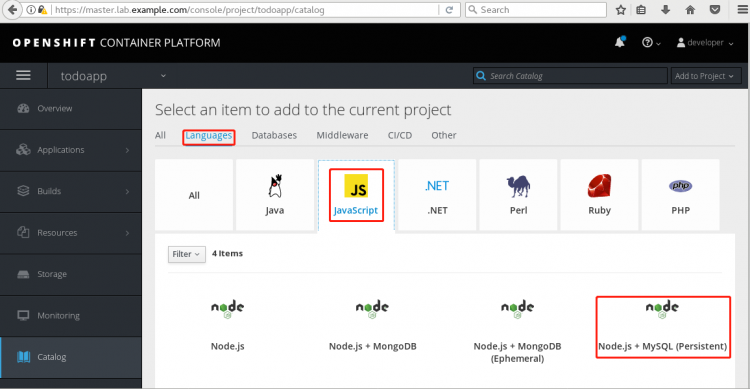
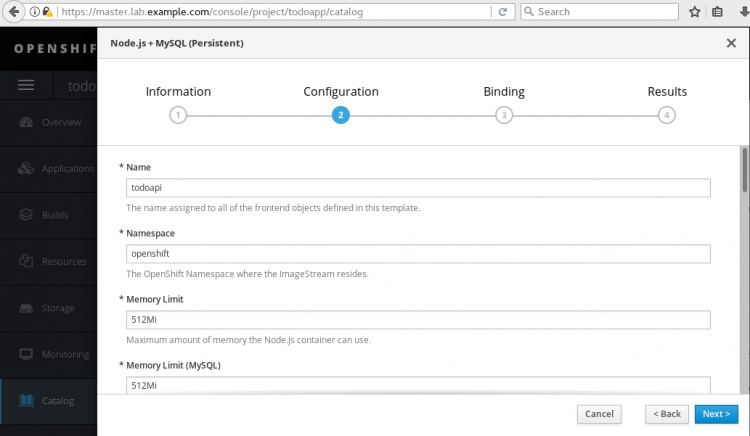
参考下表建立应用:
名称 | 值 |
Git Repository URL | http://services.lab.example.com/todoapi |
Application Hostname | todoapi.apps.lab.example.com |
MySQL Username | todoapp |
MySQL Password | todoapp |
Database name | todoappdb |
Database Administrator Password | redhat |
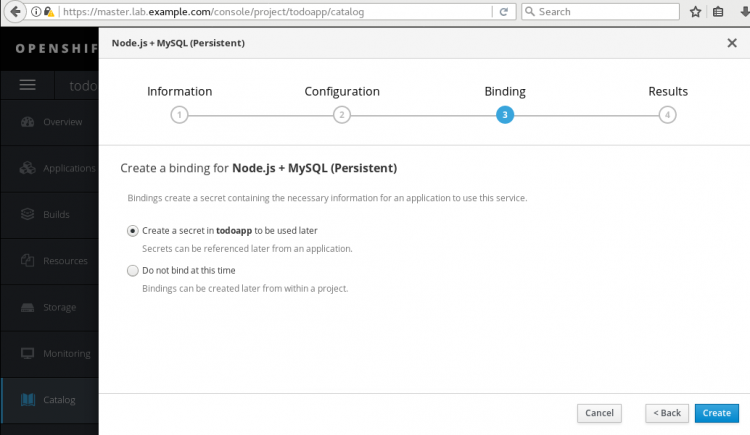
create进行创建。
Overview进行查看。
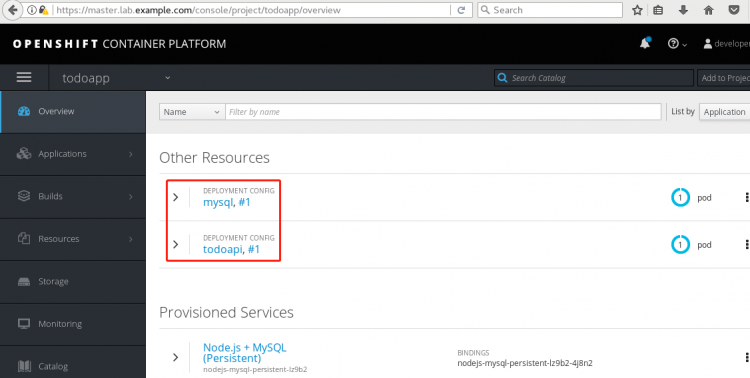
2.18 测试数据库
1 [student@workstation ~]$ oc port-forward mysql-1-6hq4d 3306:3306 #保持端口转发2 [student@workstation ~]$ mysql -h127.0.0.1 -u todoapp -ptodoapp todoappdb < /home/student/DO280/labs/review-deploy/todoapi/sql/db.sql
3#导入测试数据至数据库
4 [student@workstation ~]$ mysql -h127.0.0.1 -u todoapp -ptodoapp todoappdb -e "select id, description, case when done = 1 then 'TRUE' else 'FALSE' END as done from Item;"
5#查看是否导入成功
2.19 访问测试
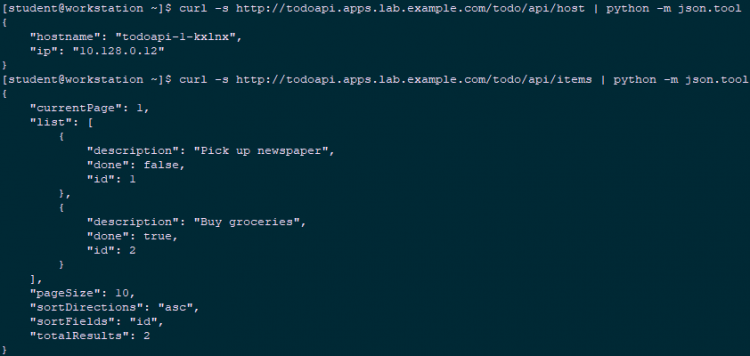
1 [student@workstation ~]$ curl -s http://todoapi.apps.lab.example.com/todo/api/host | python -m json.tool #curl访问2 {
3 "hostname": "todoapi-1-kxlnx",
4 "ip": "10.128.0.12"
5 }
6 [student@workstation ~]$ curl -s http://todoapi.apps.lab.example.com/todo/api/items | python -m json.tool #curl访问
2.20 创建应用
1 [student@workstation ~]$ oc new-app --name=todoui -i todoui #使用todoui is创建应用2 [student@workstation ~]$ oc get pods
3 NAME READY STATUS RESTARTS AGE
4 mysql-1-6hq4d 1/1 Running 0 9m
5 todoapi-1-build 0/1 Completed 0 9m
6 todoapi-1-kxlnx 1/1 Running 0 8m
7 todoui-1-wwg28 1/1 Running 0 32s
2.21 暴露服务
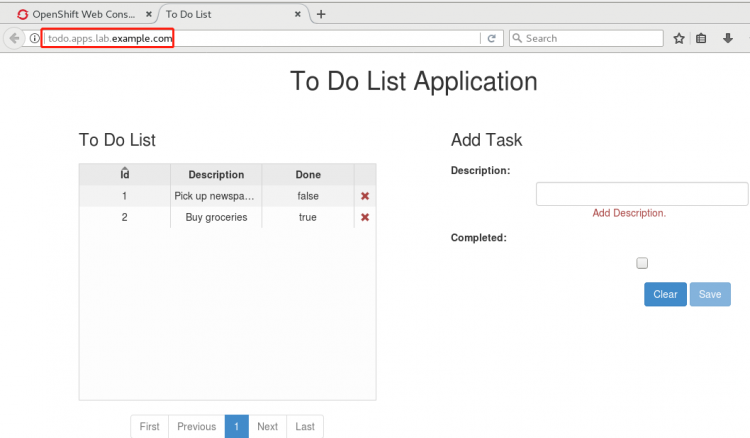
1 [student@workstation ~]$ oc expose svc todoui --hostname=todo.apps.lab.example.com浏览器访问:http://todo.apps.lab.example.com
2.22 实验判断
1 [student@workstation ~]$ lab review-deploy grade #本环境使用脚本判断
以上是 010.OpenShiefc综合实验及应用 的全部内容, 来源链接: utcz.com/a/60876.html

