noobsu系统下安装jdk1.5.4
- 一.下载/更新php源
- 二.安装php7.4
三.修改配置
- 3.1 修改www.conf 文件
- 四.配置域名
五.nginx的配置文件
- 5.1 sock方式和nginx配合工作
- 5.2监听9000端口和nginx配合工作(推荐)
视频地址
原文地址
一.下载/更新php源
打开下载网址
https://launchpad.net/~ondrej/+archive/ubuntu/php
先安装一下这个命令
add-apt-repositoryapt-get install software-properties-common
添加第三方源:
add-apt-repository ppa:ondrej/php
更新本地源
apt-get update
二.安装php7.4
安装
apt-get install php7.4 php7.4-fpm php7.4-mysql php7.4-gd php7.4-mbstring
选择6. Asia
选择70. Shanghai
启动php
service php7.4-fpm start #启动fpm
查看进程
root@7c609eaf61d3:/etc/init.d# ps aux|grep phproot 11864 0.0 0.0 342724 10104 ? Ss 07:05 0:00 php-fpm: master process (/etc/php/7.4/fpm/php-fpm.conf)
www-data 11865 0.0 0.0 345020 9672 ? S 07:05 0:00 php-fpm: pool www
www-data 11866 0.0 0.0 345020 9672 ? S 07:05 0:00 php-fpm: pool www
root 11868 0.0 0.0 11464 1004 pts/1 S+ 07:06 0:00 grep --color=auto php
查看版本
root@7c609eaf61d3:/etc/init.d# php -v #查看进程PHP 7.4.8 (cli) (built: Jul 13 2020 16:45:47) ( NTS )
Copyright (c) The PHP Group
Zend Engine v3.4.0, Copyright (c) Zend Technologies
with Zend OPcache v7.4.8, Copyright (c), by Zend Technologies
安装php主要的就三个
phpcli #命令行
php7.4-fpm #和nginx配合的多进程管理 多数使用这个
module #和apache配合的
查看监听的端口
安装net-tools
可以用altupn命令查看监听的端口
apt-get install net-toolsroot@7c609eaf61d3:/etc/init.d# netstat -altupn|grep 9000
root@7c609eaf61d3:/etc/init.d# netstat -altupn|grep 80
tcp 0 0 0.0.0.0:80 0.0.0.0:* LISTEN 23/nginx: master pr
tcp 0 0 172.17.0.3:47020 124.200.113.110:80 TIME_WAIT -
tcp6 0 0 :::80 :::* LISTEN 23/nginx: master pr
以上可以看到9000端口没有被监听,只监听了80端口fpm监听有两种方式
- a.监听端口,一般为9000端口
- b.监听socket
三.修改配置
3.1 修改www.conf 文件
vim /etc/php/7.4/fpm/pool.d/www.conf
/listen = #可以找到监听方式 listen = /run/php/php7.4-fpm.sock
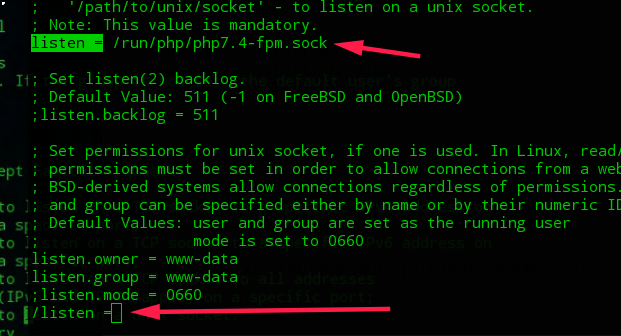
说明默认使用sock方式配合nginx方式工作
修改以下几处配置
1.打开在控制台显示php的错误
;php_flag[display_errors] = off 改为 php_flag[display_errors] = on
;php_admin_flag[log_errors] = on 改为 php_admin_flag[log_errors] = on
2.打开日志
;access.log = log/$pool.access.log 改为 access.log = log/$pool.access.log
打开日志后,需要新建日志文件/usr/log/www.access.log,
/var/log/php7.4-fpm.log文件里
mkdir -p /usr/log
vim /usr/log/www.access.log
保存并退出
如果没有这个文件,php会启动不了,不报错,错误日志会写入日志文件,
cat /etc/php/7.4/fpm/php-fpm.conf里可以查到php错误日志会写会
error_log = /var/log/php7.4-fpm.log
四.配置域名
vim /etc/hosts
127.0.0.1 phptest.haimait.hm
五.nginx的配置文件
5.1 sock方式和nginx配合工作
修改php监听方式
vim /etc/php/7.4/fpm/pool.d/www.conf这里我们使用监听
sock的方式配合nginx工作listen = /run/php/php7.4-fpm.sock重启php
service php7.4-fpm reload修改nginx配置文件
vim /etc/nginx/conf.d/phptest.haimait.hm.confserver {listen 80;
server_name phptest.haimait.hm;
access_log /var/log/nginx/phptest.haimait.hm.access.log;
error_log /var/log/nginx/phptest.haimait.hm.error.log;
root /wwwroot/html/phptest;
location / {
index index.php index.html index.htm;
}
location ~ \.php$ {
root /wwwroot/html/phptest;
#fastcgi_pass这里的路径要的/etc/php/7.4/fpm/pool.d/www.conf 里listen = 里的配置的一致
fastcgi_pass unix:/run/php/php7.4-fpm.sock;
#fastcgi_pass 127.0.0.1:9000;
fastcgi_index index.php;
fastcgi_param SCRIPT_FILENAME $document_root$fastcgi_script_name; #�user root
#fastcgi_param SCRIPT_FILENAME /scripts$fastcgi_script_name;
include fastcgi_params;
}
}
保存退出后
重启nginx
root@7c609eaf61d3:/etc/nginx/conf.d# service nginx restart* Restarting nginx nginx
curl测试
curl http://127.0.0.1/index.php 测试成功
5.2监听9000端口和nginx配合工作(推荐)
修改php监听方式
vim /etc/php/7.4/fpm/pool.d/www.conf这里我们改为使用监听9000端口的方式配合nginx
listen = /run/php/php7.4-fpm.sock改为listen = 127.0.0.1重启php
service php7.4-fpm reload修改nginx配置文件
vim /etc/nginx/conf.d/phptest.haimait.hm.conf
server {listen 80;
server_name phptest.haimait.hm;
access_log /var/log/nginx/phptest.haimait.hm.access.log;
error_log /var/log/nginx/phptest.haimait.hm.error.log;
root /wwwroot/html/phptest;
location / {
index index.php index.html index.htm;
}
location ~ \.php$ {
root /wwwroot/html/phptest;
#fastcgi_pass这里的路径要的/etc/php/7.4/fpm/pool.d/www.conf 里listen = 里的配置的一致
#fastcgi_pass unix:/run/php/php7.4-fpm.sock;
fastcgi_pass 127.0.0.1:9000;
fastcgi_index index.php;
fastcgi_param SCRIPT_FILENAME $document_root$fastcgi_script_name; #�user root
#fastcgi_param SCRIPT_FILENAME /scripts$fastcgi_script_name;
include fastcgi_params;
}
}
保存退出后
- 重启nginx
root@7c609eaf61d3:/etc/nginx/conf.d# service nginx restart* Restarting nginx nginx
curl测试
curl http://127.0.0.1/index.php 测试成功
以上是 noobsu系统下安装jdk1.5.4 的全部内容, 来源链接: utcz.com/a/57649.html


