Deno从零到架构级系列(二)——注解路由

上回介绍了Deno的基本安装、使用。基于oak框架搭建了控制层、路由层、对入口文件进行了改造。那这回我们接着继续改造路由,模拟springmvc实现注解路由。
装饰器模式
装饰者模式(decorator),就是给对象动态添加职责的方式称为装饰者模式。直接先上例子:
// 新建文件fox.ts// 创建一个fox类
class Fox {
// skill方法,返回狐狸会跑的字样,假设就是构建了狐狸类都会跑的技能
skill() {
return '狐狸会跑。'
}
}
// 创建一个flyingfox类
class Flyingfox {
private fox: any
// 构造方法,传入要装饰的对象
constructor(fox: any) {
this.fox = fox;
// 这里直接打印该类的skill方法返回值
console.log(this.skill())
}
// 该类的skill方法
skill() {
// 在这里获取到了被装饰者
let val = this.fox.skill();
// 这里简单的加字符串,假设给被装饰者加上了新的技能
return val + '再加一对翅膀,就会飞啦!'
}
}
// new一个fox对象
let fox = new Fox();
// 打印结果为:狐狸会跑。再加一对翅膀,就会飞啦!
new Flyingfox(fox);
直接运行deno run fox.ts就会打印结果啦。这是一个非常简单的装饰者模式例子,我们继续往下,用TS的注解来实现这个例子。

TypeScript装饰器配置
因为deno本来就支持TS,但用TS实现装饰器,需要先配置。在根目录新建配置文件tsconfig.json,配置文件如下:
{"compilerOptions": {
"allowJs": true,
"module": "esnext",
"emitDecoratorMetadata": true,
"experimentalDecorators": true
}
}
TS装饰器
这里提一下,注解和装饰器是两个东西,对于不同的语言来讲,功能不同。
- 注解(Annotation):仅提供附加元数据支持,并不能实现任何操作。需要另外的 Scanner 根据元数据执行相应操作。
- 装饰器(Decorator):仅提供定义劫持,能够对类及其方法的定义并没有提供任何附加元数据的功能。
我一直称注解称习惯了。大家理解就好。
TypeScript装饰器是一种函数,写法:@ + 函数名。作用于类和类方法前定义。 还是拿上面的例子来改写,如下
@Flyingfoxclass Fox {}
// 等同于
class Fox {}
Fox = Flyingfox(Fox) || Fox;
很多小伙伴经常看到这样的写法,如下:
function Flyingfox(...list) {return function (target: any) {
Object.assign(target.prototype, ...list)
}
}
这样在装饰器外面再封装一层函数,好处是便于传参数。基本语法掌握了,我们就来实战一下,实战中才知道更深层次的东东。
装饰器修饰类class
装饰器可以修饰类,也可以修饰方法。我们先来看修饰类的例子,如下:
// test.ts// 定义一个Time方法
function Time(ms: string){
console.log('1-第一步')
// 这里的target就是你要修饰的那个类
return function(target: Function){
console.log(`4-第四步,${value}`)
}
}
// 定义一个Controller方法,也是个工厂函数
function Controller(path: string) {
console.log('2-第二步')
return function(target: Function){
console.log(`3-第三步,${value}`)
}
}
@Time('计算时间')
@Controller('这是controller')
class Controller {
}
// 运行:deno run -c tsconfig.json ./test.ts
// 1-第一步
// 2-第二步
// 3-第三步, 这是controller
// 4-第四步, 计算时间
有疑问的小伙伴可以console出来看看这个target。 这里要注意三个点:
- 运行命令:deno run -c tsconfig.json ./test.ts,这里的-c是执行ts配置文件,注意是json文件
- 外层工厂函数的执行顺序:从上到下依次执行。
- 装饰器函数的执行顺序:从下到上依次执行。
TS注解路由
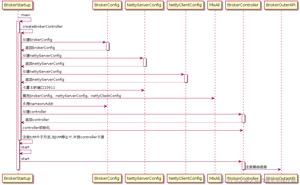
好啦,下面我们接着上一回的内容,正式改造注解路由了。oak和以前koa、express改造思路都一样。改造之前,按照路由分发请求流程,如下图:

改造之后,我们的流程如下图。

新建decorators文件夹,包含三个文件,如下:
// decorators/router.ts// 这里统一引入oak框架
import { Application, Router } from 'https://deno.land/x/[email protected]/mod.ts'
// 统一导出oak的app和router,这里的其实可以单独放一个文件,因为还有入口文件server.ts会用到
export const app: Application = new Application();
export const router: Router = new Router();
// 路由前缀,这里其实应该放到配置文件
const prefix: string = '/api'
// 构建一个map,用来存放路由
const routeMap: Map<{target: any, method: string, path: string}, Function | Function[]> = new Map()
// 这里就是我们作用于类的修饰器
export function Controller (root: string): Function {
return (target: any) => {
// 遍历所有路由
for (let [conf, controller] of routeMap) {
// 这里是判断如果类的路径是@Controller('/'),否则就跟类方法上的路径合并
conf.path = prefix + (root === '/' ? conf.path : `${root}${conf.path}`)
// 强制controller为数组
let controllers = Array.isArray(controller) ? controller : [controller]
// 这里是最关键的点,也就是分发路由
controllers.forEach((controller) => (router as any)[conf.method.toLowerCase()](conf.path, controller))
}
}
}
这里就是类上的路由了,每一行我都加了注释。给小伙伴们一个建议,哪里不明白,就在哪里console一下。 这里用的Map来存放路由,其实用反射更好,只是原生的reflect支持比较少,需要额外引入reflect的文件。有兴趣可以去看alosaur框架的实现方式。
// decorators/index.tsexport * from "./router.ts";
export * from "./controller.ts";
这个其实没什么好讲的了,就是入口文件,把该文件夹下的文件导出。这里的controller.ts先留个悬念,放到彩蛋讲。 接着改造控制层,代码如下:
// controller/bookController.tsimport { Controller } from "../decorators/index.ts";
// 这里我们假装是业务层过来的数据
const bookService = new Map<string, any>();
bookService.set("1", {
id: "1",
title: "听飞狐聊deno",
author: "飞狐",
});
// 这里是类的装饰器
@Controller('/book')
export default class BookController {
getbook (context: any) {
context.response.body = Array.from(bookService.values());
}
getbookById (context: any) {
if (context.params && context.params.id && bookService.has(context.params.id)) {
context.response.body = bookService.get(context.params.id);
}
}
}
接着改造项目入口文件server.ts
// server.ts// 这里的loadControllers先不管,彩蛋会讲
import { app, router, loadControllers } from './decorators/index.ts'
class Server {
constructor () {
this.init()
}
async init () {
// 这里就是导入所有的controller,这里的controller是控制层文件夹的名称
await loadControllers('controller');
app.use(router.routes());
app.use(router.allowedMethods());
this.listen()
}
async listen () {
// await app.listen({ port: 8000 });
setTimeout(async () => {
await app.listen({ port: 8000 })
}, 1);
}
}
new Server()
好啦,整个类的装饰器改造就结束了。整个项目目录结构如下:

先不着急运行,虽然运行也会成功,但啥都做不了,为啥呢? 因为类方法的路由还没有做,不卖关子了,接下来做类方法的装饰器。
TS类方法的装饰器
还是先从代码上来,先改造控制层,如下:
// controller/bookController.tsconst bookService = new Map<string, any>();
bookService.set("1", {
id: "1",
title: "听飞狐聊deno",
author: "飞狐",
});
@Controller('/book')
export default class BookController {
// 这里就是类方法修饰器
@Get('/getbook')
getbook (context: any) {
context.response.body = Array.from(bookService.values());
}
// 这里就是类方法修饰器
@Get('/getbookById')
getbookById (context: any) {
if (context.params && context.params.id && bookService.has(context.params.id)) {
context.response.body = bookService.get(context.params.id);
}
}
}
类方法修饰器实现,这里就只讲解有改动的地方,如下:
// decorators/router.tsimport { Application, Router } from 'https://deno.land/x/[email protected]/mod.ts'
// 这里是TS的枚举
enum MethodType {
GET='GET',
POST='POST',
PUT='PUT',
DELETE='DELETE'
}
export const app: Application = new Application();
export const router: Router = new Router();
const prefix: string = '/api'
const routeMap: Map<{target: any, method: string, path: string}, Function | Function[]> = new Map()
export function Controller (root: string): Function {
return (target: any) => {
for (let [conf, controller] of routeMap) {
conf.path = prefix + (root === '/' ? conf.path : `${root}${conf.path}`)
let controllers = Array.isArray(controller) ? controller : [controller]
controllers.forEach((controller) => (router as any)[conf.method.toLowerCase()](conf.path, controller))
}
}
}
// 这里就是http请求工厂函数,传入的type就是http的get、post等
function httpMethodFactory (type: MethodType) {
// path是类方法的路径,如:@Get('getbook'),这个path就是指getbook。
// 类方法修饰器传入三个参数,target是方法本身,key是属性名
return (path: string) => (target: any, key: string, descriptor: any) => {
// 第三个参数descriptor我们这里不用,但是还是讲解一下,对象的值如下:
// {
// value: specifiedFunction,
// enumerable: false,
// configurable: true,
// writable: true
// };
(routeMap as any).set({
target: target.constructor,
method: type,
path: path,
},
target[key])
}
}
export const Get = httpMethodFactory(MethodType.GET)
export const Post = httpMethodFactory(MethodType.POST)
export const Delete = httpMethodFactory(MethodType.DELETE)
export const Put = httpMethodFactory(MethodType.PUT)
到这里,注解路由就改造完了。但是,这个时候请大家跳到彩蛋把导入文件的方法补上。然后一气呵成的运行入口文件,就大功告成了。

彩蛋
这里的彩蛋部分,其实是一个deno的导入文件方法,代码如下:
// decorators/controller.tsexport async function loadControllers (controllerPath: string) {
try {
for await (const dirEntry of Deno.readDirSync(controllerPath)) {
import(`../${controllerPath}/${dirEntry.name}`);
}
} catch (error) {
console.error(error)
console.log("no such file or dir :---- " + controllerPath)
}
}
这里的readDirSync就是读取传入的文件夹路径,然后用import导入迭代的文件。
解决Deno的bug
另外大家如果在1.2以前的版本遇到报错如下:
Error: Another accept task is ongoing不要着急,这个是deno的错误。解决方法如下:
async listen () {// await app.listen({ port: 8000 });
setTimeout(async () => {
await app.listen({ port: 8000 })
}, 1);
}
找到入口文件,在监听端口方法加个setTimeout就可以搞定了。之前deno官方的issue,很多人在提这个bug。飞狐在此用点特殊的手法解决了。嘿嘿~

下回预告
学会了TS装饰器可以做的很多,比如:请求参数注解、日志、权限判断等等。回顾一下,这篇的内容比较多,也比较深入。大家可以好好消化一下,概括一下:
- 装饰者模式
- TS类的装饰器,TS类方法的装饰器
- 文件夹的导入,文件的引入
下回我们讲全局错误处理,借鉴alosaur做异常处理。有任何问题大家可以在评论区留言~
Ta-ta for now ヾ( ̄▽ ̄)
以上是 Deno从零到架构级系列(二)——注解路由 的全部内容, 来源链接: utcz.com/a/47626.html