git commit 规范指北
Git Hooks 简介
Git 本身除了代码版本管理之外,还提供了 Git Hooks 钩子机制,它能够让我们在 commit、push 之前(后)执行一些自定义的操作。
在每个 Git 项目根目录下,都会有一个隐藏的 .git 目录,其中 hooks 目录中提供了许多默认的钩子脚本,去掉其默认的 .sample 后缀即可在对应的步骤执行该脚本文件。

使用 husky 改造 Git Hooks
安装
npm install -D husky安装 husky 之后,可以看到 .git/hooks 目录中文件的变化:

其中 pre-*为某一操作之前运行的脚本,post-*为某一操作之后运行的脚本。
配置
在 package.json 中加入如下配置:
// package.json{
"husky": {
"hooks": {
"pre-commit": "npm run lint",
"pre-push": "npm test",
"...": "..."
}
},
"...": "..."
}
从 1.0.0开始,husky 可以配置为 .huskyrc,.huskyrc.json,.huskyrc.yaml,huskyrc.yml,.huskyrc.js或husky.config.js文件。
// .huskyrc{
"hooks": {
"pre-commit": "npm run lint"
}
}
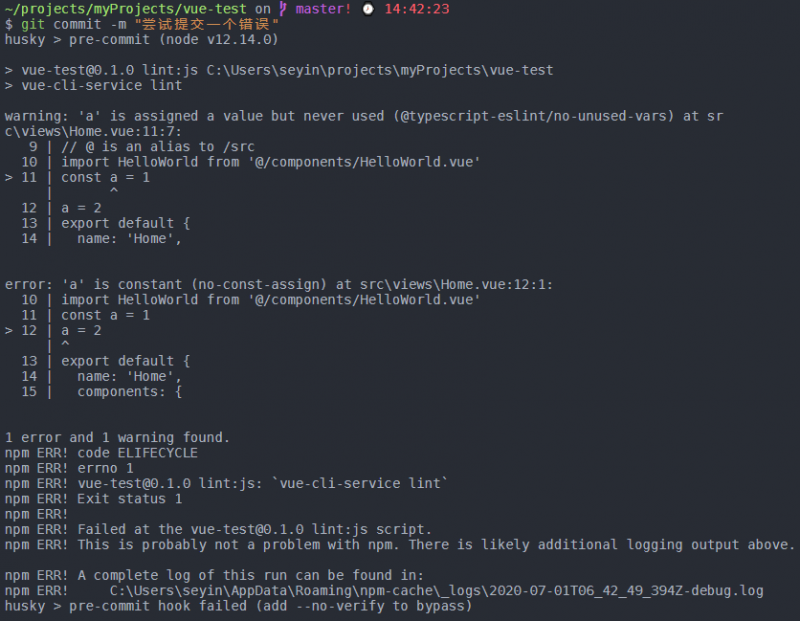
现在,每次 commit 之前都会运行 npm run lint命令,如果存在错误(error),将不能提交代码。PS:如果只是警告(warning),会有相应的提示信息,但是是可以成功提交的。
使用 lint-staged 改进 pre-commit
上一步中,每次提交前都会检查所有代码。在大型项目中这会使得提交速度很慢。而且,这可能会导致别人的代码错误使得我们的修改无法提交。现在我们使用 lint-staged 来解决这个问题,每个团队成员提交的时候,只检查当次改动的文件。
安装
npm install -D lint-staged配置
// package.json{
"lint-staged": {
"*.vue": "vue-cli-service lint",
"*.js": "eslint",
"*.less": "stylelint",
"*.css": "stylelint",
"*.scss": "stylelint",
"*.md": "markdownlint"
},
"...": "..."
}
// .huskyrc{
"hooks": {
"pre-commit": "lint-staged"
}
}
现在,我们每次提交时都只会检查我们自己改动的文件,再也不用去给别人修复错误了😁

使用 commitlint 规范 commit messages
规范的 commit message 更有利于阅读和维护,有助于团队的 code review,提高团队工作效率。同时方便我们生成 Change log。推荐使用 Angular 规范。
安装
npm install -D @commitlint/config-conventional @commitlint/cli配置
// .huskyrc{
"husky": {
"hooks": {
"pre-commit": "lint-staged",
"commit-msg": "commitlint -E HUSKY_GIT_PARAMS"
}
}
}
// commitlint.config.jsmodule.exports = {
extends: ['@commitlint/config-conventional']
}
当我们的 commit message 不符合规范时,将无法进行提交❌

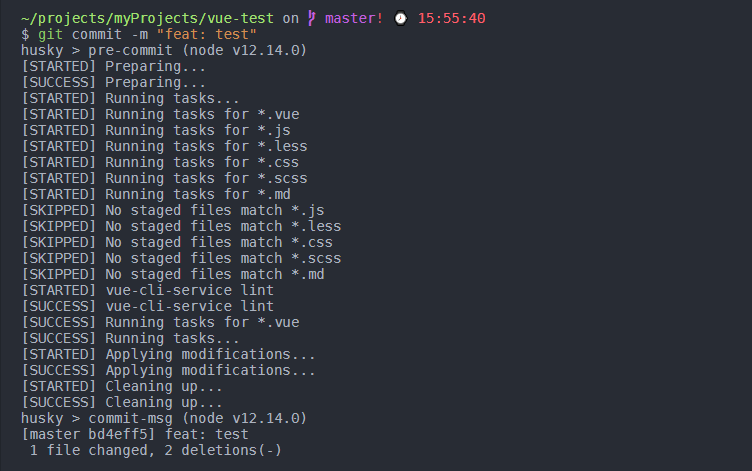
我们修改一下 commit message,使其符合 Angular 规范,再次提交✅
使用 commitizen 编写符合规范的 commit message
安装
# 全局安装npm install -g commitizen
# 项目级安装
npm install -D commitizen cz-conventional-changelog
配置
如果是全局安装,在项目目录下,运行下面的命令,使其支持 Angular 的 Commit message 格式。
commitizen init cz-conventional-changelog --save --save-exact如果是项目级安装,则需在 package.json中加入下面的配置:
{"script": {
"...": "...",
"commit": "git-cz"
},
"config": {
"commitizen": {
"path": "node_modules/cz-conventional-changelog"
}
},
"...": "..."
}
现在,在需要使用git commit命令的地方,改为使用git cz(全局安装时)或者npm run commit(项目级安装时)命令。然后在命令行中通过答题方式生成规范的 commit message。翻译如下:
Select the type of change that you're committing: (Use arrow keys)
选择要提交的更改类型:(通过上下箭头键)
- feat: A new feature
feat: 新功能
- fix: A bug fix
fix: 修复 bug
- docs: Documentation only changes
docs: 修改项目中的文档
- style: Changes that do not affect the meaning of the code (white-space, formatting, missing semi-colons, etc)
style: 不影响代码逻辑的修改(空格、格式、缺少分号等)
- refactor: A code change that neither fixes a bug nor adds a feature
refactor: 重构(除了修复 bug 和新增功能的修改)
- perf: A code change that improves performance
perf: 性能优化
- test: Adding missing tests or correcting existing tests
test: 测试代码修改
- feat: A new feature
What is the scope of this change (e.g. component or file name): (press enter to skip)
说明此次提交的影响范围(比如:视图层或者某个文件名)(回车跳过)
Write a short, imperative tense description of the change (max 95 chars):
简短描述
Provide a longer description of the change: (press enter to skip)
详细描述(回车跳过)
Are there any breaking changes? (y/N)
有没有与上个版本不兼容的更改?
Does this change affect any open issues? (y/N)
此次提交是否针对某个 issues?
使用 conventional-changelog 生成 Change log
安装
npm install -D conventional-changelog-cli配置
// package.json{
"scripts": {
"...": "..."
"changelog": "conventional-changelog -p angular -i CHANGELOG.md -s"
},
"...": "..."
}
运行npm run change log 即可在项目根目录生成 CHANGELOG.md 文档。
以上是 git commit 规范指北 的全部内容, 来源链接: utcz.com/a/29187.html


