Taro京东小程序快速上手

小程序世界纷争不断,巨型 App 都在纷纷构建自己的小程序流量入口,希望在造福商家、用户的同时,也能巩固自家流量壁垒,我们已经熟知了微信小程序、支付宝小程序,我们可能还知道已经有了头条小程序,QQ 轻应用等,今天为大家带来的是一款新型小程序,是由电商巨头京东即将发布的一款小程序,电商巨头的小程序又会为中国互联网带来怎么样的改变了?让我们拭目以待吧!而我们今天将带大家使用 Taro 来编写京东小程序,并完成可以发文章的的多页面博客小程序。
初始化项目代码
我们将使用同属于京东凹凸实验室团队研发开源的多端统一开发解决方案 -- Taro 来开发我们的京东小程序。首先我们来看一看最后的完成效果:

准备环境
手动初始化项目
确保你安装了 Node 开发环境,没有请参考图雀社区另外一篇 Node.js 文章,里面有完善的 Node.js 环境配置。
安装了最新的 Node.js 环境之后,我们使用 Node 安装时自带的包管理工具 Npm 来创建一个 Taro 项目,打开终端,运行如下命令:
$ npx @tarojs/cli init jd-mp运行上面的命令之后,你会看到终端有如下输出:
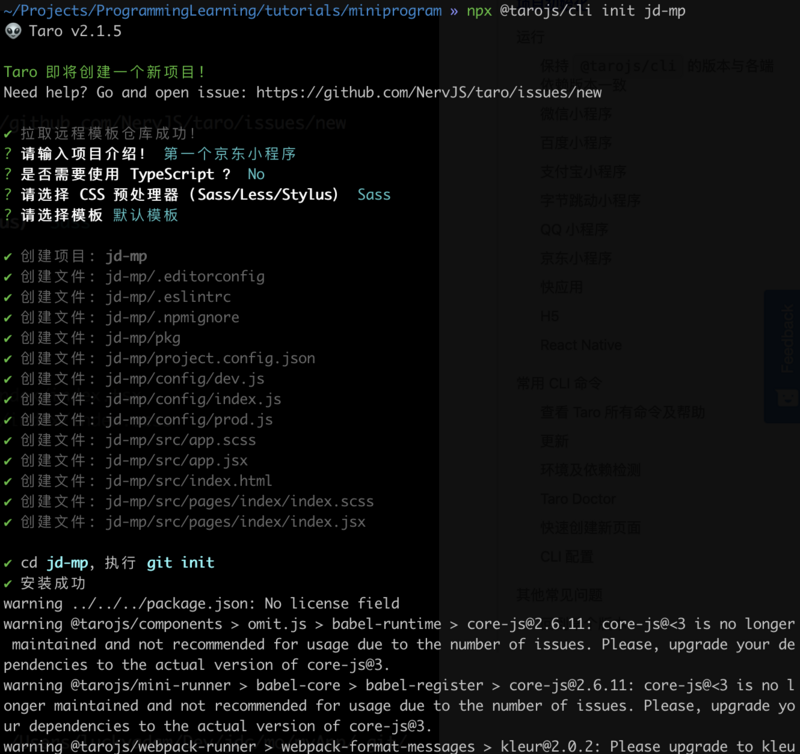
稍等一会,当终端出现如下字样时,就代表项目初始化成功啦!
yarn install v1.21.1info No lockfile found.
[1/4] Resolving packages...
[2/4] Fetching packages...
[3/4] Linking dependencies...
[4/4] Building fresh packages...
success Saved lockfile.
Done in 158.43s.
创建项目 jd-mp 成功!
请进入项目目录 jd-mp 开始工作吧!😝
可以看到,我用了 158.43s ,所以初始项目的过程可能有点长,请耐心等待,如果最后你没有看到终端出现如上的字样,那么你可能遇到了问题,可以访问 Taro 的论坛去寻求解答。
使用准备好的代码
如果你安装了 Node 环境,但是不想或者自己初始化项目是遇到了问题,那么你可以 Clone 一下我们为你准备的初始项目代码,之后跟着教程对照着这份初始代码进行改进就可以啦!
如果你偏爱 Github,那么可以运行如下命令来获取初始代码:
$ git clone https://github.com/tuture-dev/jd-miniprogram.git如果你偏爱 Gitee,那么可以运行如下命令来获取初始代码:
$ git clone https://gitee.com/tuture/jd-miniprogram.git与自己使用命令初始化 Taro 项目不同,通过 Clone 我们为你准备好的代码,你需要手动安装依赖,打开终端,输入如下命令安装依赖:
$ cd jd-miniprogram && npm install好的,通过上面的步骤,我们就准备好了初始代码,接下来就需要你实际动手写代码了,是不是有点期待呢?我们马上就可以尝试开发一个京东小程序了!
配置 JD 开发环境
安装 JD 的运行脚本
等等,因为京东小程序才刚刚出来,还没有正式开始推广,所以 Taro 初始化项目的脚本里没有生成京东小程序的开启依赖,所以我们需要手动安装一下对应的开启依赖,打开命令行,在 jd-mp 项目根目录下执行如下命令安装:
$ npm install @tarojs/taro-jd安装好之后,我们还需要在 package.json 中添加如下两条开启京东小程序项目的脚本:
{"name": "jd-mp",
"version": "1.0.0",
"private": true,
"description": "第一个京东小程序",
"templateInfo": {
"name": "default",
"typescript": false,
"css": "sass"
},
"scripts": {
// ...
"build:quickapp": "taro build --type quickapp",
"build:jd": "taro build --type jd",
// ...
"dev:quickapp": "npm run build:quickapp -- --watch",
"dev:jd": "npm run build:jd -- --watch"
},
"author": "",
"license": "MIT",
"dependencies": {
// ...
"@tarojs/taro-jd": "^2.1.5",
// ...
},
// ...
}
安装并添加对应的命令之后,我们就可以在终端项目根目录执行如下命令来运行我们的京东小程序:
$ npx taro build --type jd --watch注意要加上 --watch 参数,这样当我们在编辑器(如 VSCode)修改内容并保存之后,项目会自动编译更新,然后刷新开发者工具就可以查看修改后的效果,上面这条命令会实际运行我们 package.json 里面添加的脚本命令:
"dev:jd": "npm run build:jd -- --watch"注册京东小程序
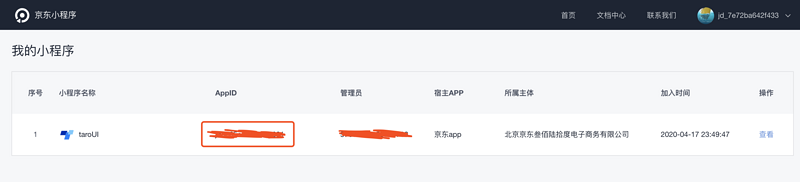
当进行了上面的配置之后,并把项目开起来之后,这个时候我们就需要去注册一个京东小程序,拿到对应的小程序的 AppId ,你可以访问京东小程序官网,根据步骤注册小程序,并创建项目,然后取到项目的 AppId ,类似如下:
然后下载京东开发者工具,新建一个小程序项目,并输入拿到的 AppId :
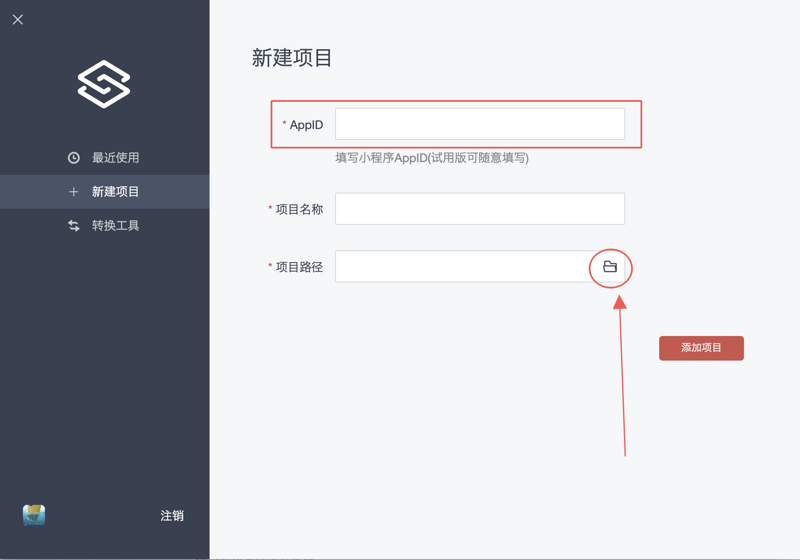
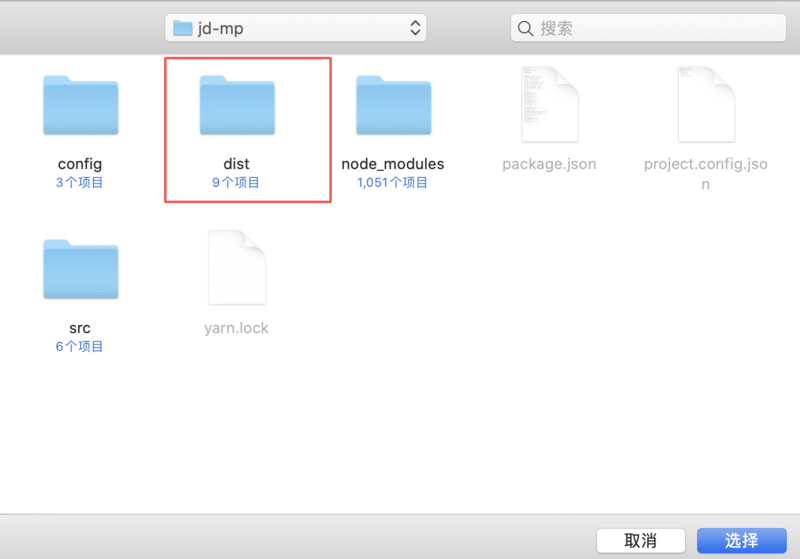
并在京东开发者里面点击上面圆圈圈出的那个文件夹图标,打开上面创建的 jd-mp 项目,不过请注意,我们需要选中项目里面编译好的 dist 目录:
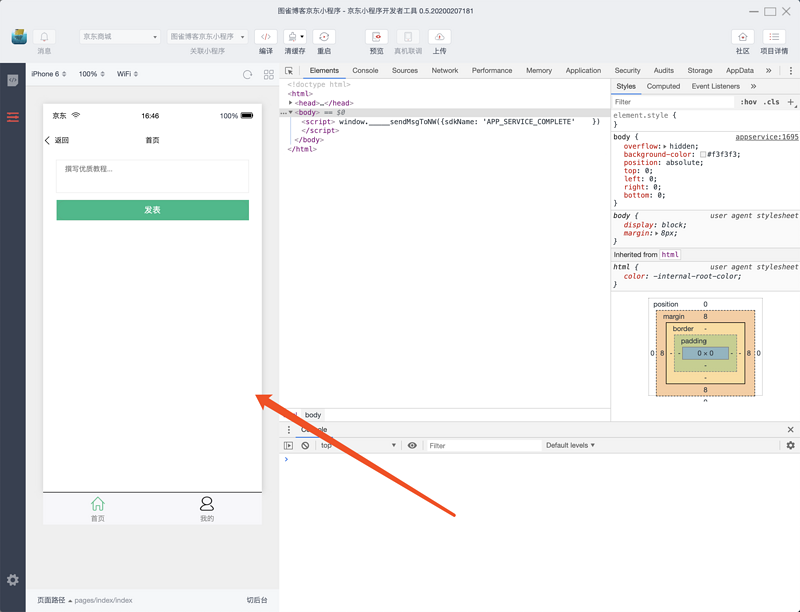
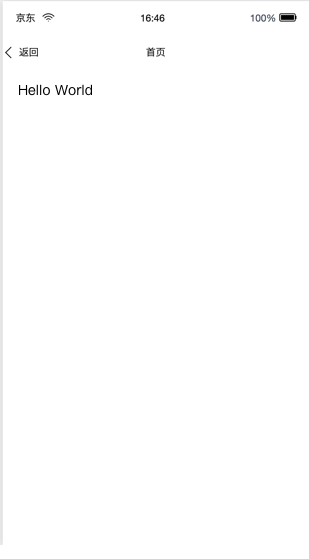
这个时候,你的项目运行着,打开之后,你会在京东小程序开发者工具里面看到如下效果:
当然上面这个指示的效果是我最终写好的项目,你初次打开应该可以看到一个 Hello World 🥳🥳🥳
编写第一个 JD 组件并配置样式
一切准备就绪,可以开始编写我们的京东小程序了!
编写第一个 JD 组件
Taro 小程序 2.x.x 暂时支持 React 来写小程序,而 Taro 3.x.x 允许 React,Vue 和 Nerve 来写,之后我们图雀社区会出 Taro 3.x.x 的教程,让 Vue 的读者也可以使用 Taro 来写小程序。
既然现在只能用 React,那么就让我们新潮一点,使用 React Hooks 来简化组件编写,打开 src/pages/index/index.jsx ,将类组件重构成函数式组件,并添加一点发帖相关的内容:
import Taro from "@tarojs/taro";import { View, Button, Textarea } from "@tarojs/components";
import "./index.scss";
export default function Index() {
return (
<View className="index">
<Textarea
placeholder="撰写优质教程..."
className="post-input"
autoHeight
/>
<Button className="post-button">发表</Button>
</View>
);
}
Index.config = {
navigationBarTitleText: "首页"
};
可以看到我们将类组件改成了函数式组件,并从 @tarojs/components 里面导入并添加了两个组件 Textarea 和 Button ,用于帖子表单的内容输入和发表。
接着,我们将之前的类属性 config 移动到 Index.config 上面来定义,这个 config 只在页面级组件里面存在,用于定义页面的一些属性,比如这个的 navigationBarTitleText 就是此页面的标题,在小程序里面代表顶部的标题:
为组件添加样式
当我们添加了上面两个组件之后,组件的原生样式开起来比较普通,为了让我们的小程序更加专业一点,我们给其加点样式,其实使用 Taro 开发京东小程序时,写样式和我们平时开发 Web 应用差不多,这里我们使用了 SCSS 来写样式,在组件里面定义了对应的类名并导入了 CSS 文件,之后再 CSS 文件里面写样式。
打开 src/pages/index/index.scss ,在其中添加对应的样式文件如下:
.index {display: flex;
flex-direction: column;
align-items: center;
}
.post-input {
margin-top: 24px;
background: #fff;
width: 80%;
min-height: 80px;
padding: 16px 30px;
border: 1px solid #eee;
font-size: 14px;
}
.post-button {
margin-top: 24px;
width: calc(80% + 60px);
border-radius: 0;
background-color: #00bc87;
color: white;
}
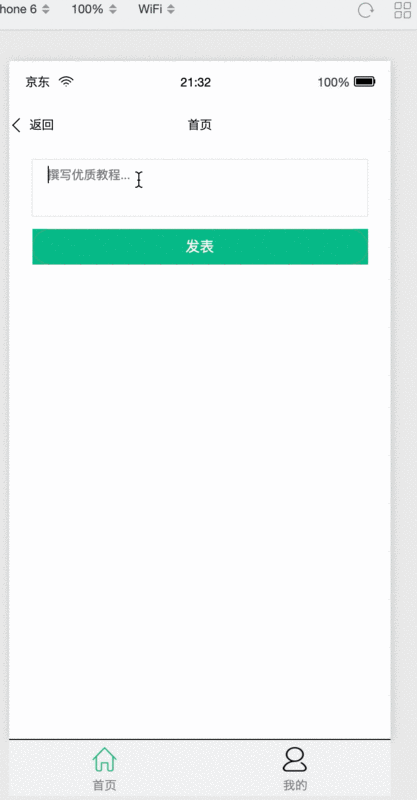
当添加了样式之后,我们的应用变成了如下样子:
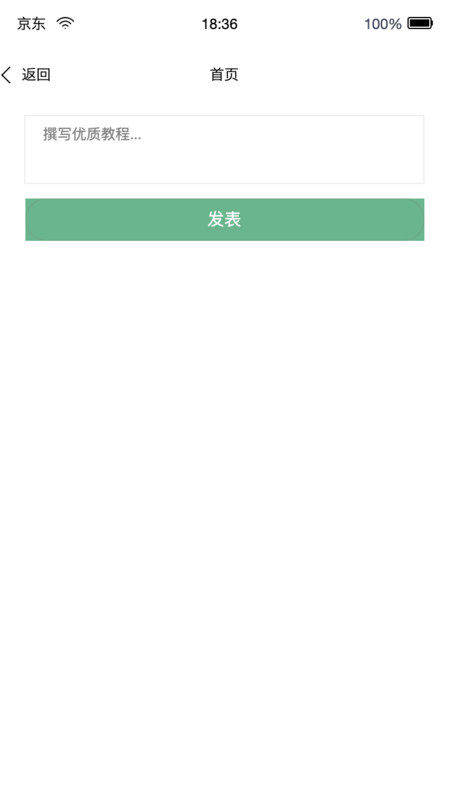
怎么样,是不是变得有点专业了呢?🤓
使用 React Hooks 并处理事件
在编写了第一个组件之后,我们尝试来处理我们帖子的内容输入,这个时候就涉及到事件处理了,我们需要将之前在 src/pages/index/index.jsx 里面定义的 TextArea 做成 “受控组件”,我们使用 React Hooks 提供的 useState 来做到这一点。
打开 src/pages/index/index.jsx ,对其中的内容作出对应的修改如下:
import Taro, { useState } from "@tarojs/taro";import { View, Button, Textarea } from "@tarojs/components";
import "./index.scss";
export default function Index() {
const [post, setPost] = useState("");
function handleChange(e) {
setPost(e.target.value);
}
return (
<View className="index">
<Textarea
placeholder="撰写优质教程..."
className="post-input"
value={post}
onInput={handleChange}
autoHeight
/>
<Button className="post-button">发表</Button>
</View>
);
}
Index.config = {
navigationBarTitleText: "首页"
};
可以看到,上面我们导入了 useState 钩子,然后调用生成了一个 post 和 setPost ,接着我们定义了一个 handleChange 函数来处理 Textarea 的 onInput 事件,接收用户输入来设置 post 值,并通过将 post 设置回 Textarea 的 value 来达到 “受控组件” 的目的。
组件组合和处理 UI 反馈
当我们的内容多起来之后,在一个组件里面放太多内容会导致逻辑不清晰,所以我们尝试新建组件来抽出属于它的一部分逻辑。接下来我们马上要处理帖子发表逻辑,并且还要展示发表之后的效果,所以我们需要额外新建一个组件来展示帖子逻辑。
新建组件
在 src 目录先新建 components 文件夹,然后在里面新建 PostCard 文件夹,接着在这个文件夹里面建一个 index.jsx 文件,用于放置组件逻辑和 UI,我们在这里组件里面编写如下逻辑:
import Taro from "@tarojs/taro";import { View, Text, Image } from "@tarojs/components";
import "./styles.scss";
export default function PostCard(props) {
const { post } = props;
return (
<View className="post">
<Text className="post-name">{post}</Text>
</View>
);
}
可以看到我们创建了一个 PostCard 函数式组件,然后渲染了其父组件传下来的参数 post ,并且导入了一个 styles.scss 文件,我们将马上来创建它。
在 src/components/PostCard 文件夹下创建一个 styles.scss ,并编写如下内容:
.post {width: calc(80% + 60px);
margin: 0 auto;
padding: 32px 0;
border-bottom: 1px solid #eee;
}
.post-name {
font-size: 20px;
font-weight: 600;
width: 100%;
}
处理 UI 反馈
当编写了渲染帖子的组件之后,我们回到 src/pages/index/index.jsx 组件,来导入我们写好的 PostCard 组件,并同时处理帖子发表逻辑:
import Taro, { useState } from "@tarojs/taro";import { View, Button, Textarea } from "@tarojs/components";
import PostCard from "../../components/PostCard";
import "./index.scss";
export default function Index() {
const [post, setPost] = useState("");
const [postList, setPostList] = useState([]);
function handleChange(e) {
setPost(e.target.value);
}
function handleSubmit() {
console.log("hello world", post);
if (!post) {
Taro.showToast({
title: "内容不能为空",
icon: "none"
});
} else {
Taro.showToast({
title: "发表成功",
icon: "success"
});
setPost("");
setPostList(postList.concat(post));
}
}
return (
<View className="index">
<Textarea
placeholder="撰写优质教程..."
className="post-input"
value={post}
onInput={handleChange}
autoHeight
/>
<Button className="post-button" onClick={handleSubmit}>
发表
</Button>
<View className="post-box">
{postList.map(postItem => (
<PostCard post={postItem} />
))}
</View>
</View>
);
}
Index.config = {
navigationBarTitleText: "首页"
};
可以看到上面我们使用 useState 钩子创建了一个新的状态 postList ,接着我们在 Button 上定义了一个 onClick 的处理函数 handleSubmit ,在这个函数里面,我们判断输入的 post 是否为空,如果为空提示用户不可以发布,如果有内容,则提示用户新帖子发布成功,并将 post 添加到 postList 中,以及置空 post 内容,等待下次输入。
注意到这里我们使用 Taro.showToast API 来提示用户,Taro 还有很多方便的 API,比如弹出模态框等,可以参考文档。
最后,我们加一点样式来让我们的界面更加专业,打开 src/pages/index/index.scss ,修改内容如下:
.index {display: flex;
flex-direction: column;
align-items: center;
}
.post-input {
margin-top: 24px;
background: #fff;
width: 80%;
min-height: 80px;
padding: 16px 30px;
border: 1px solid #eee;
font-size: 14px;
}
.post-button {
margin-top: 24px;
width: calc(80% + 60px);
border-radius: 0;
background-color: #00bc87;
color: white;
}
.post-box {
width: 100%;
margin-top: 24px;
}
大功告成!我们现在可以发表帖子并展示效果了,这个时候测试你的京东小程序,应该可以看到如下效果:
我们成功的处理了组件的组合,并且在发表帖子的时候使用 Taro 的 API 给与了用户 UI 反馈。
多页面与路由跳转
通过上面的步骤,我们可以展示帖子列表,但是我们都知道,帖子的内容可能很长,所以我们需要额外的页面来展示帖子详情,所以我们接下来将新建页面并使用 Taro 提供的 API 进行多页面的跳转。
新建页面
我们在 src/pages 文件夹下建一个 post 文件夹,并在里面建一个 post.jsx 文件,并编写对应的内容如下:
import Taro, { useRouter } from "@tarojs/taro";import { View, Text } from "@tarojs/components";
import "./post.scss";
export default function Post() {
const { params } = useRouter();
const { post = "" } = params;
return (
<View className="post">
<Text className="post-name">{post}</Text>
</View>
);
}
Post.config = {
navigationBarTitleText: "帖子页"
};
可以看到上面我们创建了一个 Post 函数式组件,然后增加了 config 配置,在标题改为 “帖子页”,接着我们使用 Taro 提供的 useRouter 钩子来获取路由传递过来的参数,取到参数里面的 post 并渲染。
注册页面
当创建了新页面之后,我们还要告诉应用我们创建的这个页面,也就是在应用注册这个页面,打开 src/app.jsx ,在对应 App 组件的 config.pages 属性里面添加刚刚创建的帖子详情页的路径如下:
import Taro, { Component } from "@tarojs/taro";import Index from "./pages/index";
import "./app.scss";
// 如果需要在 h5 环境中开启 React Devtools
// 取消以下注释:
// if (process.env.NODE_ENV !== 'production' && process.env.TARO_ENV === 'h5') {
// require('nerv-devtools')
// }
class App extends Component {
componentDidMount() {}
componentDidShow() {}
componentDidHide() {}
componentDidCatchError() {}
config = {
pages: ["pages/index/index", "pages/post/post"],
window: {
backgroundTextStyle: "light",
navigationBarBackgroundColor: "#fff",
navigationBarTitleText: "WeChat",
navigationBarTextStyle: "black"
}
};
// 在 App 类中的 render() 函数没有实际作用
// 请勿修改此函数
render() {
return <Index />;
}
}
Taro.render(<App />, document.getElementById("app"));
处理路由跳转
创建并注册了页面之后,我们就可以在 src/components/PostCard/index.jsx 组件里面处理点击帖子列表单个帖子的路由跳转了:
import Taro from "@tarojs/taro";import { View, Text } from "@tarojs/components";
import "./styles.scss";
export default function PostCard(props) {
const { post } = props;
function handleClick() {
Taro.navigateTo({
url: `/pages/post/post?post=${post}`
});
}
return (
<View className="post" onClick={handleClick}>
<Text className="post-name">{post}</Text>
</View>
);
}
可以看到,我们新增了 onClick 事件的处理方法 handleClick ,并调用 Taro 提供的 navigateTo API 进行页面之间的跳转,更多页面导航的 API 可以参考文档。
现在你可以在添加帖子之后,点击单个帖子,你会发现页面发生跳转到帖子详情页,并展示了帖子的内容:

添加 TabBar
处理了多页面的跳转,一个小程序还存在一些 TarBar 的需求,即底部有几个按钮进行多种类型的页面跳转,我们也来发掘一下在京东小程序里面如何添加 TabBar。
编写新 TabBar 页面
我们首先来建立 TabBar 需要切换的另外一个页面,一般逻辑里面是 “我的” 页面,在 src/pages 目录下新建 mine 文件夹,然后在里面创建 mine.jsx 文件,编写对应的内容如下:
import Taro, { useRouter } from "@tarojs/taro";import { View, Text, Image } from "@tarojs/components";
import "./mine.scss";
import avatar from "../../images/avatar.png";
export default function Mine() {
return (
<View className="mine">
<Image src={avatar} className="mine-avatar" />
<View className="slogan">
<Text className="slogan-name">
图雀社区:予力内容创作,加速技术传播
</Text>
</View>
</View>
);
}
Mine.config = {
navigationBarTitleText: "我的"
};
可以看到是我们熟悉的函数式组件,并且 config 我们设置了 “我的” 的标题,并且还在组件中渲染了一张图片和标语,图片可以在项目中获取。1)Github 2)Gitee
接着我们可以创建对应的样式文件,在 src/pages/mine/ 下创建对应的 mine.scss 文件,并编写如下的内容:
.mine {padding-top: 40px;
display: flex;
flex-direction: column;
align-items: center;
}
.mine-avatar {
width: 300px;
height: 300px;
border-radius: 50%;
}
.slogan {
margin-top: 24px;
}
.slogan-name {
font-size: 32px;
}
配置 TabBar
准备好了 TabBar 的第二个页面之后,我们在 src/app.jsx 里面配置京东小程序的 TabBar:
import Taro, { Component } from "@tarojs/taro";import Index from "./pages/index";
import "./app.scss";
// 如果需要在 h5 环境中开启 React Devtools
// 取消以下注释:
// if (process.env.NODE_ENV !== 'production' && process.env.TARO_ENV === 'h5') {
// require('nerv-devtools')
// }
class App extends Component {
componentDidMount() {}
componentDidShow() {}
componentDidHide() {}
componentDidCatchError() {}
config = {
pages: ["pages/index/index", "pages/post/post", "pages/mine/mine"],
window: {
backgroundTextStyle: "light",
navigationBarBackgroundColor: "#fff",
navigationBarTitleText: "WeChat",
navigationBarTextStyle: "black"
},
tabBar: {
list: [
{
pagePath: "pages/index/index",
text: "首页",
iconPath: "./images/home.png",
selectedIconPath: "./images/homeSelected.png"
},
{
pagePath: "pages/mine/mine",
text: "我的",
iconPath: "./images/mine.png",
selectedIconPath: "./images/mineSelected.png"
}
]
}
};
// 在 App 类中的 render() 函数没有实际作用
// 请勿修改此函数
render() {
return <Index />;
}
}
Taro.render(<App />, document.getElementById("app"));
可以看到,首先我们在 config.pages 里面声明了 pages/mine/mine.jsx 的路径,然后我们给 config 额外增加了一个 tabBar 属性,这个对象里面是一个 list 属性,然后在里面加入了两个 TabBar 页面的配置信息:
pagePath代表当前选中 TabBar 渲染的页面路径textTabBar 的展示标题iconPathTabBar 未选中时展示的图标selectedIconPathTabBar 选中时展示的图标
更多 TabBar 的配置信息可以参考文档。用到的图标文件可以在项目中获取:1)Github 2)Gitee。
当配置好上面的内容之后我们应该可以在京东小程序开发者界面里面看到如下效果:

发起网络请求
前面所有的都是了解小程序本地编写的一些内容,大多数应用还需要网络请求获取远程数据来进行展示,当然我们的京东小程序尝鲜也不能漏掉这一点。
我们打开 src/pages/index/index.jsx 文件,对其中的内容作出对应的修改如下:
import Taro, { useState, useEffect } from "@tarojs/taro";import { View, Button, Textarea } from "@tarojs/components";
import PostCard from "../../components/PostCard";
import "./index.scss";
export default function Index() {
const [post, setPost] = useState("");
const [postList, setPostList] = useState([]);
function handleChange(e) {
setPost(e.target.value);
}
function handleSubmit() {
console.log("hello world", post);
if (!post) {
Taro.showToast({
title: "内容不能为空",
icon: "none"
});
} else {
Taro.showToast({
title: "发表成功",
icon: "success"
});
setPost("");
setPostList(postList.concat(post));
}
}
useEffect(() => {
async function getPosts() {
try {
const res = await Taro.request({
url:
"https://9ff4272f-ce60-4be6-9376-f9f462482edc.mock.pstmn.io/articles"
});
const postList = res.data.map(item => item.name);
setPostList(postList);
} catch (err) {
console.log("err", err);
}
}
getPosts();
}, []);
return (
<View className="index">
<Textarea
placeholder="撰写优质教程..."
className="post-input"
value={post}
onInput={handleChange}
autoHeight
/>
<Button className="post-button" onClick={handleSubmit}>
发表
</Button>
<View className="post-box">
{postList.map(postItem => (
<PostCard post={postItem} />
))}
</View>
</View>
);
}
Index.config = {
navigationBarTitleText: "首页"
};
可以看到,我们导入了 useEffect 钩子,并在其中定义了一个异步 getPosts 函数,用于获取初始的帖子列表,接着我们在这个函数中使用 Taro 的请求 API Taro.request 来发起网络请求,并将请求到的数据进行处理更新到 postList 中,关于更多请求的 API 请参考 Taro 文档。
当添加了上面内容之后,我们可以收获如下的效果:

总结
通过这篇教程快速上手京东小程序开发,我们可以发现得益于 Taro 的优秀跨端特性,即使是最新刚推出的京东小程序也可以游刃有余的开发我们需要的功能,这不禁让我想起了 Taro Next 发布之际,Taro 团队明确的初心和使命:“降低开发成本,提高开发体验和开发效率”,不忘初心,牢记使命,这就是 Taro 团队拥抱变化的方式!
以上是 Taro京东小程序快速上手 的全部内容, 来源链接: utcz.com/a/18688.html