微服务中使用Spring Security + OAuth 2.0 + JWT 搭建认证授权服务
OAuth 是一种用来规范令牌(Token)发放的授权机制,主要包含了四种授权模式:授权码模式、简化模式、密码模式和客户端模式。关于 OAuth 更多介绍可访问 理解OAuth 2.0 查看。本文主要以 密码模式 来实现用户认证和授权。
搭建项目
项目代码已上传至 Github 。
本例项目以微服务为基础,仅实现认证服务和资源服务,其他如网关、服务管理、配置中心等省略,本文重点是使用 Spring Security + OAuth 2.0 + JWT 实现用户认证授权。
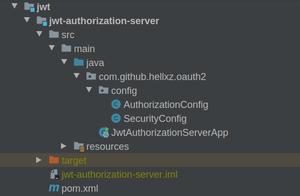
项目结构如下图,认证服务和资源服务分离,认证服务主要是提供令牌和校验令牌服务。

父工程 pom.xml 配置如下,主要是指定依赖包的版本:
1
2
3
4
5
6
7
8
9
10
11
12
13
14
15
16
17
18
19
20
21
22
23
24
25
26
27
28
29
30
31
32
33
34
35
36
37
38
39
40
41
42
43
44
45
46
47
48
49
50
51
52
53
54
55
56
57
58
59
60
61
62
63
64
65
66
<!-- 依赖包版本管理 -->
<properties>
<project.build.sourceEncoding>UTF-8</project.build.sourceEncoding>
<spring.boot.version>2.2.2.RELEASE</spring.boot.version>
<spring.cloud.version>Hoxton.SR9</spring.cloud.version>
<spring.cloud.alibaba.version>2.2.1.RELEASE</spring.cloud.alibaba.version>
<mysql.driver.version>8.0.16</mysql.driver.version>
<lombok.version>1.16.18</lombok.version>
<druid.version>1.1.10</druid.version>
</properties>
<dependencyManagement>
<dependencies>
<!-- spring boot 2.2.2.RELEASE -->
<dependency>
<groupId>org.springframework.boot</groupId>
<artifactId>spring-boot-dependencies</artifactId>
<version>2.2.2.RELEASE</version>
<type>pom</type>
<scope>import</scope>
</dependency>
<!-- spring cloud -->
<dependency>
<groupId>org.springframework.cloud</groupId>
<artifactId>spring-cloud-dependencies</artifactId>
<version>${spring.cloud.version}</version>
<type>pom</type>
<scope>import</scope>
</dependency>
<!-- Spring Cloud Alibaba -->
<dependency>
<groupId>com.alibaba.cloud</groupId>
<artifactId>spring-cloud-alibaba-dependencies</artifactId>
<version>${spring.cloud.alibaba.version}</version>
<type>pom</type>
<scope>import</scope>
</dependency>
<!-- mysql driver -->
<dependency>
<groupId>mysql</groupId>
<artifactId>mysql-connector-java</artifactId>
<version>${mysql.driver.version}</version>
</dependency>
<!-- lombok -->
<dependency>
<groupId>org.projectlombok</groupId>
<artifactId>lombok</artifactId>
<version>${lombok.version}</version>
</dependency>
<!-- druid -->
<dependency>
<groupId>com.alibaba</groupId>
<artifactId>druid-spring-boot-starter</artifactId>
<version>${druid.version}</version>
</dependency>
</dependencies>
</dependencyManagement>
搭建认证服务
引入依赖
- 在
pom.xml引入以下依赖:
1
2
3
4
5
6
7
8
9
10
11
12
13
14
15
16
17
18
19
20
21
22
23
24<dependency>
<groupId>org.springframework.cloud</groupId>
<artifactId>spring-cloud-starter-oauth2</artifactId>
</dependency>
<dependency>
<groupId>org.springframework.security</groupId>
<artifactId>spring-security-oauth2-jose</artifactId>
</dependency>
<dependency>
<groupId>com.alibaba</groupId>
<artifactId>druid-spring-boot-starter</artifactId>
</dependency>
<dependency>
<groupId>org.springframework.boot</groupId>
<artifactId>spring-boot-starter-jdbc</artifactId>
</dependency>
<dependency>
<groupId>mysql</groupId>
<artifactId>mysql-connector-java</artifactId>
</dependency>
spring-cloud-starter-oauth2 已经包含了 spring-cloud-starter-security、spring-security-oauth2、spring-security-jwt 这3个依赖,只需引入 spring-cloud-starter-oauth2 即可。
- 编辑
application.yml,添加数据库连接参数:
1
2
3
4
5
6
7
8
9
10
11
12
spring:
datasource:
type:com.alibaba.druid.pool.DruidDataSource
url:jdbc:mysql://127.0.0.1:3307/oauth_server?useUnicode=true&characterEncoding=utf8&zeroDateTimeBehavior=convertToNull&useSSL=false&serverTimezone=Asia/Shanghai
username:root
password:1
druid:
driver-class-name:com.mysql.cj.jdbc.Driver
initial-size:5
max-active:50
max-wait:60000
min-idle:5
准备工作
- 新建
UserDTO类,实现org.springframework.security.core.userdetails.UserDetails接口;
1
2
3
4
5
6
7
8
9
10
11
12
13
14
15
16
17
18
19
20
21
22
23
24
25
26
27
28
29
30
31
32
33
34
35
36
37
38
39
/**
* @author lanweihong 986310747@qq.com
*/
publicclassUserDTOimplementsSerializable, UserDetails{
privatestaticfinallong serialVersionUID = 5538522337801286424L;
private String userName;
private String password;
private Set<SimpleGrantedAuthority> authorities;
public Collection<? extends GrantedAuthority> getAuthorities() {
returnthis.authorities;
}
public String getPassword(){
returnthis.password;
}
public String getUsername(){
returnthis.userName;
}
publicbooleanisAccountNonExpired(){
returntrue;
}
publicbooleanisAccountNonLocked(){
returntrue;
}
publicbooleanisCredentialsNonExpired(){
returntrue;
}
publicbooleanisEnabled(){
returntrue;
}
}
- 新建类
UserDetailsServiceImpl,实现org.springframework.security.core.userdetails.UserDetailsService接口,用于校验用户凭据。
1
2
3
4
5
6
7
8
9
10
11
12
13
14
15
16
17
18
19
20
publicclassUserDetailsServiceImplimplementsUserDetailsService{
private PasswordEncoder passwordEncoder;
publicvoidsetPasswordEncoder(PasswordEncoder passwordEncoder){
this.passwordEncoder = passwordEncoder;
}
public UserDetails loadUserByUsername(String username)throws UsernameNotFoundException {
// TODO 实际开发中,这里请修改从数据库中查询...
UserDTO user = new UserDTO();
user.setUserName(username);
// 密码为 123456 ,且加密
user.setPassword(passwordEncoder.encode("123456"));
return user;
}
}
以上用户配置用于测试,任意用户名,但密码为 123456,实际生产中务必修改为从数据库中读取校验。
配置认证授权服务器
新建类
Oauth2ServerConfig,继承org.springframework.security.oauth2.config.annotation.web.configuration.AuthorizationServerConfigurerAdapter类;在Oauth2ServerConfig类上 添加注解@EnableAuthorizationServer。框架提供了几个默认的端点:
/oauth/authorize:授权端点/oauth/token:获取令牌端点/oauth/confirm_access:用户确认授权端点/oauth/check_token:校验令牌端点/oauth/error:用于在授权服务器中呈现错误/oauth/token_key:获取 jwt 公钥端点
继承
AuthorizationServerConfigurerAdapter类后,我们需要重写以下三个方法扩展实现我们的需求。configure(ClientDetailsServiceConfigurer clients):用于定义、初始化客户端信息configure(AuthorizationServerEndpointsConfigurer endpoints):用于定义授权令牌端点及服务configure(AuthorizationServerSecurityConfigurer security):用于定义令牌端点的安全约束
配置客户端详细信息
ClientDetailsServiceConfigurer 用于定义 内存 中或 基于JDBC存储实现 的客户端,其重要的几个属性有:
clientId:客户端id,必填;clientSecret:客户端密钥;authorizedGrantTypes:客户端授权类型,有 5 种模式:authorization_code、password、client_credentials、implicit、refresh_token;scope:授权范围;accessTokenValiditySeconds:access_token有效时间,单位为秒,默认为 12 小时;refreshTokenValiditySeconds:refresh_token有效时间,单位为秒,默认为 30 天;
客户端信息一般保存在 Redis 或 数据库中,本例中客户端信息保存在 MySQL 中;
基于JDBC存储 模式需要创建数据表,官方提供了建表的 SQL 语句,可访问 schema.sql 获取 SQL ;
使用以下 SQL(适用于MySQL) 来建表:
1
2
3
4
5
6
7
8
9
10
11
12
13
14CREATETABLE`oauth_client_details` (
`client_id`varchar(256) CHARACTERSET utf8 COLLATE utf8_general_ci NOTNULL,
`resource_ids`varchar(256) CHARACTERSET utf8 COLLATE utf8_general_ci NULLDEFAULTNULL,
`client_secret`varchar(256) CHARACTERSET utf8 COLLATE utf8_general_ci NULLDEFAULTNULL,
`scope`varchar(256) CHARACTERSET utf8 COLLATE utf8_general_ci NULLDEFAULTNULL,
`authorized_grant_types`varchar(256) CHARACTERSET utf8 COLLATE utf8_general_ci NULLDEFAULTNULL,
`web_server_redirect_uri`varchar(256) CHARACTERSET utf8 COLLATE utf8_general_ci NULLDEFAULTNULL,
`authorities`varchar(256) CHARACTERSET utf8 COLLATE utf8_general_ci NULLDEFAULTNULL,
`access_token_validity`int(11) NULLDEFAULTNULL,
`refresh_token_validity`int(11) NULLDEFAULTNULL,
`additional_information`varchar(4096) CHARACTERSET utf8 COLLATE utf8_general_ci NULLDEFAULTNULL,
`autoapprove`varchar(256) CHARACTERSET utf8 COLLATE utf8_general_ci NULLDEFAULTNULL,
PRIMARY KEY (`client_id`) USING BTREE
) ENGINE = InnoDBCHARACTERSET = utf8 COLLATE = utf8_general_ci ROW_FORMAT = Dynamic;添加一条客户端信息用于测试:
1
INSERTINTO`oauth_client_details`VALUES ('auth-server', NULL, '$2a$10$mcEwJ8qqhk2DYIle6VfhEOZHRdDbCSizAQbIwBR7tTuv9Q7Fca9Gi', 'all', 'password,refresh_token', '', NULL, NULL, NULL, NULL, NULL);
其中密码 123456 使用 BCryptPasswordEncoder 加密,加密后字符为 $2a$10$mcEwJ8qqhk2DYIle6VfhEOZHRdDbCSizAQbIwBR7tTuv9Q7Fca9Gi。
- 配置
ClientDetailsServiceConfigurer,指定客户端信息:
1
2
3
4
5
6
7
8
9
10
11
12
13
14
15
16
17
18
19
20
21
22
23
publicclassOauth2ServerConfigextendsAuthorizationServerConfigurerAdapter{
privatefinal DataSource dataSource;
privatefinal PasswordEncoder passwordEncoder;
publicOauth2ServerConfig(DataSource dataSource, PasswordEncoder passwordEncoder){
this.dataSource = dataSource;
this.passwordEncoder = passwordEncoder;
}
publicvoidconfigure(ClientDetailsServiceConfigurer clients)throws Exception {
// 使用基于 JDBC 存储模式
JdbcClientDetailsService clientDetailsService = new JdbcClientDetailsService(dataSource);
// client_secret 加密
clientDetailsService.setPasswordEncoder(passwordEncoder);
clients.withClientDetails(clientDetailsService);
}
}
配置授权令牌端点及服务
配置 AuthorizationServerEndpointsConfigurer 需要指定 AuthenticationManager 及 UserDetailService,尤其是使用密码模式时,必须指定 AuthenticationManager,否则会报 Unsupported grant type: password 错误。
- 新建
WebSecurityConfig类,继承org.springframework.security.config.annotation.web.configuration.WebSecurityConfigurerAdapter类,重写authenticationManagerBean()方法,并定义需要用到的PasswordEncoder;
1
2
3
4
5
6
7
8
9
10
11
12
13
14
15
16
17
18
19
20
21
22
23
24
25
26
27
28
29
30
31
32
33
34
35
36
37
38
39
40
41
(prePostEnabled = true)
publicclassWebSecurityConfigextendsWebSecurityConfigurerAdapter{
protectedvoidconfigure(HttpSecurity http)throws Exception {
http
// 支持跨域请求
.cors()
.and()
// 禁用 CSRF
.csrf().disable()
.formLogin().disable()
.httpBasic().disable()
.logout().disable()
.authorizeRequests()
.antMatchers("/oauth/token").permitAll();
.anyRequest().authenticated();
}
/**
* 重写 authenticationManagerBean()
* @return
* @throws Exception
*/
public AuthenticationManager authenticationManagerBean()throws Exception {
returnsuper.authenticationManagerBean();
}
public PasswordEncoder passwordEncoder(){
returnnew BCryptPasswordEncoder();
}
}
- 配置
AuthorizationServerEndpointsConfigurer:
1
2
3
4
5
6
7
8
9
10
11
12
13
14
15
16
17
18
19
20
21
22
23
24
25
26
27
@Configuration
@EnableAuthorizationServer
public class Oauth2ServerConfig extends AuthorizationServerConfigurerAdapter {
private final UserDetailsServiceImpl userDetailsService;
/**
* 密码模式 grant_type:password 需指定 AuthenticationManager
*/
private final AuthenticationManager authenticationManager;
@Autowired
public Oauth2ServerConfig(UserDetailsServiceImpl userDetailsService,
AuthenticationManager authenticationManager) {
this.userDetailsService = userDetailsService;
this.authenticationManager = authenticationManager;
}
@Override
public void configure(AuthorizationServerEndpointsConfigurer endpoints) throws Exception {
endpoints
// 开启密码模式授权
.authenticationManager(authenticationManager)
.userDetailsService(userDetailsService);
}
}
使用 JWT 作为令牌格式
生成 JWT 密钥对
使用 JDK 的 keytool 工具生成 JKS 密钥对 jwt.jks,并将 jwt.jks 放到 resources 目录下。
定位至 JDK 目录下的 bin 目录,执行以下命令生成密钥对:
1
keytool -genkey -alias weihong -keyalg RSA -keypass 123456 -keystore jwt.jks -storepass 123456
参数说明:
2
3
4
5
6
7
8
9
10
11
-alias 别名
-keyalg 密钥算法
-keypass 密钥口令
-keystore 生成密钥对的存储路径和名称
-storepass 密钥对口令
定义 token 转换器
在 Oauth2ServerConfig 类中定义 accessTokenConverter() 及 keyPair():
1
2
3
4
5
6
7
8
9
10
11
12
13
14
15
16
17
18
19
20/**
* token 转换器
* 默认是 uuid 格式,我们在这里指定 token 格式为 jwt
* 使用非对称加密算法对 token 签名
* @return
*/
public JwtAccessTokenConverter accessTokenConverter(){
JwtAccessTokenConverter converter = new JwtAccessTokenConverter();
// 使用非对称加密算法对 token 签名
converter.setKeyPair(keyPair());
return converter;
}
public KeyPair keyPair(){
// 从 classpath 目录下的证书 jwt.jks 中获取秘钥对
KeyStoreKeyFactory keyStoreKeyFactory = new KeyStoreKeyFactory(new ClassPathResource("jwt.jks"), "lanweihong".toCharArray());
return keyStoreKeyFactory.getKeyPair("weihong", "lanweihong".toCharArray());
}
指定令牌存储策略为 JWT
配置 AuthorizationServerEndpointsConfigurer 的令牌存储策略为 JWT,指定 accessTokenConverter 为我们定义好的 accessTokenConverter():
1
2
3
4
5
6
7
8
9
10
11
12
13
14
15
16
17
18
19
20
21
22
23
24
25
26
27
28
29
30
31
32
33
34
35
36
37
38
39
40
41
42
43
44
45
46
47
48
49
50
publicclassOauth2ServerConfigextendsAuthorizationServerConfigurerAdapter{
privatefinal UserDetailsServiceImpl userDetailsService;
/**
* 密码模式 grant_type:password 需指定 AuthenticationManager
*/
privatefinal AuthenticationManager authenticationManager;
publicOauth2ServerConfig(UserDetailsServiceImpl userDetailsService,
AuthenticationManager authenticationManager){
this.userDetailsService = userDetailsService;
this.authenticationManager = authenticationManager;
}
publicvoidconfigure(AuthorizationServerEndpointsConfigurer endpoints){
endpoints
// 开启密码模式授权
.authenticationManager(authenticationManager)
.userDetailsService(userDetailsService)
// 指定令牌存储策略
.accessTokenConverter(accessTokenConverter());
}
/**
* token 转换器
* 默认是 uuid 格式,我们在这里指定 token 格式为 jwt
* @return
*/
public JwtAccessTokenConverter accessTokenConverter(){
JwtAccessTokenConverter converter = new JwtAccessTokenConverter();
// 使用非对称加密算法对 token 签名
converter.setKeyPair(keyPair());
return converter;
}
public KeyPair keyPair(){
// 从 classpath 目录下的证书 jwt.jks 中获取秘钥对
KeyStoreKeyFactory keyStoreKeyFactory = new KeyStoreKeyFactory(new ClassPathResource("jwt.jks"), "lanweihong".toCharArray());
return keyStoreKeyFactory.getKeyPair("weihong", "lanweihong".toCharArray());
}
}
扩展 JWT 存储内容
有时候我们需要扩展 JWT 存储的内容,比如存储一些用户数据、权限信息等。我们可以定义 TokenEnhancer 或继承 TokenEnhancer 来实现 JWT 内容增强器:
1
2
3
4
5
6
7
8
9
10
11
public TokenEnhancer tokenEnhancer(){
return (oAuth2AccessToken, oAuth2Authentication) -> {
Map<String, Object> map = new HashMap<>(1);
UserDTO userDTO = (UserDTO) oAuth2Authentication.getPrincipal();
map.put("userName", userDTO.getUsername());
// TODO 其他信息可以自行添加
((DefaultOAuth2AccessToken) oAuth2AccessToken).setAdditionalInformation(map);
return oAuth2AccessToken;
};
}
配置 AuthorizationServerEndpointsConfigurer JWT 内容增强器:
1
2
3
4
5
6
7
8
9
10
11
12
13
14
15
16
17
18
19
20
21
22
23
24
25
26
27
28
29
30
31
32
33
34
35
36
37
38
39
40
41
42
43
44
45
46
47
48
49
50
51
52
53
54
55
56
57
58
59
60
61
62
63
64
65
66
67
68
69
publicclassOauth2ServerConfigextendsAuthorizationServerConfigurerAdapter{
privatefinal UserDetailsServiceImpl userDetailsService;
privatefinal AuthenticationManager authenticationManager;
publicOauth2ServerConfig(UserDetailsServiceImpl userDetailsService,
AuthenticationManager authenticationManager){
this.userDetailsService = userDetailsService;
this.authenticationManager = authenticationManager;
}
publicvoidconfigure(AuthorizationServerEndpointsConfigurer endpoints)throws Exception {
TokenEnhancerChain enhancerChain = new TokenEnhancerChain();
List<TokenEnhancer> delegates = new ArrayList<>();
delegates.add(tokenEnhancer());
delegates.add(accessTokenConverter());
// 配置 JWT 内容增强
enhancerChain.setTokenEnhancers(delegates);
endpoints
// 开启密码模式授权
.authenticationManager(authenticationManager)
.userDetailsService(userDetailsService)
.accessTokenConverter(accessTokenConverter())
.tokenEnhancer(enhancerChain);
}
/**
* token 转换器
* 默认是 uuid 格式,我们在这里指定 token 格式为 jwt
* @return
*/
public JwtAccessTokenConverter accessTokenConverter(){
JwtAccessTokenConverter converter = new JwtAccessTokenConverter();
// 使用非对称加密算法对 token 签名
converter.setKeyPair(keyPair());
return converter;
}
public KeyPair keyPair(){
KeyStoreKeyFactory keyStoreKeyFactory = new KeyStoreKeyFactory(new ClassPathResource("jwt.jks"), "lanweihong".toCharArray());
return keyStoreKeyFactory.getKeyPair("weihong", "lanweihong".toCharArray());
}
/**
* JWT 内容增强器,用于扩展 JWT 内容,可以保存用户数据
* @return
*/
public TokenEnhancer tokenEnhancer(){
return (oAuth2AccessToken, oAuth2Authentication) -> {
Map<String, Object> map = new HashMap<>(1);
UserDTO userDTO = (UserDTO) oAuth2Authentication.getPrincipal();
map.put("userName", userDTO.getUsername());
// TODO 其他信息可以自行添加
((DefaultOAuth2AccessToken) oAuth2AccessToken).setAdditionalInformation(map);
return oAuth2AccessToken;
};
}
}
使用 Redis 存储 token
- 在
pom.xml中添加依赖:
1
2
3
4<dependency>
<groupId>org.springframework.boot</groupId>
<artifactId>spring-boot-starter-data-redis</artifactId>
</dependency>
- 编辑
application.yml,添加 Redis 连接参数:
1
2
3
4
5spring:
redis:
host:localhost
port:6379
password:1
- 添加 token 保存至 redis 的配置:
1
2
3
4
5
6
7
8
9
10
11
publicclassRedisTokenStoreConfig{
private RedisConnectionFactory connectionFactory;
public TokenStore redisTokenStore(){
returnnew RedisTokenStore(connectionFactory);
}
}
- 在认证服务配置中指定 token 存储方式:
1
2
3
4
5
6
7
8
9
10
11
12
13
14
15
16
17
18
19
20
21
22
23
24
25
26
27
28
29
30
31
32
publicclassOauth2ServerConfigextendsAuthorizationServerConfigurerAdapter{
privatefinal UserDetailsServiceImpl userDetailsService;
/**
* 密码模式 grant_type:password 需指定 AuthenticationManager
*/
privatefinal AuthenticationManager authenticationManager;
privatefinal TokenStore tokenStore;
publicOauth2ServerConfig(UserDetailsServiceImpl userDetailsService,
AuthenticationManager authenticationManager,
@Qualifier("redisTokenStore") TokenStore tokenStore) {
this.userDetailsService = userDetailsService;
this.authenticationManager = authenticationManager;
this.tokenStore = tokenStore;
}
publicvoidconfigure(AuthorizationServerEndpointsConfigurer endpoints)throws Exception {
endpoints
// 开启密码模式授权
.authenticationManager(authenticationManager)
.userDetailsService(userDetailsService)
// 设置 token 存储方式
.tokenStore(tokenStore);
}
}
配置授权令牌安全约束
1
2
3
4
5
6
7
8
9
10
publicvoidconfigure(AuthorizationServerSecurityConfigurer security)throws Exception {
security
// 允许表单认证
.allowFormAuthenticationForClients()
// 开放 /oauth/token_key 获取 token 加密公钥
.tokenKeyAccess("permitAll()")
// 开放 /oauth/check_token
.checkTokenAccess("permitAll()");
}
认证授权服务配置完整代码
Oauth2ServerConfig:
1
2
3
4
5
6
7
8
9
10
11
12
13
14
15
16
17
18
19
20
21
22
23
24
25
26
27
28
29
30
31
32
33
34
35
36
37
38
39
40
41
42
43
44
45
46
47
48
49
50
51
52
53
54
55
56
57
58
59
60
61
62
63
64
65
66
67
68
69
70
71
72
73
74
75
76
77
78
79
80
81
82
83
84
85
86
87
88
89
90
91
92
93
94
95
96
97
98
99
100
101
102
103
104
105
106
107
108
publicclassOauth2ServerConfigextendsAuthorizationServerConfigurerAdapter{
/**
* 数据源
*/
privatefinal DataSource dataSource;
privatefinal UserDetailsServiceImpl userDetailsService;
/**
* 密码模式 grant_type:password 需指定 AuthenticationManager
*/
privatefinal AuthenticationManager authenticationManager;
privatefinal PasswordEncoder passwordEncoder;
privatefinal TokenStore tokenStore;
publicOauth2ServerConfig(DataSource dataSource,
UserDetailsServiceImpl userDetailsService,
AuthenticationManager authenticationManager,
PasswordEncoder passwordEncoder,
@Qualifier("redisTokenStore") TokenStore tokenStore) {
this.dataSource = dataSource;
this.userDetailsService = userDetailsService;
this.authenticationManager = authenticationManager;
this.passwordEncoder = passwordEncoder;
this.tokenStore = tokenStore;
}
publicvoidconfigure(AuthorizationServerSecurityConfigurer security){
security
// 允许表单认证
.allowFormAuthenticationForClients()
// 需通过认证后才能访问 /oauth/token_key 获取 token 加密公钥
.tokenKeyAccess("permitAll()")
// 开放 /oauth/check_token
.checkTokenAccess("permitAll()");
}
publicvoidconfigure(ClientDetailsServiceConfigurer clients)throws Exception {
// 使用基于 JDBC 存储模式
JdbcClientDetailsService clientDetailsService = new JdbcClientDetailsService(dataSource);
clientDetailsService.setPasswordEncoder(passwordEncoder);
clients.withClientDetails(clientDetailsService);
}
publicvoidconfigure(AuthorizationServerEndpointsConfigurer endpoints){
TokenEnhancerChain enhancerChain = new TokenEnhancerChain();
List<TokenEnhancer> delegates = new ArrayList<>();
delegates.add(tokenEnhancer());
delegates.add(accessTokenConverter());
// 配置 JWT 内容增强
enhancerChain.setTokenEnhancers(delegates);
endpoints
// 开启密码模式授权
.authenticationManager(authenticationManager)
.userDetailsService(userDetailsService)
.accessTokenConverter(accessTokenConverter())
.tokenEnhancer(enhancerChain)
// 设置 token 存储方式
.tokenStore(tokenStore);
}
/**
* token 转换器
* 默认是 uuid 格式,我们在这里指定 token 格式为 jwt
* @return
*/
public JwtAccessTokenConverter accessTokenConverter(){
JwtAccessTokenConverter converter = new JwtAccessTokenConverter();
// 使用非对称加密算法对 token 签名
converter.setKeyPair(keyPair());
return converter;
}
public KeyPair keyPair(){
KeyStoreKeyFactory keyStoreKeyFactory = new KeyStoreKeyFactory(new ClassPathResource("jwt.jks"), "lanweihong".toCharArray());
return keyStoreKeyFactory.getKeyPair("weihong", "lanweihong".toCharArray());
}
/**
* JWT 内容增强器,用于扩展 JWT 内容,可以保存用户数据
* @return
*/
public TokenEnhancer tokenEnhancer(){
return (oAuth2AccessToken, oAuth2Authentication) -> {
Map<String, Object> map = new HashMap<>(1);
UserDTO userDTO = (UserDTO) oAuth2Authentication.getPrincipal();
map.put("userName", userDTO.getUsername());
// TODO 其他信息可以自行添加
((DefaultOAuth2AccessToken) oAuth2AccessToken).setAdditionalInformation(map);
return oAuth2AccessToken;
};
}
}
WebSecurityConfig:
1
2
3
4
5
6
7
8
9
10
11
12
13
14
15
16
17
18
19
20
21
22
23
24
25
26
27
28
29
30
31
32
33
34
35
36
37
38
39
40
41
(prePostEnabled = true)
publicclassWebSecurityConfigextendsWebSecurityConfigurerAdapter{
protectedvoidconfigure(HttpSecurity http)throws Exception {
http
// 支持跨域请求
.cors()
.and()
// 禁用 CSRF
.csrf().disable()
.formLogin().disable()
.httpBasic().disable()
.logout().disable()
.authorizeRequests()
.antMatchers("/oauth/token").permitAll()
.anyRequest().authenticated();
}
/**
* 重写 authenticationManagerBean()
* @return
* @throws Exception
*/
public AuthenticationManager authenticationManagerBean()throws Exception {
returnsuper.authenticationManagerBean();
}
public PasswordEncoder passwordEncoder(){
returnnew BCryptPasswordEncoder();
}
}
测试获取 token
获取 token
运行项目,使用 Postman 访问 /oauth/token 端点,并传参数,参数必须与我们配置的内容一致;

成功获取到 token ,格式如下:
1
2
3
4
5
6
7
8
9{
"access_token": "eyJhbGciOiJSUzI1NiIsInR5cCI6IkpXVCJ9.eyJleHAiOjE2MTA1NjkzNDksInVzZXJOYW1lIjoiYWRtaW4iLCJ1c2VyX25hbWUiOiJhZG1pbiIsImp0aSI6IjgzM2VjZDdkLThmMzctNDAxOS04YWQwLTBlODI3ZTM4M2U5YyIsImNsaWVudF9pZCI6Im9hdXRoLXNlcnZlciIsInNjb3BlIjpbImFsbCJdfQ.ke6fWfGMOXhppF-6XXftZJx0w8hSnTKYYwvi_As66Ats9_AFqrHCZiuHA_M5LD2bJzahFC__-IUr_6g6ajx-IlLpSPqs3izgbuOPcTzCivfznGn38W5kYPe1ygQ8mJzN97yAT1QKZGMAT0nr7HR5NSG2MHYPbHuWSHp4KVIf7XQbszmXVPKEeQsv64QZ8O1xe9XtshF4mtZsxfLEGxAZEPSkoyJi-vwH6qKnvVh8EI8zgwTX5cIh6Gj4rcEfDiJYNAiI_NanuNA1wBoI1eD-QYSUQ5XXW1Q4vQAnjQMQwvTZYn1hGdAbeHQrA9hPLw5_Axeq8_meWpNobla_rRYkLQ",
"token_type": "bearer",
"refresh_token": "eyJhbGciOiJSUzI1NiIsInR5cCI6IkpXVCJ9.eyJ1c2VyX25hbWUiOiJhZG1pbiIsInNjb3BlIjpbImFsbCJdLCJhdGkiOiI4MzNlY2Q3ZC04ZjM3LTQwMTktOGFkMC0wZTgyN2UzODNlOWMiLCJleHAiOjE2MTMxMTgxNDksInVzZXJOYW1lIjoiYWRtaW4iLCJqdGkiOiIwMDljZjhmNy05OTE5LTQyODEtYjUxNS02NjM3ZjIyM2MyN2YiLCJjbGllbnRfaWQiOiJvYXV0aC1zZXJ2ZXIifQ.bFMQRXCOz2rvu8QhTOjjlM66Fe3EM5F2wUXI-3dQOxnu2AOCsCJKUZdT0AhsnJkSI5Ewc1jUd7TiUifj9p6CYzIuHtnPORUUE67vt7eiKjpdNdNaUIvXzSoAcx-B5FgYynKslZm5S6WwqQMEb6jFMeg1iN3DphDPbjUMCP2qZevm6fNTT0b7PzxE0POepqqEnyjIS1YOnMnyHkgSAQCtYMAwWATalS4tMFNRb-hbE2MGi-U1j3Z1Mq79x9Uce8ZXjD2a_sCE9x0fqTixO-pRUrQNrIqiX_bZlw96xktnUQy2wCoJiZRxKjZyRhPLxOQPR7FUyd8yFXjCHR_yf5mwYw",
"expires_in": 43199,
"scope": "all",
"userName": "admin",
"jti": "833ecd7d-8f37-4019-8ad0-0e827e383e9c"
}
将返回的 token 复制到 https://jwt.io/ 解析,发现已正确解析。

校验 token
- 使用 Postman 访问
/oauth/check_token端点,我们试着添加错误的token,然后发送请求校验,发现返回错误;

- 使用 Postman 访问
/oauth/check_token端点,我们使用正确的token校验,成功返回信息;

刷新 token
使用 Postman 访问 /oauth/token 端点,其中参数 grant_type 使用 refresh_token,refresh_token 内容为我们从 /oauth/token 获取的 refresh_token(注意不是 access_token);其他参数请自行配置,可参考如下:

搭建资源服务
- 新建
module,在pom.xml中添加依赖:
1
2
3
4
5
6
7
8
9<dependency>
<groupId>org.springframework.boot</groupId>
<artifactId>spring-boot-starter-web</artifactId>
</dependency>
<dependency>
<groupId>org.springframework.cloud</groupId>
<artifactId>spring-cloud-starter-oauth2</artifactId>
</dependency>
- 在
application.yml中添加 token 校验的相关参数,将 token 校验地址改为认证服务的 token 校验地址:
1
2
3
4
5
6oauth2:
resource-id:resource-server
# token 校验地址
check-token-url:http://127.0.0.1:8089/oauth/check_token
client-id:oauth-server
client-secret:123456
配置资源服务
- 新建
ResourceServerConfig类,继承org.springframework.security.oauth2.config.annotation.web.configuration.ResourceServerConfigurerAdapter,添加注解@EnableResourceServer,并配置token校验服务;
1
2
3
4
5
6
7
8
9
10
11
12
13
14
15
16
17
18
19
20
21
22
23
24
25
26
27
28
29
30
31
32
33
34
35
36
37
38
39
40
41
42
43
44
45
46
47
48
49
50
51
52
publicclassResourceServerConfigextendsResourceServerConfigurerAdapter{
("${oauth2.check-token-url}")
private String checkTokenUrl;
("${oauth2.resource-id}")
private String resourceId;
("${oauth2.client-id}")
private String clientId;
("${oauth2.client-secret}")
private String clientSecret;
publicvoidconfigure(ResourceServerSecurityConfigurer resources)throws Exception {
resources.resourceId(resourceId).stateless(true);
resources.tokenServices(resourceServerTokenServices());
}
publicvoidconfigure(HttpSecurity http)throws Exception {
http.authorizeRequests()
.requestMatchers(EndpointRequest.toAnyEndpoint()).permitAll()
.anyRequest()
.authenticated()
.and()
.requestMatchers()
.antMatchers("/users/**");
}
/**
* 配置 token 校验服务
* @return
*/
ResourceServerTokenServices resourceServerTokenServices(){
RemoteTokenServices remoteTokenServices = new RemoteTokenServices();
remoteTokenServices.setCheckTokenEndpointUrl(checkTokenUrl);
remoteTokenServices.setClientId(clientId);
remoteTokenServices.setClientSecret(clientSecret);
remoteTokenServices.setAccessTokenConverter(accessTokenConverter());
return remoteTokenServices;
}
public AccessTokenConverter accessTokenConverter(){
returnnew DefaultAccessTokenConverter();
}
}
- 添加 Controller
1
2
3
4
5
6
7
8
9
10
publicclassHomeController{
("/users")
public Map<String, Object> test(Authentication authentication){
Map<String, Object> data = new HashMap<>(1);
data.put("user", authentication.getPrincipal());
return data;
}
}
测试
使用 Postman 访问 /users ,返回未授权错误:

使用 Postman 访问 /users,带上 token 访问,成功请求并获取到用户数据;

项目源码地址
https://github.com/lanweihong/spring-securuty-oauth2-jwt
参考:
理解OAuth 2.0
OAuth 2 Developers Guide
Spring Security OAuth2自定义令牌配置
以上是 微服务中使用Spring Security + OAuth 2.0 + JWT 搭建认证授权服务 的全部内容, 来源链接: utcz.com/a/131157.html