定时任务实现原理详解

定时任务,可以说是业务系统必不可少的一个部分,今天我们就一起来了解一下 JDK 定时任务实现及原理分析。

一、摘要

在很多业务的系统中,我们常常需要定时的执行一些任务,例如定时发短信、定时变更数据、定时发起促销活动等等。

定时任务实现原理详解

在上篇文章中,我们简单的介绍了定时任务的使用方式,不同的架构对应的解决方案也有所不同,总结起来主要分单机和分布式两大类,本文会重点分析下单机的定时任务实现原理以及优缺点,分布式框架的实现原理会在后续文章中进行分析。

从单机角度,定时任务实现主要有以下 3 种方案:

  • while + sleep 组合
  • 最小堆实现
  • 时间轮实现

二、while+sleep组合

while+sleep 方案,简单的说,就是定义一个线程,然后 while 循环,通过 sleep 延迟时间来达到周期性调度任务。

简单示例如下:

1
2
3
4
5
6
7
8
9
10
11
12
13
14
15
16
publicstaticvoidmain(String[]args){

finallongtimeInterval=5000;

newThread(newRunnable(){

@Override

publicvoidrun(){

while(true){

System.out.println(Thread.currentThread().getName()+"每隔5秒执行一次");

try{

Thread.sleep(timeInterval);

}catch(InterruptedExceptione){

e.printStackTrace();

}

}

}

}).start();

}

实现上非常简单,如果我们想在创建一个每隔3秒钟执行一次任务,怎么办呢?

同样的,也可以在创建一个线程,然后间隔性的调度方法;但是如果创建了大量这种类型的线程,这个时候会发现大量的定时任务线程在调度切换时性能消耗会非常大,而且整体效率低!

面对这种在情况,大佬们也想到了,于是想出了用一个线程将所有的定时任务存起来,事先排好序,按照一定的规则来调度,这样不就可以极大的减少每个线程的切换消耗吗?

正因此,JDK 中的 Timer 定时器由此诞生了!

三、最小堆实现

所谓最小堆方案,正如我们上面所说的,每当有新任务加入的时候,会把需要即将要执行的任务排到前面,同时会有一个线程不断的轮询判断,如果当前某个任务已经到达执行时间点,就会立即执行,具体实现代表就是 JDK 中的 Timer 定时器!

3.1、Timer

首先我们来一个简单的 Timer 定时器例子

1
2
3
4
5
6
7
8
9
10
11
12
13
14
15
16
17
18
publicstaticvoidmain(String[]args){

Timertimer=newTimer();

//每隔1秒调用一次

timer.schedule(newTimerTask(){

@Override

publicvoidrun(){

System.out.println("test1");

}

},1000,1000);

//每隔3秒调用一次

timer.schedule(newTimerTask(){

@Override

publicvoidrun(){

System.out.println("test2");

}

},3000,3000);

}

实现上,好像跟我们上面介绍的 while+sleep 方案差不多,同样也是起一个TimerTask线程任务,只不过共用一个Timer调度器。

下面我们一起来打开源码看看里面到底有些啥!

  • 进入Timer.schedule()方法

从方法上可以看出,这里主要做参数验证,其中TimerTask是一个线程任务,delay表示延迟多久执行(单位毫秒),period表示多久执行一次(单位毫秒)

1
2
3
4
5
6
7
public void schedule(TimerTask task, long delay, long period) {

if (delay < 0)

throw new IllegalArgumentException("Negative delay.");

if (period <= 0)

throw new IllegalArgumentException("Non-positive period.");

sched(task, System.currentTimeMillis()+delay, -period);

}

  • 接着看sched()方法

这步操作中,可以很清晰的看到,在同步代码块里,会将task对象加入到queue

1
2
3
4
5
6
7
8
9
10
11
12
13
14
15
16
17
18
19
20
21
22
23
24
25
26
27
privatevoidsched(TimerTasktask,longtime,longperiod){

if(time<0)

thrownewIllegalArgumentException("Illegal execution time.");

// Constrain value of period sufficiently to prevent numeric

// overflow while still being effectively infinitely large.

if(Math.abs(period)>(Long.MAX_VALUE>>1))

period>>=1;

synchronized(queue){

if(!thread.newTasksMayBeScheduled)

thrownewIllegalStateException("Timer already cancelled.");

synchronized(task.lock){

if(task.state!=TimerTask.VIRGIN)

thrownewIllegalStateException(

"Task already scheduled or cancelled");

task.nextExecutionTime=time;

task.period=period;

task.state=TimerTask.SCHEDULED;

}

queue.add(task);

if(queue.getMin()==task)

queue.notify();

}

}

  • 我们继续来看queue对象

任务会将入到TaskQueue队列中,同时在Timer初始化阶段会将TaskQueue作为参数传入到TimerThread线程中,并且起到线程

1
2
3
4
5
6
7
8
9
10
11
12
13
14
15
16
17
publicclassTimer{

privatefinalTaskQueuequeue=newTaskQueue();

privatefinalTimerThreadthread=newTimerThread(queue);

publicTimer(){

this("Timer-"+serialNumber());

}

publicTimer(Stringname){

thread.setName(name);

thread.start();

}

//...

}

  • TaskQueue其实是一个最小堆的数据实体类,源码如下

每当有新元素加入的时候,会对原来的数组进行重排,会将即将要执行的任务排在数组的前面

1
2
3
4
5
6
7
8
9
10
11
12
13
14
15
16
17
18
19
20
21
22
23
24
25
26
27
28
29
30
classTaskQueue{

privateTimerTask[]queue=newTimerTask[128];

privateintsize=0;

voidadd(TimerTasktask){

// Grow backing store if necessary

if(size+1==queue.length)

queue=Arrays.copyOf(queue,2*queue.length);

queue[++size]=task;

fixUp(size);

}

privatevoidfixUp(intk){

while(k>1){

intj=k>>1;

if(queue[j].nextExecutionTime<=queue[k].nextExecutionTime)

break;

TimerTasktmp=queue[j];

queue[j]=queue[k];

queue[k]=tmp;

k=j;

}

}

//....

}

  • 最后我们来看看TimerThread

TimerThread其实就是一个任务调度线程,首先从TaskQueue里面获取排在最前面的任务,然后判断它是否到达任务执行时间点,如果已到达,就会立刻执行任务

1
2
3
4
5
6
7
8
9
10
11
12
13
14
15
16
17
18
19
20
21
22
23
24
25
26
27
28
29
30
31
32
33
34
35
36
37
38
39
40
41
42
43
44
45
46
47
48
49
50
51
52
53
54
55
56
57
58
59
60
61
62
63
64
65
66
67
68
classTimerThreadextendsThread{

booleannewTasksMayBeScheduled=true;

privateTaskQueuequeue;

TimerThread(TaskQueuequeue){

this.queue=queue;

}

publicvoidrun(){

try{

mainLoop();

}finally{

// Someone killed this Thread, behave as if Timer cancelled

synchronized(queue){

newTasksMayBeScheduled=false;

queue.clear();// Eliminate obsolete references

}

}

}

/**

* The main timer loop. (See class comment.)

*/

privatevoidmainLoop(){

while(true){

try{

TimerTasktask;

booleantaskFired;

synchronized(queue){

// Wait for queue to become non-empty

while(queue.isEmpty()&&newTasksMayBeScheduled)

queue.wait();

if(queue.isEmpty())

break;// Queue is empty and will forever remain; die

// Queue nonempty; look at first evt and do the right thing

longcurrentTime,executionTime;

task=queue.getMin();

synchronized(task.lock){

if(task.state==TimerTask.CANCELLED){

queue.removeMin();

continue;// No action required, poll queue again

}

currentTime=System.currentTimeMillis();

executionTime=task.nextExecutionTime;

if(taskFired=(executionTime<=currentTime)){

if(task.period==0){// Non-repeating, remove

queue.removeMin();

task.state=TimerTask.EXECUTED;

}else{// Repeating task, reschedule

queue.rescheduleMin(

task.period<0?currentTime-task.period

:executionTime+task.period);

}

}

}

if(!taskFired)// Task hasn't yet fired; wait

queue.wait(executionTime-currentTime);

}

if(taskFired)// Task fired; run it, holding no locks

task.run();

}catch(InterruptedExceptione){

}

}

}

}

总结这个利用最小堆实现的方案,相比 while + sleep 方案,多了一个线程来管理所有的任务,优点就是减少了线程之间的性能开销,提升了执行效率;但是同样也带来的了一些缺点,整体的新加任务写入效率变成了 O(log(n))。

同时,细心的发现,这个方案还有以下几个缺点:

  • 串行阻塞:调度线程只有一个,长任务会阻塞短任务的执行,例如,A任务跑了一分钟,B任务至少需要等1分钟才能跑

  • 容错能力差:没有异常处理能力,一旦一个任务执行故障,后续任务都无法执行

3.2、ScheduledThreadPoolExecutor

鉴于 Timer 的上述缺陷,从 Java 5 开始,推出了基于线程池设计的 ScheduledThreadPoolExecutor 。

定时任务实现原理详解

其设计思想是,每一个被调度的任务都会由线程池来管理执行,因此任务是并发执行的,相互之间不会受到干扰。需要注意的是,只有当任务的执行时间到来时,ScheduledThreadPoolExecutor 才会真正启动一个线程,其余时间 ScheduledThreadPoolExecutor 都是在轮询任务的状态。

简单的使用示例:

1
2
3
4
5
6
7
8
9
10
11
12
13
14
15
16
17
publicstaticvoidmain(String[]args){

ScheduledThreadPoolExecutorexecutor=newScheduledThreadPoolExecutor(3);

//启动1秒之后,每隔1秒执行一次

executor.scheduleAtFixedRate((newRunnable(){

@Override

publicvoidrun(){

System.out.println("test3");

}

}),1,1,TimeUnit.SECONDS);

//启动1秒之后,每隔3秒执行一次

executor.scheduleAtFixedRate((newRunnable(){

@Override

publicvoidrun(){

System.out.println("test4");

}

}),1,3,TimeUnit.SECONDS);

}

同样的,我们首先打开源码,看看里面到底做了啥

  • 进入scheduleAtFixedRate()方法

首先是校验基本参数,然后将任务作为封装到ScheduledFutureTask线程中,ScheduledFutureTask继承自RunnableScheduledFuture,并作为参数调用delayedExecute()方法进行预处理

1
2
3
4
5
6
7
8
9
10
11
12
13
14
15
16
17
18
publicScheduledFuture<?>scheduleAtFixedRate(Runnablecommand,

longinitialDelay,

longperiod,

TimeUnitunit){

if(command==null||unit==null)

thrownewNullPointerException();

if(period<=0)

thrownewIllegalArgumentException();

ScheduledFutureTask<Void>sft=

newScheduledFutureTask<Void>(command,

null,

triggerTime(initialDelay,unit),

unit.toNanos(period));

RunnableScheduledFuture<Void>t=decorateTask(command,sft);

sft.outerTask=t;

delayedExecute(t);

returnt;

}

  • 继续看delayedExecute()方法

可以很清晰的看到,当线程池没有关闭的时候,会通过super.getQueue().add(task)操作,将任务加入到队列,同时调用ensurePrestart()方法做预处理

1
2
3
4
5
6
7
8
9
10
11
12
13
14
privatevoiddelayedExecute(RunnableScheduledFuture<?>task){

if(isShutdown())

reject(task);

else{

super.getQueue().add(task);

if(isShutdown()&&

!canRunInCurrentRunState(task.isPeriodic())&&

remove(task))

task.cancel(false);

else

//预处理

ensurePrestart();

}

}

其中super.getQueue()得到的是一个自定义的new DelayedWorkQueue()阻塞队列,数据存储方面也是一个最小堆结构的队列,这一点在初始化new ScheduledThreadPoolExecutor()的时候,可以看出!

1
2
3
4
publicScheduledThreadPoolExecutor(intcorePoolSize){

super(corePoolSize,Integer.MAX_VALUE,0,NANOSECONDS,

newDelayedWorkQueue());

}

打开源码可以看到,DelayedWorkQueue其实是ScheduledThreadPoolExecutor中的一个静态内部类,在添加的时候,会将任务加入到RunnableScheduledFuture数组中,同时线程池中的Woker线程会通过调用任务队列中的take()方法获取对应的ScheduledFutureTask线程任务,接着执行对应的任务线程

1
2
3
4
5
6
7
8
9
10
11
12
13
14
15
16
17
18
19
20
21
22
23
24
25
26
27
28
29
30
31
32
33
34
35
36
37
38
39
40
41
42
43
44
45
46
47
48
49
50
51
52
53
54
55
56
57
58
59
60
61
62
63
64
65
66
67
68
69
70
71
72
73
74
75
76
staticclassDelayedWorkQueueextendsAbstractQueue<Runnable>

implementsBlockingQueue<Runnable>{

privatestaticfinalintINITIAL_CAPACITY=16;

privateRunnableScheduledFuture<?>[]queue=

newRunnableScheduledFuture<?>[INITIAL_CAPACITY];

privatefinalReentrantLocklock=newReentrantLock();

privateintsize=0;

//....

publicbooleanadd(Runnablee){

returnoffer(e);

}

publicbooleanoffer(Runnablex){

if(x==null)

thrownewNullPointerException();

RunnableScheduledFuture<?>e=(RunnableScheduledFuture<?>)x;

finalReentrantLocklock=this.lock;

lock.lock();

try{

inti=size;

if(i>=queue.length)

grow();

size=i+1;

if(i==0){

queue[0]=e;

setIndex(e,0);

}else{

siftUp(i,e);

}

if(queue[0]==e){

leader=null;

available.signal();

}

}finally{

lock.unlock();

}

returntrue;

}

publicRunnableScheduledFuture<?>take()throwsInterruptedException{

finalReentrantLocklock=this.lock;

lock.lockInterruptibly();

try{

for(;;){

RunnableScheduledFuture<?>first=queue[0];

if(first==null)

available.await();

else{

longdelay=first.getDelay(NANOSECONDS);

if(delay<=0)

returnfinishPoll(first);

first=null;// don't retain ref while waiting

if(leader!=null)

available.await();

else{

ThreadthisThread=Thread.currentThread();

leader=thisThread;

try{

available.awaitNanos(delay);

}finally{

if(leader==thisThread)

leader=null;

}

}

}

}

}finally{

if(leader==null&&queue[0]!=null)

available.signal();

lock.unlock();

}

}

}

  • 回到我们最开始说到的ScheduledFutureTask任务线程类,最终执行任务的其实就是它

ScheduledFutureTask任务线程,才是真正执行任务的线程类,只是绕了一圈,做了很多包装,run()方法就是真正执行定时任务的方法。

1
2
3
4
5
6
7
8
9
10
11
12
13
14
15
16
17
18
19
20
21
22
23
24
25
26
27
28
29
30
31
32
33
34
35
36
37
privateclassScheduledFutureTask<V>

extendsFutureTask<V>implementsRunnableScheduledFuture<V>{

/** Sequence number to break ties FIFO */

privatefinallongsequenceNumber;

/** The time the task is enabled to execute in nanoTime units */

privatelongtime;

/**

* Period in nanoseconds for repeating tasks. A positive

* value indicates fixed-rate execution. A negative value

* indicates fixed-delay execution. A value of 0 indicates a

* non-repeating task.

*/

privatefinallongperiod;

/** The actual task to be re-enqueued by reExecutePeriodic */

RunnableScheduledFuture<V>outerTask=this;

/**

* Overrides FutureTask version so as to reset/requeue if periodic.

*/

publicvoidrun(){

booleanperiodic=isPeriodic();

if(!canRunInCurrentRunState(periodic))

cancel(false);

elseif(!periodic)

ScheduledFutureTask.super.run();

elseif(ScheduledFutureTask.super.runAndReset()){

setNextRunTime();

reExecutePeriodic(outerTask);

}

}

//...

}

3.3、小结

ScheduledExecutorService 相比 Timer 定时器,完美的解决上面说到的 Timer 存在的两个缺点!

在单体应用里面,使用 ScheduledExecutorService 可以解决大部分需要使用定时任务的业务需求!

但是这是否意味着它是最佳的解决方案呢?

我们发现线程池中 ScheduledExecutorService 的排序容器跟 Timer 一样,都是采用最小堆的存储结构,新任务加入排序效率是O(log(n)),执行取任务是O(1)

这里的写入排序效率其实是有空间可提升的,有可能优化到O(1)的时间复杂度,也就是我们下面要介绍的时间轮实现!

四、时间轮实现

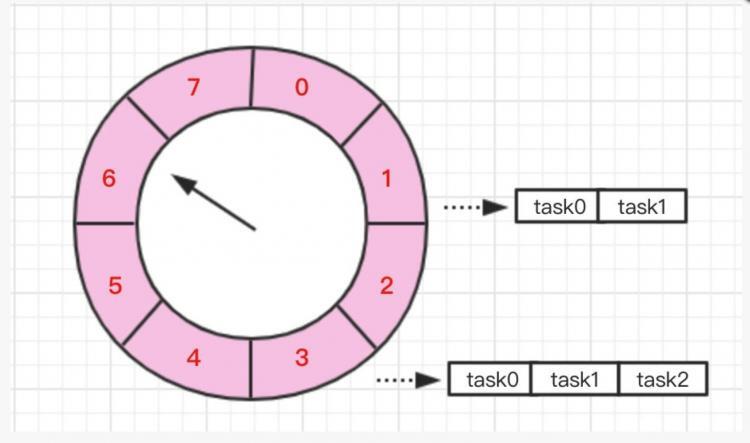
所谓时间轮(RingBuffer)实现,从数据结构上看,简单的说就是循环队列,从名称上看可能感觉很抽象。

它其实就是一个环形的数组,如图所示,假设我们创建了一个长度为 8 的时间轮。
定时任务实现原理详解

插入、取值流程:

  • 1.当我们需要新建一个 1s 延时任务的时候,则只需要将它放到下标为 1 的那个槽中,2、3、…、7也同样如此。
  • 2.而如果是新建一个 10s 的延时任务,则需要将它放到下标为 2 的槽中,但同时需要记录它所对应的圈数,也就是 1 圈,不然就和 2 秒的延时消息重复了
  • 3.当创建一个 21s 的延时任务时,它所在的位置就在下标为 5 的槽中,同样的需要为他加上圈数为 2,依次类推…

因此,总结起来有两个核心的变量:

  • 数组下标:表示某个任务延迟时间,从数据操作上对执行时间点进行取余
  • 圈数:表示需要循环圈数

通过这张图可以更直观的理解!

定时任务实现原理详解

当我们需要取出延时任务时,只需要每秒往下移动这个指针,然后取出该位置的所有任务即可,取任务的时间消耗为O(1)

当我们需要插入任务式,也只需要计算出对应的下表和圈数,即可将任务插入到对应的数组位置中,插入任务的时间消耗为O(1)

如果时间轮的槽比较少,会导致某一个槽上的任务非常多,那么效率也比较低,这就和 HashMap 的 hash 冲突是一样的,因此在设计槽的时候不能太大也不能太小。

4.1、代码实现

  • 首先创建一个RingBufferWheel时间轮定时任务管理器

1
2
3
4
5
6
7
8
9
10
11
12
13
14
15
16
17
18
19
20
21
22
23
24
25
26
27
28
29
30
31
32
33
34
35
36
37
38
39
40
41
42
43
44
45
46
47
48
49
50
51
52
53
54
55
56
57
58
59
60
61
62
63
64
65
66
67
68
69
70
71
72
73
74
75
76
77
78
79
80
81
82
83
84
85
86
87
88
89
90
91
92
93
94
95
96
97
98
99
100
101
102
103
104
105
106
107
108
109
110
111
112
113
114
115
116
117
118
119
120
121
122
123
124
125
126
127
128
129
130
131
132
133
134
135
136
137
138
139
140
141
142
143
144
145
146
147
148
149
150
151
152
153
154
155
156
157
158
159
160
161
162
163
164
165
166
167
168
169
170
171
172
173
174
175
176
177
178
179
180
181
182
183
184
185
186
187
188
189
190
191
192
193
194
195
196
197
198
199
200
201
202
203
204
205
206
207
208
209
210
211
212
213
214
215
216
217
218
219
220
221
222
223
224
225
226
227
228
229
230
231
232
233
234
235
236
237
238
239
240
241
242
243
244
245
246
247
248
249
250
251
252
253
254
255
256
257
258
259
260
261
262
263
264
265
266
267
268
269
270
271
272
273
274
275
276
277
278
279
280
281
282
283
284
285
286
287
288
289
290
291
292
293
294
295
296
297
298
299
300
301
302
303
304
305
306
307
308
309
310
311
312
313
314
315
316
317
318
319
320
321
322
323
324
325
326
327
328
329
330
331
332
333
334
335
336
337
338
339
340
341
342
343
344
345
346
347
348
349
350
351
352
353
354
355
356
357
358
359
360
361
362
363
364
365
366
367
368
369
370
371
372
373
374
375
376
377
378
publicclassRingBufferWheel{

privateLoggerlogger=LoggerFactory.getLogger(RingBufferWheel.class);

/**

* default ring buffer size

*/

privatestaticfinalintSTATIC_RING_SIZE=64;

privateObject[]ringBuffer;

privateintbufferSize;

/**

* business thread pool

*/

privateExecutorServiceexecutorService;

privatevolatileintsize=0;

/***

* task stop sign

*/

privatevolatilebooleanstop=false;

/**

* task start sign

*/

privatevolatileAtomicBooleanstart=newAtomicBoolean(false);

/**

* total tick times

*/

privateAtomicIntegertick=newAtomicInteger();

privateLocklock=newReentrantLock();

privateConditioncondition=lock.newCondition();

privateAtomicIntegertaskId=newAtomicInteger();

privateMap<Integer,Task>taskMap=newConcurrentHashMap<>(16);

/**

* Create a new delay task ring buffer by default size

*

* @param executorService the business thread pool

*/

publicRingBufferWheel(ExecutorServiceexecutorService){

this.executorService=executorService;

this.bufferSize=STATIC_RING_SIZE;

this.ringBuffer=newObject[bufferSize];

}

/**

* Create a new delay task ring buffer by custom buffer size

*

* @param executorService the business thread pool

* @param bufferSize custom buffer size

*/

publicRingBufferWheel(ExecutorServiceexecutorService,intbufferSize){

this(executorService);

if(!powerOf2(bufferSize)){

thrownewRuntimeException("bufferSize=["+bufferSize+"] must be a power of 2");

}

this.bufferSize=bufferSize;

this.ringBuffer=newObject[bufferSize];

}

/**

* Add a task into the ring buffer(thread safe)

*

* @param task business task extends {@link Task}

*/

publicintaddTask(Tasktask){

intkey=task.getKey();

intid;

try{

lock.lock();

intindex=mod(key,bufferSize);

task.setIndex(index);

Set<Task>tasks=get(index);

intcycleNum=cycleNum(key,bufferSize);

if(tasks!=null){

task.setCycleNum(cycleNum);

tasks.add(task);

}else{

task.setIndex(index);

task.setCycleNum(cycleNum);

Set<Task>sets=newHashSet<>();

sets.add(task);

put(key,sets);

}

id=taskId.incrementAndGet();

task.setTaskId(id);

taskMap.put(id,task);

size++;

}finally{

lock.unlock();

}

start();

returnid;

}

/**

* Cancel task by taskId

* @param id unique id through {@link #addTask(Task)}

* @return

*/

publicbooleancancel(intid){

booleanflag=false;

Set<Task>tempTask=newHashSet<>();

try{

lock.lock();

Tasktask=taskMap.get(id);

if(task==null){

returnfalse;

}

Set<Task>tasks=get(task.getIndex());

for(Tasktk:tasks){

if(tk.getKey()==task.getKey()&&tk.getCycleNum()==task.getCycleNum()){

size--;

flag=true;

taskMap.remove(id);

}else{

tempTask.add(tk);

}

}

//update origin data

ringBuffer[task.getIndex()]=tempTask;

}finally{

lock.unlock();

}

returnflag;

}

/**

* Thread safe

*

* @return the size of ring buffer

*/

publicinttaskSize(){

returnsize;

}

/**

* Same with method {@link #taskSize}

* @return

*/

publicinttaskMapSize(){

returntaskMap.size();

}

/**

* Start background thread to consumer wheel timer, it will always run until you call method {@link #stop}

*/

publicvoidstart(){

if(!start.get()){

if(start.compareAndSet(start.get(),true)){

logger.info("Delay task is starting");

Threadjob=newThread(newTriggerJob());

job.setName("consumer RingBuffer thread");

job.start();

start.set(true);

}

}

}

/**

* Stop consumer ring buffer thread

*

* @param force True will force close consumer thread and discard all pending tasks

* otherwise the consumer thread waits for all tasks to completes before closing.

*/

publicvoidstop(booleanforce){

if(force){

logger.info("Delay task is forced stop");

stop=true;

executorService.shutdownNow();

}else{

logger.info("Delay task is stopping");

if(taskSize()>0){

try{

lock.lock();

condition.await();

stop=true;

}catch(InterruptedExceptione){

logger.error("InterruptedException",e);

}finally{

lock.unlock();

}

}

executorService.shutdown();

}

}

privateSet<Task>get(intindex){

return(Set<Task>)ringBuffer[index];

}

privatevoidput(intkey,Set<Task>tasks){

intindex=mod(key,bufferSize);

ringBuffer[index]=tasks;

}

/**

* Remove and get task list.

* @param key

* @return task list

*/

privateSet<Task>remove(intkey){

Set<Task>tempTask=newHashSet<>();

Set<Task>result=newHashSet<>();

Set<Task>tasks=(Set<Task>)ringBuffer[key];

if(tasks==null){

returnresult;

}

for(Tasktask:tasks){

if(task.getCycleNum()==0){

result.add(task);

size2Notify();

}else{

// decrement 1 cycle number and update origin data

task.setCycleNum(task.getCycleNum()-1);

tempTask.add(task);

}

// remove task, and free the memory.

taskMap.remove(task.getTaskId());

}

//update origin data

ringBuffer[key]=tempTask;

returnresult;

}

privatevoidsize2Notify(){

try{

lock.lock();

size--;

if(size==0){

condition.signal();

}

}finally{

lock.unlock();

}

}

privatebooleanpowerOf2(inttarget){

if(target<0){

returnfalse;

}

intvalue=target&(target-1);

if(value!=0){

returnfalse;

}

returntrue;

}

privateintmod(inttarget,intmod){

// equals target % mod

target=target+tick.get();

returntarget&(mod-1);

}

privateintcycleNum(inttarget,intmod){

//equals target/mod

returntarget>>Integer.bitCount(mod-1);

}

/**

* An abstract class used to implement business.

*/

publicabstractstaticclassTaskextendsThread{

privateintindex;

privateintcycleNum;

privateintkey;

/**

* The unique ID of the task

*/

privateinttaskId;

@Override

publicvoidrun(){

}

publicintgetKey(){

returnkey;

}

/**

*

* @param key Delay time(seconds)

*/

publicvoidsetKey(intkey){

this.key=key;

}

publicintgetCycleNum(){

returncycleNum;

}

privatevoidsetCycleNum(intcycleNum){

this.cycleNum=cycleNum;

}

publicintgetIndex(){

returnindex;

}

privatevoidsetIndex(intindex){

this.index=index;

}

publicintgetTaskId(){

returntaskId;

}

publicvoidsetTaskId(inttaskId){

this.taskId=taskId;

}

}

privateclassTriggerJobimplementsRunnable{

@Override

publicvoidrun(){

intindex=0;

while(!stop){

try{

Set<Task>tasks=remove(index);

for(Tasktask:tasks){

executorService.submit(task);

}

if(++index>bufferSize-1){

index=0;

}

//Total tick number of records

tick.incrementAndGet();

TimeUnit.SECONDS.sleep(1);

}catch(Exceptione){

logger.error("Exception",e);

}

}

logger.info("Delay task has stopped");

}

}

}

  • 接着,编写一个客户端,测试客户端

1
2
3
4
5
6
7
8
9
10
11
12
13
14
15
public static void main(String[] args) {

RingBufferWheel ringBufferWheel = new RingBufferWheel( Executors.newFixedThreadPool(2));

for (int i = 0; i < 3; i++) {

RingBufferWheel.Task job = new Job();

job.setKey(i);

ringBufferWheel.addTask(job);

}

}

public static class Job extends RingBufferWheel.Task{

@Override

public void run() {

System.out.println("test5");

}

}

运行结果:

1
2
3
test5

test5

test5

如果要周期性执行任务,可以在任务执行完成之后,再重新加入到时间轮中。

详细源码分析地址:点击这里获取

4.2、应用

时间轮的应用还是非常广的,例如在 Disruptor 项目中就运用到了 RingBuffer,还有Netty中的HashedWheelTimer工具原理也差不多等等,有兴趣的同学,可以阅读一下官方对应的源码!

五、小结

本文主要围绕单体应用中的定时任务原理进行分析,可能也有理解不对的地方,欢迎批评指出!

六、参考

1、简书 - 谈谈定时任务解决方案原理

2、crossoverJie’s Blog - 延时消息之时间轮

以上是 定时任务实现原理详解 的全部内容, 来源链接: utcz.com/a/130478.html

回到顶部