【Java】欢迎光临Spring时代(一) 上柱国IOC列传
欢迎光临Spring时代(一) 上柱国IOC列传
北冥有只鱼发布于 57 分钟前
缘起
2002年 Rod Johnson在2002年编著的《Expert One-On-One J2EE Design And Development》一书中对,对Java EE正统框架(EJB)臃肿、低效、脱离现实的学院派提出了质疑,然后以该书为指导思想,编写了interface21框架。然后在interface21框架的基础上,经过重新设计,于2004年发布。到现在开始已经十八年左右了。
开发者: Spring Framework 请回答
在《欢迎光临Spring时代-绪论》中我们提出了几个关于如何取对象的问题,这里我们再回忆一下:
- 对象之间有复杂的依赖关系的时候,在不希望是硬编码的情况下,如何取对象才能做到优雅和可配置化?
- 知道如何创建对象,但是无法把握创建对象的时机。我现在就希望把如何创建对象代码交给"负责什么时候创建的代码"。后者在对应的时机,就调用对应的创建对象函数。
- 虽然Java不用操心内存回收问题,但是我还是希望能节省资源一下,在控制器这一层,不希望处理的每个请求都new一下对应的service实现类,我希望能将该Service做成单例模式,能否在做成单例的同时又做到让取对象优雅呢?
Spring Framework: IOC容器就是答案
准备工作
本篇我们还基于maven来做示例,基本上开发Spring Framework的程序基本上就只需要五个jar包就够了,分别是下面这五个:
- spring-context
- spring-core
- spring-aop
- spring-beans
- spring-expression
这次我们选的版本都是5.2.8.RELEASE。
如果你不会用maven,然后请参考我的这篇博客:
- Maven学习笔记
如果暂时还不想学maven,还想做jar包下载。那么有两种形式可以下载到对应的jar包:
- Spring Framework 官方maven库
浏览器访问这个网址: https://maven.springframework...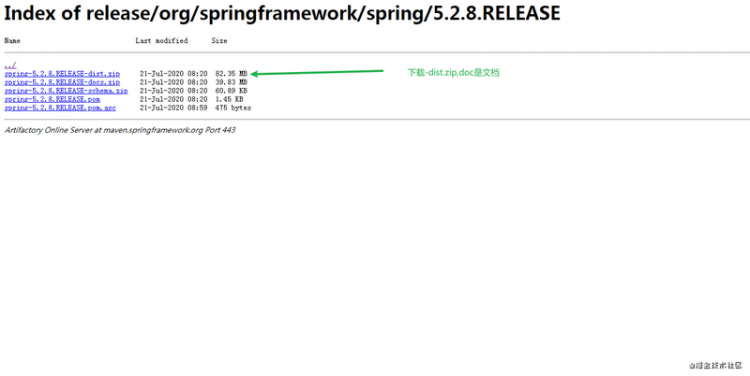
下载完粘贴到对应的lib目录下即可。
- 去maven的中央仓库下载
第一个Spring Framework程序
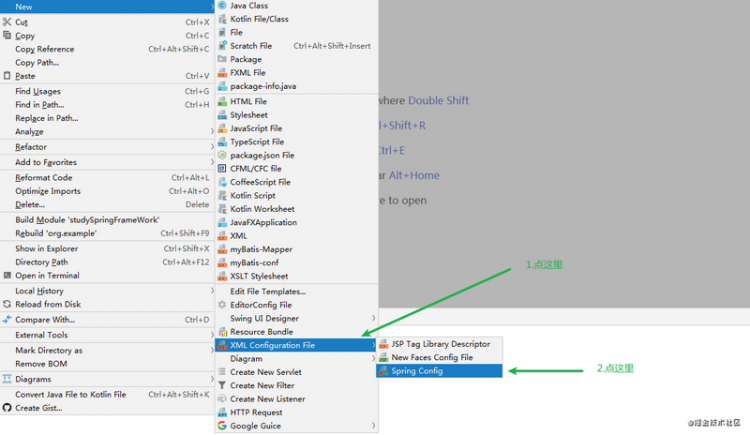
一般Spring框架的这个配置文件,我们都命名为applicationContext.xml,这是一种大致的约定。
上面的问题是如何优雅的取对象,在取之前你首先就得存,向applicationContext.xml放对象。怎么放?
像下面这样放: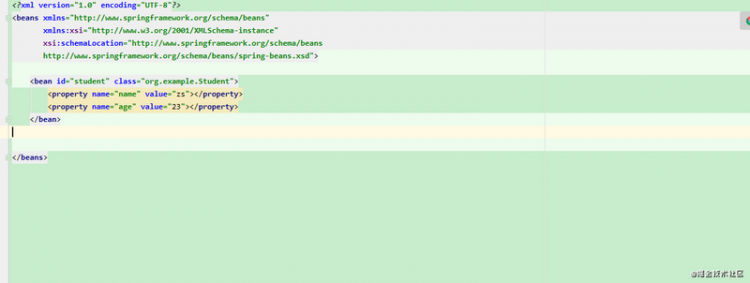
我建了一个Student类,然后里面有name和age属性,无参和有参构造函数,get和set函数,重写了toString方法。
bean里的id是唯一的,class是Student类的全类名(包名+类名)。
如何取:
public class SpringDemo {public static void main(String[] args) {
// 加载配置文件
ApplicationContext applicationContext = new ClassPathXmlApplicationContext("applicationContext.xml");
Student student = (Student) applicationContext.getBean("student");
System.out.println(student);
}
}
打印结果: 
这就叫DI和IOC
我们直接new,在Spring的配置文件配置参数,然后间接取对象的方式, 我们称之为控制反转(IOC Inversion of Control)或依赖注入(DI Dependency Injection)。首先解释一下为什么有两个称呼,刚开始是只有控制反转,后来发现控制反转这个概念有点难以理解,就在一次大会上讲控制反转改为依赖注入。
那什么是控制反转,我们可以认为new 对象是一种控制权,然后控制反转就是我们将new对象的控制权交给Spring Framework。依赖注入呢? 其实也是一样,我们可以理解为在Spring的配置文件配置完对象之后,Spring将该对象给需要该对象的对象,此时就回答了上面我们提出的第二个问题:
对象之间有依赖关系该如何配置呢?
用上面的配置只能解决简单的值,那如果某个对象的某个属性也是对象类型的呢? Spring也想到了,当对象的属性是属性用ref注入,像下面这样:
<bean id = "studentCard" class = "org.example.StudentCard"><property name = "id" value="1"></property>
<property name = "cardNo" value="code01"></property>
</bean>
<bean id="student" class="org.example.Student">
<property name = "name" value = "zs"></property>
<property name = "age" value = "23"></property>
<property name = "studentCard" ref = "studentCard"></property>
</bean>
普通属性用value,那么引用类型就用ref,ref的值是配置文件中bean标签的id属性,所以在applicationContext.xml中id禁止重复。
通过注解将对象放入IOC容器中
我们上面的第三个问题,我们Dao层的对象在对应的Service只需要一份就可以了,Spring容器中的对象默认都是单例的。
那Dao层有的时候都没有属性,我们还要写在配置文件中吗?Spring也想到了,提供了下面几个注解:
@Controller 对应控制层@Service 对应服务层
@Component 通用注解,如果你不确定这个对象属于那一层的话,就用这个。
@Repository 对应dao层
然后在配置文件中加入:
<!--配置扫描器,base-package放需要扫描的包,指定了包之后,Spring会扫描。该包下面的类,如果有以上四个注解,那么就会将对应的类加入到容器中,id默认为类名首字母转小写。
多个包也可以写,用逗号隔开即可。如果写是一个包下面有多个包,
比如org.example.service,org.example.dao。写到二级包:org.example。Spring会自动扫描所有的子包。
-->
<context:component-scan base-package="org.example"/>

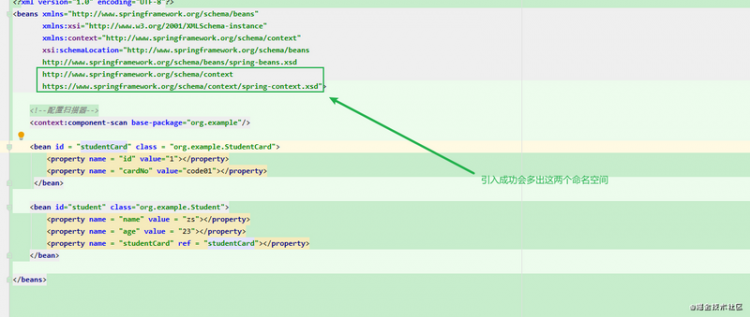
所以我们上面的第三个问题就得到了回答,我们写Service层需要对应的dao层对应的时候就可以这么写:
@Servicepublic class StudentService {
// 假装Student是dao层,被打上@Autowired的属性,Spring在扫描的时候会自动去容器去寻找对应的类型
// 然后给该属性注入值,所以如果你有两个IOC容器中有两个Student对象,那么可能就会报错
// Spring官方并不推荐如此注入
@Autowired
private Student student;
public void print(){
System.out.println(student);
}
}
官方推荐的注入方式是 @Autowired出现在set方法或构造方法上:
@Servicepublic class StudentService {
private Student student;
@Autowired
public StudentService(Student student) {
this.student = student;
}
public void print(){
System.out.println(student);
}
}
至此我们上面提出的第一个问题和第三个问题得到了解决:
- 对象有复杂的依赖关系,我们在配置文件中佩,在调用的类中,用Autowired自动注入,这很优雅。
- 对应的Serveice层通过注解就能将dao层注入,就不用再每个业务方法中,重复new了。
然后有不懂SpringMVC框架的同学这里可能就会问了,那我在Servlet中该如何取IOC容器中的对象啊,Servlet的初始化又不像main函数,有个明确的入口,用户是可以从任意一个网页进入的。对于这个问题可以参看:
接着我们回答第二个问题,难以把握对象的创建时机的这个问题,对于这个问题,Spring框架的答案是条件注解。
IOC容器有两种形式,一种是基于配置文件(我们上面用的就是),一种是基于注解。条件注解是基于注解形式的,查了一些资料还是没找到如何用配置文件实现条件注解的。但是基于配置文件的IOC还需要再补充一些,所以下面是先将配置文件形式的讲解完毕后,才会讲基于注解的,条件注解也是基于注解。
基于XML的依赖注入
不同的注入方式
我们知道创建一个对象是有几种不同的方式的:
- 通过无参构造函数,然后通过set函数设置值
- 通过有参构造函数
- 通过反射
- 通过序列化
同样的在配置文件中配置对象参数的也有几种形式,上面的property的配置的形式就是通过第一种方式来创建对象的。有兴致的同学可以测试下。
接下来我们介绍的就是通过第二种方式将对象放入IOC容器中:
<bean id = "studentCard" class = "org.example.StudentCard"><constructor-arg value="1" index = "0"/>
<constructor-arg value="11" index = "1"/>
</bean>
constructor-arg有四个属性:
- value (具体的值,不加index的话,具体的值和构造函数要求的参数类型要保持一致,默认情况下标签的先后顺序和构造函数保持一致)
- index 用于指定给构造函数的第几个参数
- type 指定参数类型
- name 用于指定参数名
- ref 这个讲过是指引用类型
通过反射产生对象:
<bean id = "studentCard" class = "org.example.StudentCard" p:id="1" p:cardNo="23"></bean>

引用类型通过p:属性名-ref来设定IOC容器中bean的ID
将集合放入对应的IOC容器中
首先我们准备一个集合的类,构造函数省略,get和set方法省略:
public class CollectionDemo {private List<String> list;
private String[] arrayString;
private Set<String> set;
private Map<String, Object> map;
private Properties properties;
}
Spring配置文件:
<bean id = "collectionDemo" class = "org.example.CollectionDemo"><property name="list">
<value>
14
</value>
</property>
<property name="arrayString">
<array>
<value>ddd</value>
</array>
</property>
<property name = "set">
<set>
<value>aaa</value>
</set>
</property>
<property name="map">
<map>
<entry>
<key>
<value>zs</value>
</key>
<value>zs</value>
</entry>
</map>
</property>
<property name = "properties">
<props>
<prop key="aa">bb</prop>
<prop key="cc">dd</prop>
</props>
</property>
</bean>
示例:
public class SpringDemo {public static void main(String[] args) {
ApplicationContext applicationContext = new ClassPathXmlApplicationContext("applicationContext.xml");
CollectionDemo collectionDemo = (CollectionDemo)applicationContext.getBean("collectionDemo");
System.out.println(collectionDemo);
}
}

刚学Spring框架的时候,视频上说控制反转,我们自己不再new对象,我以为就是真的不再new了,就在配置文件里面配就行了,后来随着编码量的上升,才发现这是对Spring框架的一种误解,是有复杂依赖关系的我们在配置文件里面配,像你要是想用个HashMap,就不必了。
特殊值的注入问题
我们在配置文件配置对象的时候,用的值都和XML预定义的符号值不冲突,什么意思呢? 假设我给对象的值是<,就会报错。
我们上面配置Student对象的参数的时候,我们用的是这种:
<bean id="student" class="org.example.Student"><property name = "name" value = "zs"></property>
<property name = "age" value = "23"></property>
<property name = "studentCard" ref = "studentCard"></property>
</bean>
我们称之为value属性注入,其实还可以这么写:
<bean id="student" class="org.example.Student"><property name = "name" >
<value type="java.lang.String">zs</value>
</property>
<property name = "age" value = "23"></property>
<property name = "studentCard" ref = "studentCard"></property>
</bean>
我们称之为value子标签注入。 两者的区别如下: 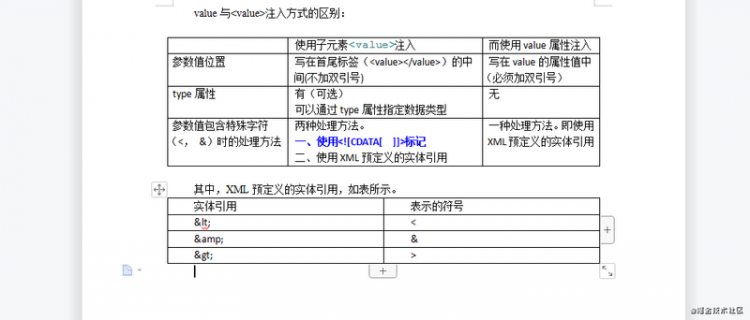
所以当我们配置的属性值是< 这个符号的时候我们就可以这么写:
<bean id="student" class="org.example.Student"><property name = "name" >
<value type="java.lang.String">z<s</value>
</property>
</bean>
也可以这么写:
<bean id="student" class="org.example.Student"><property name = "name" >
<value type="java.lang.String"><![CDATA[z<3]]></value>
</property>
</bean>
那我要给属性的值注入null怎么办? 方法有两个
- 不给值(property 标签都不写,写标签value里面啥都不写,如果是String的话,默认给的是空字符串)
- 用null标签
<bean id="student" class="org.example.Student" autowire = "byName"><property name = "name" >
<null/>
</property>
</bean>
各种类型的自动注入
上面我们提到在Spring的配置文件中配置对象的属性值的时候,如果属性值是对象类型的,那么用ref就可以了,其实这个也可以不写,用自动注入就可以了,用这种自动注入也有两种方式:
- byName Spring会自动的去寻找容器中id为对象属性类名首字母转小写的对象。
<bean id = "studentCard" class = "org.example.StudentCard"><property name="id" value="1"></property>
<property name="cardNo" value="zs"></property>
</bean>
<bean id="student" class="org.example.Student" autowire = "byName">
<property name = "name" >
<value type="java.lang.String"><![CDATA[z<3]]></value>
</property>
<property name="age">
<value>34</value>
</property>
</bean>
运行结果不再展示,假设你把第一个bean标签的id改为studentCard1,那么就注入不了。
- byType 按类型,自动去寻找匹配的类型,如果你有两个StudentCard类型,也是无法注入。
<bean id="student" class="org.example.Student" autowire = "byType"><property name = "name" >
<value type="java.lang.String"><![CDATA[z<3]]></value>
</property>
<property name="age">
<value>34</value>
</property>
</bean
基于注解的依赖注入
@Bean+方法
在xml里面限制还是挺多的,如果你不小心写错了属性名,那么也是到运行时才能发现错误,如果你不小心给错了类型值,也是到运行时才能发现错误,比如属性是数字类型,你给了一个字符串。很多时候我们都希望尽可能早的发现错误,那么我们的配置文件能不能变换一种形式呢? 用代码做配置文件怎么样呢? 好啊,很好的想法啊,那我们就用代码做配置文件吧。
@Configurationpublic class SpringConfig {
@Bean(name = "studentCard")
public StudentCard studentCard(){
return new StudentCard(11,"22");
}
@Bean
public Student student(@Qualifier("studentCard") StudentCard studentCard){
return new Student(20,"zs",studentCard);
}
@Bean
public StudentCard studentCard2(){
return new StudentCard(11,"22");
}
}
private static void annotationTest() {
ApplicationContext applicationContext = new AnnotationConfigApplicationContext(SpringConfig.class);
Student student = applicationContext.getBean("student", Student.class);
System.out.println(student);
}
运行结果: 
- 问如何让一个类成为一个配置文件?
- 如何将bean标签移植到配置类中?
- 那我想自定义id名,可以吗?
- 那引用类型的属性注入怎么办?
- 那我有两个对象,都属于一个类。 我想指定一个对象注入怎么办?
@import 、FactoryBean、ImportBeanDefinitionRegistrar、ImportSelector
@import(注解) 、FactoryBean(接口)、ImportBeanDefinitionRegistrar(接口)、ImportSelector(接口)是Spring提供的将对象加入IOC容器的另外方式。
- @import
@Configuration@ComponentScan(basePackages = "org.example")
// ImportTest是我建的一个空类,用来测试@import,value是一个数组
@Import(value = {ImportTest.class})
public class SpringConfig {
}
测试一下:
private static void annotationPrintAllBean() {ApplicationContext applicationContext = new AnnotationConfigApplicationContext(SpringConfig.class);
String[] beanNames = applicationContext.getBeanDefinitionNames();
for (String beanName : beanNames) {
System.out.println(beanName);
}
}
测试结果: 
这种方式加进来的bean名是全类名。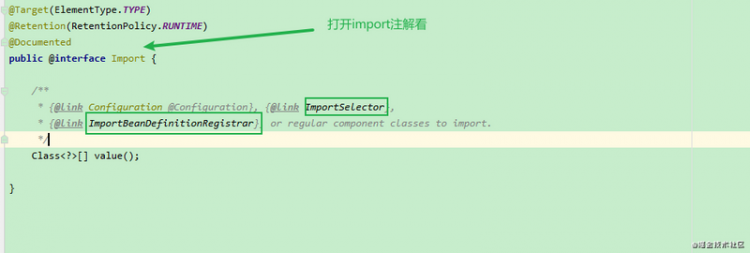
- ImportSelector简述
首先实现ImportSelector接口:
public class MyImportSelector implements ImportSelector {// 最后返回的即为需要加入到容器的类名
@Override
public String[] selectImports(AnnotationMetadata importingClassMetadata) {
return new String[]{ImportTest.class.getName()};
}
}
然后在配置类上引入:
@Configuration@ComponentScan(basePackages = "org.example")
@Import(value = MyImportSelector.class)
public class SpringConfig {
}
测试代码:
private static void annotationPrintAllBean() {ApplicationContext applicationContext = new AnnotationConfigApplicationContext(SpringConfig.class);
String[] beanNames = applicationContext.getBeanDefinitionNames();
for (String beanName : beanNames) {
System.out.println(beanName);
}
}
测试结果: 
AnnotationMetadata 中携带打上@import注解的配置类上的元信息。
- ImportBeanDefinitionRegistrar概述
先实现接口:
public class MyImportBeanDefinitionRegistrar implements ImportBeanDefinitionRegistrar {@Override
public void registerBeanDefinitions(AnnotationMetadata importingClassMetadata, BeanDefinitionRegistry registry) {
// BeanDefinitionRegistry可以将bean注册进IOC工厂
// 我们需要准备一个BeanDefinition。
BeanDefinition beanDefinition = new RootBeanDefinition(ImportTest.class);
registry.registerBeanDefinition("importTest",beanDefinition);
}
}
配置类引入:
@Configuration@ComponentScan(basePackages = "org.example")
@Import(value = MyImportBeanDefinitionRegistrar.class)
public class SpringConfig {
}
测试代码:
private static void annotationPrintAllBean() {ApplicationContext applicationContext = new AnnotationConfigApplicationContext(SpringConfig.class);
String[] beanNames = applicationContext.getBeanDefinitionNames();
for (String beanName : beanNames) {
System.out.println(beanName);
}
}
测试结果: 
- FactoryBean
FactoryBean是一个接口,还有一个接口叫BeanFactory。
反射是框架的灵魂,有的时候,某个bean重复性的属性太多,在配置文件里面配置也是一件让人烦心的事情,但是程序不是擅长做重复工作吗? 我们能否少写点,从配置文件中读,然后用程序来做这种重复性工作呢?这也就是FactoryBean接口做的事情。
@Componentpublic class MyFactory implements FactoryBean<Car> {
private String cardInfo;
public MyFactory() {
// 假装从Spring的配置文件中读到了值。
this.cardInfo = "brand,100,200.12";;
}
/**
* 向IOC容器中放入对象
* @return
* @throws Exception
*/
@Override
public Car getObject() throws Exception {
Car car = new Car();
String[] cardInfoArray = cardInfo.split(",");
car.setBrand(cardInfoArray[0]);
car.setMaxSpeed(Integer.parseInt(cardInfoArray[1]));
car.setPrice(Double.parseDouble(cardInfoArray[2]));
return car;
}
/**
* 向IOC容器返回指定的类型
* @return
*/
@Override
public Class<?> getObjectType() {
return Car.class;
}
/**
* 设置是否是单例模式
* @return
*/
@Override
public boolean isSingleton() {
return false;
}
}
测试代码:
private static void testFactoryBean() {ApplicationContext applicationContext = new AnnotationConfigApplicationContext(SpringConfig.class);
// 代表取MyFactory
MyFactory myFactory = applicationContext.getBean("&myFactory", MyFactory.class);
// 不加&代表取工厂中放入的bean
Car car = applicationContext.getBean("myFactory", Car.class);
System.out.println(myFactory);
System.out.println(car);
}
测试结果: 
扫描包移植[email protected]
排除某些类
在配置类上加上:
@ComponentScan(basePackages = "org.example", excludeFilters = {@ComponentScan.Filter(type = FilterType.ANNOTATION,value = {Service.class})})- basePackages: 默认扫描本包及其子包。
- excludeFilters : 排除的类,要求两个属性,第一个是type,可以理解为策略。
@Configuration@ComponentScan(basePackages = "org.example", excludeFilters = {@ComponentScan.Filter(type = FilterType.ANNOTATION,value = {Service.class})})
// @ComponentScan(basePackages = "org.example", excludeFilters = {@ComponentScan.Filter(type = FilterType.ASSIGNABLE_TYPE,value = {StudentDao.class})})
// @ComponentScan(basePackages = "org.example", includeFilters= {@ComponentScan.Filter(type = FilterType.ASSIGNABLE_TYPE,value = {StudentDao.class})},useDefaultFilters = false)
// @ComponentScan(basePackages = "org.example", includeFilters = {@ComponentScan.Filter(type = FilterType.CUSTOM,value = {MyFilter.class})},useDefaultFilters = false)
public class SpringConfig {
@Bean(name = "studentCard")
public StudentCard studentCard(){
return new StudentCard(11,"22");
}
@Bean
public Student student(@Qualifier("studentCard") StudentCard studentCard){
return new Student(20,"zs",studentCard);
}
@Bean
public StudentCard studentCard2(){
return new StudentCard(11,"22");
}
}
private static void annotationTest() {
ApplicationContext applicationContext = new AnnotationConfigApplicationContext(SpringConfig.class);
// 获取IOC容器中所有的bean
String[] beanNameArray = applicationContext.getBeanDefinitionNames();
for (String beanDefinitionName : beanNameArray) {
System.out.println(beanDefinitionName);
}
}
测试结果: 
没有service了。
下面解除第二个@ComponentScan的注释,将第一个@ComponentScan的注释解除掉。再度测试: 
会发现StudentDao没了。
只包含某些类
与排除指定的类是类似的,只不过Spring默认会加载子包上需要加入到IOC容器中的类,也就是说你想只包含的类在basePackages下面,那么这个包含就是无效的。所以我们需要通过useDefaultFilters来禁止Spring的默认行为。
我们注释掉其他的@ComponentScan,只让第三个@ComponentScan解除注释。测试一下: 
会发现打上@Service类的对象没了。
自定义规则排除或包含某些类
自定义规则要实现TypeFilter,像下面这样:
public class MyFilter implements TypeFilter {// 返回true加入到IOC容器中
@Override
public boolean match(MetadataReader metadataReader, MetadataReaderFactory metadataReaderFactory) throws IOException {
// 获取扫描的元数据类型
ClassMetadata classMetadata = metadataReader.getClassMetadata();
// 每扫到子包下的一个类,这个方法就会被调用。
String className = classMetadata.getClassName();
// 只要类名中包含Student的,我就加入到容器中
if (className.contains("Student")){
return true;
}else{
return false;
}
}
}
还是上面的配置类, 我们解除第四个@ComponentScan的注释,其他的全部注释。测试一下。
HomeStudentCondition是我自己建的类,没加我们介绍的Spring提供的注解,也加进来了。
条件注解
条件注解可以让某些对象在某些条件满足的情况下,才加入到IOC容器中(等价于创建该对象),如果该条件不满足则该对象不创建,也就是不加入到对应的IOC容器中。那条件该怎么告诉Spring框架呢? 也是通过一个类,这个类要求实现Condition接口。
顺带提一下Spring Boot很大程度上也依赖于条件注解。
首先两个bean:
public class HomeStudent extends Student {/**
* 出入证 无参和构造函数 get set方法不再列出
*/
private String pass;
}
public class BoardStudent extends Student {
/**
* 宿舍号 无参和构造函数 get set方法不再列出
*/
private String dormitoryNumber;
}
然后准备条件,需要实现Condition接口:
public class HomeStudentCondition implements Condition {@Override
public boolean matches(ConditionContext conditionContext, AnnotatedTypeMetadata annotatedTypeMetadata) {
// 获取当前的环境,一般开发环境分成三套: 开发、测试、生产。
Environment environment = conditionContext.getEnvironment();
// 从环境中获取学生类型
String studentType = environment.getProperty("studentType");
// 如果是住宿学生就加入到IOC容器中
if ("HomeStudent".equals(studentType)){
return true;
}
return false;
}
}
public class BoardStudentCondition implements Condition {
@Override
public boolean matches(ConditionContext context, AnnotatedTypeMetadata metadata) {
Environment environment = context.getEnvironment();
String studentType = environment.getProperty("studentType");
if ("BoardStudent".equals(studentType)){
return true;
}
return false;
}
}
然后在对应的bean上加上条件变量:
@Configuration@ComponentScan(basePackages = "org.example")
public class SpringConfig {
@Bean
@Conditional(HomeStudentCondition.class)
public HomeStudent homeStudent() {
return new HomeStudent("出入证");
}
@Bean
@Conditional(BoardStudentCondition.class)
public BoardStudent boardStudent() {
return new BoardStudent("宿舍200");
}
}
在IDEA中配置环境。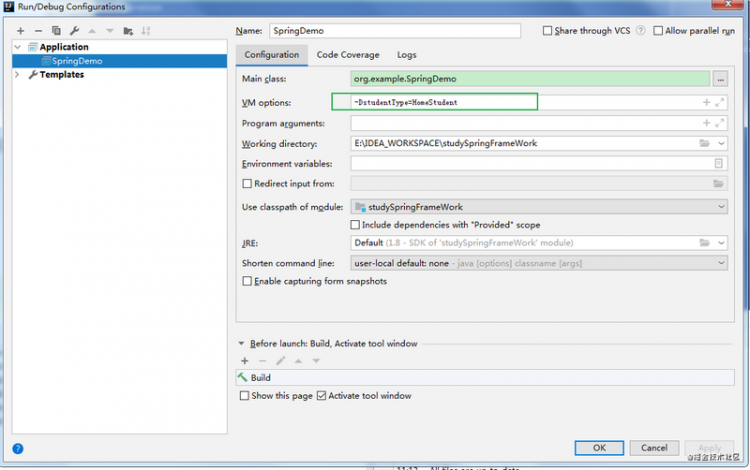
测试代码:
private static void annotationTest() {ApplicationContext applicationContext = new AnnotationConfigApplicationContext(SpringConfig.class);
String[] beanNames = applicationContext.getBeanDefinitionNames();
for (String beanName : beanNames) {
System.out.println(beanName);
}
}
测试结果:
会发现boardStudent没了。
bean的作用域
- singleton 单例(默认值),在每个Spring IOC容器中,一个bean仅对应一个对象实例
- prototype 原型,每次从IOC容器中获取对应的对象的时候,都会返回一个新的对象实例。
- request 一次HTTP请求中,一个bean定义对应一个实例,即每次HTTP请求会将有各自的bean实例,他们依据某个bean定义创建而成。仅在基于WEB的Spring ApplicationContext的情况才生效
- session 在一个HTTP Session中,一个bean对应一个实例,仅在基于WEB的Spring ApplicationContext的情况才生效。
- 在一个全局的的HTTP Session中,一个bean定义对应一个实例。典型情况下仅在使用porlet(一个Tomcat容器)的时候有效。
仅在基于WEB的Spring ApplicationContext的情况才生效。
我们主要常用的是singleton和prototype,下面我们来测试一下:
public class SpringConfig {@Bean(name = "studentCard")
public StudentCard studentCard(){
return new StudentCard(11,"22");
}
@Bean
@Scope(value = ConfigurableBeanFactory.SCOPE_PROTOTYPE)
public Student student(@Qualifier("studentCard") StudentCard studentCard){
return new Student(20,"zs",studentCard);
}
@Bean
public StudentCard studentCard2(){
return new StudentCard(11,"22");
}
}
private static void annotationTest() {
ApplicationContext applicationContext = new AnnotationConfigApplicationContext(SpringConfig.class);
Student student1 = (Student) applicationContext.getBean("student");
Student student2 = (Student) applicationContext.getBean("student");
System.out.println(student1 == student2);
}
结果: 
ConfigurableBeanFactory不是枚举类型,只是有两个常量字符串: singleton和prototype。你直接写这两个字符串中任意一个也行。
配置文件中进行测试:
<bean id="student" class="org.example.Student" scope="prototype"><property name = "name" >
<value type="java.lang.String"><![CDATA[z<3]]></value>
</property>
<property name="age">
<value>34</value>
</property>
</bean>
private static void xmlTest() {ApplicationContext applicationContext = new ClassPathXmlApplicationContext("applicationContext.xml");
Student student1 = (Student) applicationContext.getBean("student");
Student student2 = (Student) applicationContext.getBean("student");
System.out.println(student1 == student2);
}

一点点细节的补充
在singleton作用域下,容器在启动的时候就会创建该对象,但是也支持懒加载,即在首次向容器中获取该对象的时候创建。
那么怎么告知IOC容器,在启动的时候,先不要创建呢? 通过@Lazy注解。如何测试呢? 你可以在对应对象的构造函数上,打断点或者输出点东西测试,也可以在启动的时候,打印IOC容器来所有对象的名字来打印。
这里是在对应对象的构造函数上输出一点东西来测试。
- 配置类懒加载
@Configurationpublic class SpringConfig {
@Bean(name = "studentCard")
public StudentCard studentCard(){
return new StudentCard(11,"22");
}
@Bean
@Scope(value = ConfigurableBeanFactory.SCOPE_PROTOTYPE)
public Student student(@Qualifier("studentCard") StudentCard studentCard){
return new Student(20,"zs",studentCard);
}
@Bean
@Lazy
public StudentCard studentCard2(){
return new StudentCard(11,"22");
}
}
- 配置文件懒加载
<bean id="student" class="org.example.Student" lazy-init="true"><property name="age">
<value>34</value>
</property>
</bean>
这里测试结果就不再展示了。
自动装配的几种形式
上面我们已经介绍了,自动装配的两个注解了:
- @Autowired 默认根据类型去查找,如果找不到,默认会报错。
- @Qualifier 按照名字进行装配
这里我们再介绍几个:
- @Primary
- @Resource 并非来自Spring,来自Java的JSR250提案,默认按照bean名进行匹配,如果没找到对应的bean名,则去匹配对应的类型,JDK已经自带。
- @Inject 并非来自Spring,来自于Java的 JSR330提案。需要引入jar包。
Spring帝国简介
从刚开始的Spring framework,到现在Spring家族已经有很多产品了: 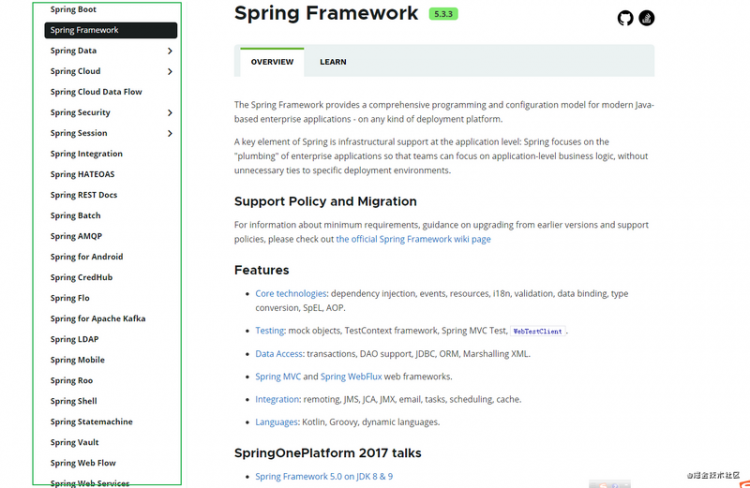
后面我们将会介绍SpringMVC,接管MVC的C的一个框架。Java领域的问题,在Spring帝国,几乎都可以找到解决方案(一个是方案整合(Spring Cloud),一个是自己提供(Spring MVC)。)
总结一下
最开始我是从视频开始学习Spring框架的,看视频也是最快学框架的方式,其实看视频的时候,心里还是有些疑问的,但是又找不到人去问。感觉视频中讲的有的时候很牵强,不成系统,零零碎碎的。我不是很喜欢零零碎碎的知识点,我喜欢系统一点的,于是就又系统的整理了一下自己对Spring的理解,也算是入门教程,也算是总结。希望对各位学习Spring有所帮助。
参考资料:
- 《精通Spring 4.x 企业应用开发实战》 陈雄华 林开雄 文建国著
- Spring进阶
- Spring视频教程
- springboot高级实战课第一期
javaspring
阅读 41更新于 54 分钟前
本作品系原创,采用《署名-非商业性使用-禁止演绎 4.0 国际》许可协议
北冥有只鱼
22 声望
9 粉丝
北冥有只鱼
22 声望
9 粉丝
宣传栏
目录
缘起
2002年 Rod Johnson在2002年编著的《Expert One-On-One J2EE Design And Development》一书中对,对Java EE正统框架(EJB)臃肿、低效、脱离现实的学院派提出了质疑,然后以该书为指导思想,编写了interface21框架。然后在interface21框架的基础上,经过重新设计,于2004年发布。到现在开始已经十八年左右了。
开发者: Spring Framework 请回答
在《欢迎光临Spring时代-绪论》中我们提出了几个关于如何取对象的问题,这里我们再回忆一下:
- 对象之间有复杂的依赖关系的时候,在不希望是硬编码的情况下,如何取对象才能做到优雅和可配置化?
- 知道如何创建对象,但是无法把握创建对象的时机。我现在就希望把如何创建对象代码交给"负责什么时候创建的代码"。后者在对应的时机,就调用对应的创建对象函数。
- 虽然Java不用操心内存回收问题,但是我还是希望能节省资源一下,在控制器这一层,不希望处理的每个请求都new一下对应的service实现类,我希望能将该Service做成单例模式,能否在做成单例的同时又做到让取对象优雅呢?
Spring Framework: IOC容器就是答案
准备工作
本篇我们还基于maven来做示例,基本上开发Spring Framework的程序基本上就只需要五个jar包就够了,分别是下面这五个:
- spring-context
- spring-core
- spring-aop
- spring-beans
- spring-expression
这次我们选的版本都是5.2.8.RELEASE。
如果你不会用maven,然后请参考我的这篇博客:
- Maven学习笔记
如果暂时还不想学maven,还想做jar包下载。那么有两种形式可以下载到对应的jar包:
- Spring Framework 官方maven库
浏览器访问这个网址: https://maven.springframework...
下载完粘贴到对应的lib目录下即可。
- 去maven的中央仓库下载
第一个Spring Framework程序

一般Spring框架的这个配置文件,我们都命名为applicationContext.xml,这是一种大致的约定。
上面的问题是如何优雅的取对象,在取之前你首先就得存,向applicationContext.xml放对象。怎么放?
像下面这样放:
我建了一个Student类,然后里面有name和age属性,无参和有参构造函数,get和set函数,重写了toString方法。
bean里的id是唯一的,class是Student类的全类名(包名+类名)。
如何取:
public class SpringDemo {public static void main(String[] args) {
// 加载配置文件
ApplicationContext applicationContext = new ClassPathXmlApplicationContext("applicationContext.xml");
Student student = (Student) applicationContext.getBean("student");
System.out.println(student);
}
}
打印结果: 
这就叫DI和IOC
我们直接new,在Spring的配置文件配置参数,然后间接取对象的方式, 我们称之为控制反转(IOC Inversion of Control)或依赖注入(DI Dependency Injection)。首先解释一下为什么有两个称呼,刚开始是只有控制反转,后来发现控制反转这个概念有点难以理解,就在一次大会上讲控制反转改为依赖注入。
那什么是控制反转,我们可以认为new 对象是一种控制权,然后控制反转就是我们将new对象的控制权交给Spring Framework。依赖注入呢? 其实也是一样,我们可以理解为在Spring的配置文件配置完对象之后,Spring将该对象给需要该对象的对象,此时就回答了上面我们提出的第二个问题:
对象之间有依赖关系该如何配置呢?
用上面的配置只能解决简单的值,那如果某个对象的某个属性也是对象类型的呢? Spring也想到了,当对象的属性是属性用ref注入,像下面这样:
<bean id = "studentCard" class = "org.example.StudentCard"><property name = "id" value="1"></property>
<property name = "cardNo" value="code01"></property>
</bean>
<bean id="student" class="org.example.Student">
<property name = "name" value = "zs"></property>
<property name = "age" value = "23"></property>
<property name = "studentCard" ref = "studentCard"></property>
</bean>
普通属性用value,那么引用类型就用ref,ref的值是配置文件中bean标签的id属性,所以在applicationContext.xml中id禁止重复。
通过注解将对象放入IOC容器中
我们上面的第三个问题,我们Dao层的对象在对应的Service只需要一份就可以了,Spring容器中的对象默认都是单例的。
那Dao层有的时候都没有属性,我们还要写在配置文件中吗?Spring也想到了,提供了下面几个注解:
@Controller 对应控制层@Service 对应服务层
@Component 通用注解,如果你不确定这个对象属于那一层的话,就用这个。
@Repository 对应dao层
然后在配置文件中加入:
<!--配置扫描器,base-package放需要扫描的包,指定了包之后,Spring会扫描。该包下面的类,如果有以上四个注解,那么就会将对应的类加入到容器中,id默认为类名首字母转小写。
多个包也可以写,用逗号隔开即可。如果写是一个包下面有多个包,
比如org.example.service,org.example.dao。写到二级包:org.example。Spring会自动扫描所有的子包。
-->
<context:component-scan base-package="org.example"/>


所以我们上面的第三个问题就得到了回答,我们写Service层需要对应的dao层对应的时候就可以这么写:
@Servicepublic class StudentService {
// 假装Student是dao层,被打上@Autowired的属性,Spring在扫描的时候会自动去容器去寻找对应的类型
// 然后给该属性注入值,所以如果你有两个IOC容器中有两个Student对象,那么可能就会报错
// Spring官方并不推荐如此注入
@Autowired
private Student student;
public void print(){
System.out.println(student);
}
}
官方推荐的注入方式是 @Autowired出现在set方法或构造方法上:
@Servicepublic class StudentService {
private Student student;
@Autowired
public StudentService(Student student) {
this.student = student;
}
public void print(){
System.out.println(student);
}
}
至此我们上面提出的第一个问题和第三个问题得到了解决:
- 对象有复杂的依赖关系,我们在配置文件中佩,在调用的类中,用Autowired自动注入,这很优雅。
- 对应的Serveice层通过注解就能将dao层注入,就不用再每个业务方法中,重复new了。
然后有不懂SpringMVC框架的同学这里可能就会问了,那我在Servlet中该如何取IOC容器中的对象啊,Servlet的初始化又不像main函数,有个明确的入口,用户是可以从任意一个网页进入的。对于这个问题可以参看:
接着我们回答第二个问题,难以把握对象的创建时机的这个问题,对于这个问题,Spring框架的答案是条件注解。
IOC容器有两种形式,一种是基于配置文件(我们上面用的就是),一种是基于注解。条件注解是基于注解形式的,查了一些资料还是没找到如何用配置文件实现条件注解的。但是基于配置文件的IOC还需要再补充一些,所以下面是先将配置文件形式的讲解完毕后,才会讲基于注解的,条件注解也是基于注解。
基于XML的依赖注入
不同的注入方式
我们知道创建一个对象是有几种不同的方式的:
- 通过无参构造函数,然后通过set函数设置值
- 通过有参构造函数
- 通过反射
- 通过序列化
同样的在配置文件中配置对象参数的也有几种形式,上面的property的配置的形式就是通过第一种方式来创建对象的。有兴致的同学可以测试下。
接下来我们介绍的就是通过第二种方式将对象放入IOC容器中:
<bean id = "studentCard" class = "org.example.StudentCard"><constructor-arg value="1" index = "0"/>
<constructor-arg value="11" index = "1"/>
</bean>
constructor-arg有四个属性:
- value (具体的值,不加index的话,具体的值和构造函数要求的参数类型要保持一致,默认情况下标签的先后顺序和构造函数保持一致)
- index 用于指定给构造函数的第几个参数
- type 指定参数类型
- name 用于指定参数名
- ref 这个讲过是指引用类型
通过反射产生对象:
<bean id = "studentCard" class = "org.example.StudentCard" p:id="1" p:cardNo="23"></bean>

引用类型通过p:属性名-ref来设定IOC容器中bean的ID
将集合放入对应的IOC容器中
首先我们准备一个集合的类,构造函数省略,get和set方法省略:
public class CollectionDemo {private List<String> list;
private String[] arrayString;
private Set<String> set;
private Map<String, Object> map;
private Properties properties;
}
Spring配置文件:
<bean id = "collectionDemo" class = "org.example.CollectionDemo"><property name="list">
<value>
14
</value>
</property>
<property name="arrayString">
<array>
<value>ddd</value>
</array>
</property>
<property name = "set">
<set>
<value>aaa</value>
</set>
</property>
<property name="map">
<map>
<entry>
<key>
<value>zs</value>
</key>
<value>zs</value>
</entry>
</map>
</property>
<property name = "properties">
<props>
<prop key="aa">bb</prop>
<prop key="cc">dd</prop>
</props>
</property>
</bean>
示例:
public class SpringDemo {public static void main(String[] args) {
ApplicationContext applicationContext = new ClassPathXmlApplicationContext("applicationContext.xml");
CollectionDemo collectionDemo = (CollectionDemo)applicationContext.getBean("collectionDemo");
System.out.println(collectionDemo);
}
}

刚学Spring框架的时候,视频上说控制反转,我们自己不再new对象,我以为就是真的不再new了,就在配置文件里面配就行了,后来随着编码量的上升,才发现这是对Spring框架的一种误解,是有复杂依赖关系的我们在配置文件里面配,像你要是想用个HashMap,就不必了。
特殊值的注入问题
我们在配置文件配置对象的时候,用的值都和XML预定义的符号值不冲突,什么意思呢? 假设我给对象的值是<,就会报错。
我们上面配置Student对象的参数的时候,我们用的是这种:
<bean id="student" class="org.example.Student"><property name = "name" value = "zs"></property>
<property name = "age" value = "23"></property>
<property name = "studentCard" ref = "studentCard"></property>
</bean>
我们称之为value属性注入,其实还可以这么写:
<bean id="student" class="org.example.Student"><property name = "name" >
<value type="java.lang.String">zs</value>
</property>
<property name = "age" value = "23"></property>
<property name = "studentCard" ref = "studentCard"></property>
</bean>
我们称之为value子标签注入。 两者的区别如下: 
所以当我们配置的属性值是< 这个符号的时候我们就可以这么写:
<bean id="student" class="org.example.Student"><property name = "name" >
<value type="java.lang.String">z<s</value>
</property>
</bean>
也可以这么写:
<bean id="student" class="org.example.Student"><property name = "name" >
<value type="java.lang.String"><![CDATA[z<3]]></value>
</property>
</bean>
那我要给属性的值注入null怎么办? 方法有两个
- 不给值(property 标签都不写,写标签value里面啥都不写,如果是String的话,默认给的是空字符串)
- 用null标签
<bean id="student" class="org.example.Student" autowire = "byName"><property name = "name" >
<null/>
</property>
</bean>
各种类型的自动注入
上面我们提到在Spring的配置文件中配置对象的属性值的时候,如果属性值是对象类型的,那么用ref就可以了,其实这个也可以不写,用自动注入就可以了,用这种自动注入也有两种方式:
- byName Spring会自动的去寻找容器中id为对象属性类名首字母转小写的对象。
<bean id = "studentCard" class = "org.example.StudentCard"><property name="id" value="1"></property>
<property name="cardNo" value="zs"></property>
</bean>
<bean id="student" class="org.example.Student" autowire = "byName">
<property name = "name" >
<value type="java.lang.String"><![CDATA[z<3]]></value>
</property>
<property name="age">
<value>34</value>
</property>
</bean>
运行结果不再展示,假设你把第一个bean标签的id改为studentCard1,那么就注入不了。
- byType 按类型,自动去寻找匹配的类型,如果你有两个StudentCard类型,也是无法注入。
<bean id="student" class="org.example.Student" autowire = "byType"><property name = "name" >
<value type="java.lang.String"><![CDATA[z<3]]></value>
</property>
<property name="age">
<value>34</value>
</property>
</bean
基于注解的依赖注入
@Bean+方法
在xml里面限制还是挺多的,如果你不小心写错了属性名,那么也是到运行时才能发现错误,如果你不小心给错了类型值,也是到运行时才能发现错误,比如属性是数字类型,你给了一个字符串。很多时候我们都希望尽可能早的发现错误,那么我们的配置文件能不能变换一种形式呢? 用代码做配置文件怎么样呢? 好啊,很好的想法啊,那我们就用代码做配置文件吧。
@Configurationpublic class SpringConfig {
@Bean(name = "studentCard")
public StudentCard studentCard(){
return new StudentCard(11,"22");
}
@Bean
public Student student(@Qualifier("studentCard") StudentCard studentCard){
return new Student(20,"zs",studentCard);
}
@Bean
public StudentCard studentCard2(){
return new StudentCard(11,"22");
}
}
private static void annotationTest() {
ApplicationContext applicationContext = new AnnotationConfigApplicationContext(SpringConfig.class);
Student student = applicationContext.getBean("student", Student.class);
System.out.println(student);
}
运行结果: 
- 问如何让一个类成为一个配置文件?
- 如何将bean标签移植到配置类中?
- 那我想自定义id名,可以吗?
- 那引用类型的属性注入怎么办?
- 那我有两个对象,都属于一个类。 我想指定一个对象注入怎么办?
@import 、FactoryBean、ImportBeanDefinitionRegistrar、ImportSelector
@import(注解) 、FactoryBean(接口)、ImportBeanDefinitionRegistrar(接口)、ImportSelector(接口)是Spring提供的将对象加入IOC容器的另外方式。
- @import
@Configuration@ComponentScan(basePackages = "org.example")
// ImportTest是我建的一个空类,用来测试@import,value是一个数组
@Import(value = {ImportTest.class})
public class SpringConfig {
}
测试一下:
private static void annotationPrintAllBean() {ApplicationContext applicationContext = new AnnotationConfigApplicationContext(SpringConfig.class);
String[] beanNames = applicationContext.getBeanDefinitionNames();
for (String beanName : beanNames) {
System.out.println(beanName);
}
}
测试结果: 
这种方式加进来的bean名是全类名。
- ImportSelector简述
首先实现ImportSelector接口:
public class MyImportSelector implements ImportSelector {// 最后返回的即为需要加入到容器的类名
@Override
public String[] selectImports(AnnotationMetadata importingClassMetadata) {
return new String[]{ImportTest.class.getName()};
}
}
然后在配置类上引入:
@Configuration@ComponentScan(basePackages = "org.example")
@Import(value = MyImportSelector.class)
public class SpringConfig {
}
测试代码:
private static void annotationPrintAllBean() {ApplicationContext applicationContext = new AnnotationConfigApplicationContext(SpringConfig.class);
String[] beanNames = applicationContext.getBeanDefinitionNames();
for (String beanName : beanNames) {
System.out.println(beanName);
}
}
测试结果: 
AnnotationMetadata 中携带打上@import注解的配置类上的元信息。
- ImportBeanDefinitionRegistrar概述
先实现接口:
public class MyImportBeanDefinitionRegistrar implements ImportBeanDefinitionRegistrar {@Override
public void registerBeanDefinitions(AnnotationMetadata importingClassMetadata, BeanDefinitionRegistry registry) {
// BeanDefinitionRegistry可以将bean注册进IOC工厂
// 我们需要准备一个BeanDefinition。
BeanDefinition beanDefinition = new RootBeanDefinition(ImportTest.class);
registry.registerBeanDefinition("importTest",beanDefinition);
}
}
配置类引入:
@Configuration@ComponentScan(basePackages = "org.example")
@Import(value = MyImportBeanDefinitionRegistrar.class)
public class SpringConfig {
}
测试代码:
private static void annotationPrintAllBean() {ApplicationContext applicationContext = new AnnotationConfigApplicationContext(SpringConfig.class);
String[] beanNames = applicationContext.getBeanDefinitionNames();
for (String beanName : beanNames) {
System.out.println(beanName);
}
}
测试结果: 
- FactoryBean
FactoryBean是一个接口,还有一个接口叫BeanFactory。
反射是框架的灵魂,有的时候,某个bean重复性的属性太多,在配置文件里面配置也是一件让人烦心的事情,但是程序不是擅长做重复工作吗? 我们能否少写点,从配置文件中读,然后用程序来做这种重复性工作呢?这也就是FactoryBean接口做的事情。
@Componentpublic class MyFactory implements FactoryBean<Car> {
private String cardInfo;
public MyFactory() {
// 假装从Spring的配置文件中读到了值。
this.cardInfo = "brand,100,200.12";;
}
/**
* 向IOC容器中放入对象
* @return
* @throws Exception
*/
@Override
public Car getObject() throws Exception {
Car car = new Car();
String[] cardInfoArray = cardInfo.split(",");
car.setBrand(cardInfoArray[0]);
car.setMaxSpeed(Integer.parseInt(cardInfoArray[1]));
car.setPrice(Double.parseDouble(cardInfoArray[2]));
return car;
}
/**
* 向IOC容器返回指定的类型
* @return
*/
@Override
public Class<?> getObjectType() {
return Car.class;
}
/**
* 设置是否是单例模式
* @return
*/
@Override
public boolean isSingleton() {
return false;
}
}
测试代码:
private static void testFactoryBean() {ApplicationContext applicationContext = new AnnotationConfigApplicationContext(SpringConfig.class);
// 代表取MyFactory
MyFactory myFactory = applicationContext.getBean("&myFactory", MyFactory.class);
// 不加&代表取工厂中放入的bean
Car car = applicationContext.getBean("myFactory", Car.class);
System.out.println(myFactory);
System.out.println(car);
}
测试结果: 
扫描包移植[email protected]
排除某些类
在配置类上加上:
@ComponentScan(basePackages = "org.example", excludeFilters = {@ComponentScan.Filter(type = FilterType.ANNOTATION,value = {Service.class})})- basePackages: 默认扫描本包及其子包。
- excludeFilters : 排除的类,要求两个属性,第一个是type,可以理解为策略。
@Configuration@ComponentScan(basePackages = "org.example", excludeFilters = {@ComponentScan.Filter(type = FilterType.ANNOTATION,value = {Service.class})})
// @ComponentScan(basePackages = "org.example", excludeFilters = {@ComponentScan.Filter(type = FilterType.ASSIGNABLE_TYPE,value = {StudentDao.class})})
// @ComponentScan(basePackages = "org.example", includeFilters= {@ComponentScan.Filter(type = FilterType.ASSIGNABLE_TYPE,value = {StudentDao.class})},useDefaultFilters = false)
// @ComponentScan(basePackages = "org.example", includeFilters = {@ComponentScan.Filter(type = FilterType.CUSTOM,value = {MyFilter.class})},useDefaultFilters = false)
public class SpringConfig {
@Bean(name = "studentCard")
public StudentCard studentCard(){
return new StudentCard(11,"22");
}
@Bean
public Student student(@Qualifier("studentCard") StudentCard studentCard){
return new Student(20,"zs",studentCard);
}
@Bean
public StudentCard studentCard2(){
return new StudentCard(11,"22");
}
}
private static void annotationTest() {
ApplicationContext applicationContext = new AnnotationConfigApplicationContext(SpringConfig.class);
// 获取IOC容器中所有的bean
String[] beanNameArray = applicationContext.getBeanDefinitionNames();
for (String beanDefinitionName : beanNameArray) {
System.out.println(beanDefinitionName);
}
}
测试结果: 
没有service了。
下面解除第二个@ComponentScan的注释,将第一个@ComponentScan的注释解除掉。再度测试: 
会发现StudentDao没了。
只包含某些类
与排除指定的类是类似的,只不过Spring默认会加载子包上需要加入到IOC容器中的类,也就是说你想只包含的类在basePackages下面,那么这个包含就是无效的。所以我们需要通过useDefaultFilters来禁止Spring的默认行为。
我们注释掉其他的@ComponentScan,只让第三个@ComponentScan解除注释。测试一下: 
会发现打上@Service类的对象没了。
自定义规则排除或包含某些类
自定义规则要实现TypeFilter,像下面这样:
public class MyFilter implements TypeFilter {// 返回true加入到IOC容器中
@Override
public boolean match(MetadataReader metadataReader, MetadataReaderFactory metadataReaderFactory) throws IOException {
// 获取扫描的元数据类型
ClassMetadata classMetadata = metadataReader.getClassMetadata();
// 每扫到子包下的一个类,这个方法就会被调用。
String className = classMetadata.getClassName();
// 只要类名中包含Student的,我就加入到容器中
if (className.contains("Student")){
return true;
}else{
return false;
}
}
}
还是上面的配置类, 我们解除第四个@ComponentScan的注释,其他的全部注释。测试一下。
HomeStudentCondition是我自己建的类,没加我们介绍的Spring提供的注解,也加进来了。
条件注解
条件注解可以让某些对象在某些条件满足的情况下,才加入到IOC容器中(等价于创建该对象),如果该条件不满足则该对象不创建,也就是不加入到对应的IOC容器中。那条件该怎么告诉Spring框架呢? 也是通过一个类,这个类要求实现Condition接口。
顺带提一下Spring Boot很大程度上也依赖于条件注解。
首先两个bean:
public class HomeStudent extends Student {/**
* 出入证 无参和构造函数 get set方法不再列出
*/
private String pass;
}
public class BoardStudent extends Student {
/**
* 宿舍号 无参和构造函数 get set方法不再列出
*/
private String dormitoryNumber;
}
然后准备条件,需要实现Condition接口:
public class HomeStudentCondition implements Condition {@Override
public boolean matches(ConditionContext conditionContext, AnnotatedTypeMetadata annotatedTypeMetadata) {
// 获取当前的环境,一般开发环境分成三套: 开发、测试、生产。
Environment environment = conditionContext.getEnvironment();
// 从环境中获取学生类型
String studentType = environment.getProperty("studentType");
// 如果是住宿学生就加入到IOC容器中
if ("HomeStudent".equals(studentType)){
return true;
}
return false;
}
}
public class BoardStudentCondition implements Condition {
@Override
public boolean matches(ConditionContext context, AnnotatedTypeMetadata metadata) {
Environment environment = context.getEnvironment();
String studentType = environment.getProperty("studentType");
if ("BoardStudent".equals(studentType)){
return true;
}
return false;
}
}
然后在对应的bean上加上条件变量:
@Configuration@ComponentScan(basePackages = "org.example")
public class SpringConfig {
@Bean
@Conditional(HomeStudentCondition.class)
public HomeStudent homeStudent() {
return new HomeStudent("出入证");
}
@Bean
@Conditional(BoardStudentCondition.class)
public BoardStudent boardStudent() {
return new BoardStudent("宿舍200");
}
}
在IDEA中配置环境。
测试代码:
private static void annotationTest() {ApplicationContext applicationContext = new AnnotationConfigApplicationContext(SpringConfig.class);
String[] beanNames = applicationContext.getBeanDefinitionNames();
for (String beanName : beanNames) {
System.out.println(beanName);
}
}
测试结果:
会发现boardStudent没了。
bean的作用域
- singleton 单例(默认值),在每个Spring IOC容器中,一个bean仅对应一个对象实例
- prototype 原型,每次从IOC容器中获取对应的对象的时候,都会返回一个新的对象实例。
- request 一次HTTP请求中,一个bean定义对应一个实例,即每次HTTP请求会将有各自的bean实例,他们依据某个bean定义创建而成。仅在基于WEB的Spring ApplicationContext的情况才生效
- session 在一个HTTP Session中,一个bean对应一个实例,仅在基于WEB的Spring ApplicationContext的情况才生效。
- 在一个全局的的HTTP Session中,一个bean定义对应一个实例。典型情况下仅在使用porlet(一个Tomcat容器)的时候有效。
仅在基于WEB的Spring ApplicationContext的情况才生效。
我们主要常用的是singleton和prototype,下面我们来测试一下:
public class SpringConfig {@Bean(name = "studentCard")
public StudentCard studentCard(){
return new StudentCard(11,"22");
}
@Bean
@Scope(value = ConfigurableBeanFactory.SCOPE_PROTOTYPE)
public Student student(@Qualifier("studentCard") StudentCard studentCard){
return new Student(20,"zs",studentCard);
}
@Bean
public StudentCard studentCard2(){
return new StudentCard(11,"22");
}
}
private static void annotationTest() {
ApplicationContext applicationContext = new AnnotationConfigApplicationContext(SpringConfig.class);
Student student1 = (Student) applicationContext.getBean("student");
Student student2 = (Student) applicationContext.getBean("student");
System.out.println(student1 == student2);
}
结果: 
ConfigurableBeanFactory不是枚举类型,只是有两个常量字符串: singleton和prototype。你直接写这两个字符串中任意一个也行。
配置文件中进行测试:
<bean id="student" class="org.example.Student" scope="prototype"><property name = "name" >
<value type="java.lang.String"><![CDATA[z<3]]></value>
</property>
<property name="age">
<value>34</value>
</property>
</bean>
private static void xmlTest() {ApplicationContext applicationContext = new ClassPathXmlApplicationContext("applicationContext.xml");
Student student1 = (Student) applicationContext.getBean("student");
Student student2 = (Student) applicationContext.getBean("student");
System.out.println(student1 == student2);
}

一点点细节的补充
在singleton作用域下,容器在启动的时候就会创建该对象,但是也支持懒加载,即在首次向容器中获取该对象的时候创建。
那么怎么告知IOC容器,在启动的时候,先不要创建呢? 通过@Lazy注解。如何测试呢? 你可以在对应对象的构造函数上,打断点或者输出点东西测试,也可以在启动的时候,打印IOC容器来所有对象的名字来打印。
这里是在对应对象的构造函数上输出一点东西来测试。
- 配置类懒加载
@Configurationpublic class SpringConfig {
@Bean(name = "studentCard")
public StudentCard studentCard(){
return new StudentCard(11,"22");
}
@Bean
@Scope(value = ConfigurableBeanFactory.SCOPE_PROTOTYPE)
public Student student(@Qualifier("studentCard") StudentCard studentCard){
return new Student(20,"zs",studentCard);
}
@Bean
@Lazy
public StudentCard studentCard2(){
return new StudentCard(11,"22");
}
}
- 配置文件懒加载
<bean id="student" class="org.example.Student" lazy-init="true"><property name="age">
<value>34</value>
</property>
</bean>
这里测试结果就不再展示了。
自动装配的几种形式
上面我们已经介绍了,自动装配的两个注解了:
- @Autowired 默认根据类型去查找,如果找不到,默认会报错。
- @Qualifier 按照名字进行装配
这里我们再介绍几个:
- @Primary
- @Resource 并非来自Spring,来自Java的JSR250提案,默认按照bean名进行匹配,如果没找到对应的bean名,则去匹配对应的类型,JDK已经自带。
- @Inject 并非来自Spring,来自于Java的 JSR330提案。需要引入jar包。
Spring帝国简介
从刚开始的Spring framework,到现在Spring家族已经有很多产品了: 
后面我们将会介绍SpringMVC,接管MVC的C的一个框架。Java领域的问题,在Spring帝国,几乎都可以找到解决方案(一个是方案整合(Spring Cloud),一个是自己提供(Spring MVC)。)
总结一下
最开始我是从视频开始学习Spring框架的,看视频也是最快学框架的方式,其实看视频的时候,心里还是有些疑问的,但是又找不到人去问。感觉视频中讲的有的时候很牵强,不成系统,零零碎碎的。我不是很喜欢零零碎碎的知识点,我喜欢系统一点的,于是就又系统的整理了一下自己对Spring的理解,也算是入门教程,也算是总结。希望对各位学习Spring有所帮助。
参考资料:
- 《精通Spring 4.x 企业应用开发实战》 陈雄华 林开雄 文建国著
- Spring进阶
- Spring视频教程
- springboot高级实战课第一期
以上是 【Java】欢迎光临Spring时代(一) 上柱国IOC列传 的全部内容, 来源链接: utcz.com/a/114933.html



得票时间