
【JS】基于区块开发(二):命令行工具
基于区块开发(二):命令行工具
dabai发布于 今天 02:31
欢迎关注我的公众号睿Talk,获取我最新的文章::命令行工具")
一、前言
在上一篇文章中,我简单的介绍了基于区块开发的总体思路和配套工具。接下来我会用 2 篇文章来分别介绍命令行工具和VSCode插件的具体实现细节。
二、基础功能
命令行工具的基础功能包含以下几点:
- 列出可选的区块列表
- 通过链接预览效果
- 将选中的区块安装到项目中
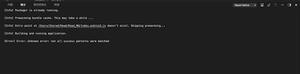
列出可选的区块列表并预览
由于区块信息是会动态变化的,所以区块列表必须通过接口获取。数据源方面一切从简,只是在ngnix后面挂了一个json文件,区块信息有什么变化就直接修改文件。
获取到区块信息后,就要考虑如何在命令行展现了。由于操作过程中涉及到一系列交互,一番调研后决定使用 Inquirer.js。单单有列表还不够,用户还需要去预览区块的效果,这里用到了 terminal-link 这个工具。
为了使展现效果更生动,使用 chalk 来添加字体颜色,
最终的展现效果如下::命令行工具")
关键代码如下:
const blockArray = blocks.map((block) => {const { name, value, preview } = block;
const link = terminalLink("预览", preview);
return {
name: `📦 ${chalk.cyan(name)} ${link}`,
value: value,
};
});
const choice = await inquirer.prompt([
{
type: "list",
name: "block",
message: `⛰ 请选择区块(共 ${blockArray.length} 个 )`,
choices: blockArray,
pageSize: 10,
},
{
type: "confirm",
name: "cwd",
message: `在当前目录安装区块吗?[${cwd}]`,
default: "y",
},
]);
// 选中的区块和安装路径
const { block, cwd: cur } = choice;
将选中的区块安装到项目中
获得用户选择的区块和区块的安装路径后,下一步就是获取区块的源码,并添加到项目中。所有区块的源码都集中存放在 git 仓库,只需要把仓库克隆下来,然后把文件夹拷贝到目标路径就可以了。过程中使用了 ora 来显示 loading 状态,rimraf 来删除目录。
// child_process模块const exec = cp.exec;
const spinner = ora();
// 目标目录
const dir = path.resolve(".")
// 存放区块源码仓库的临时目录
const tmpdir = path.resolve(dir, ".block");
spinner.start(`📥 获取区块`);
exec(
`git clone --depth=1 http://git.xxx.com/xxx/block.git ${tmpdir}`
);
spinner.succeed();
spinner.start(`💻 拷贝区块`);
// 这里都block变量是用户选择都区块名称
const sourceDir = path.resolve(tmpdir, `src/block/${block}`);
exec(`cp -r ${sourceDir}/. ${dir}/${block}`);
spinner.succeed();
spinner.start(`🗑️ 清理源区块文件`);
rimraf.sync(tmpdir);
spinner.succeed();
spinner.start(`👌 区块安装完成`);
spinner.succeed();
到此为止区块就能成功的安装到项目中去了。:命令行工具")
三、进阶功能
区块大体上分为3类:
- 单页面
- 页面+弹窗
- 多页面
:命令行工具")
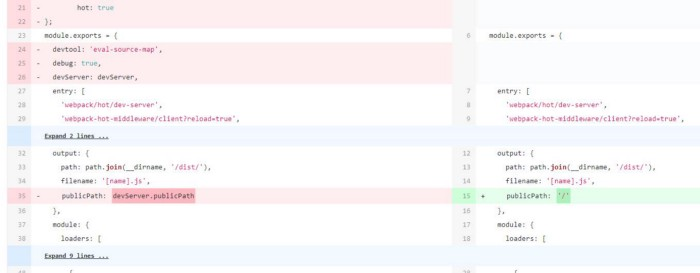
其中多页面区块会涉及到路由定义,为了更好的用户体验,会根据团队内约定的代码组织方式修改现有的文件。比如在区块安装前是这个样子::命令行工具")
区块安装后,不需要改任何代码,会自动添加对应的菜单项和路由::命令行工具")
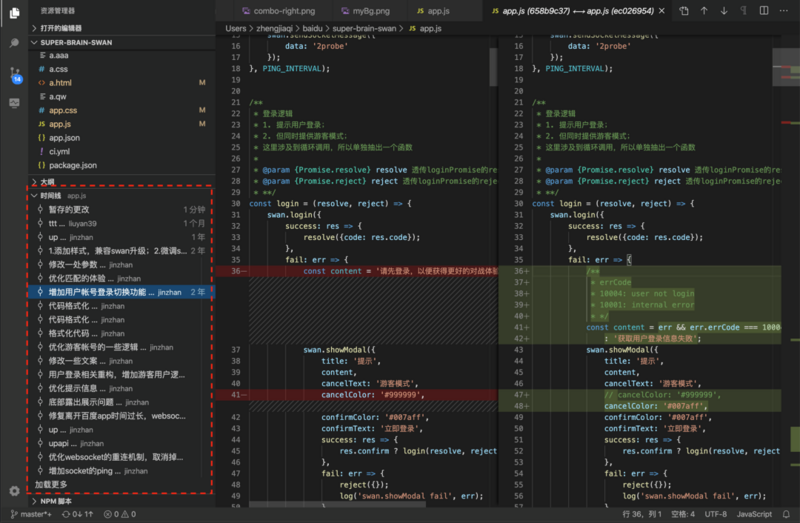
再来看看代码的修改记录::命令行工具")
要实现这个功能,就要用到 AST 了。AST 的使用方法可以看我之前写的 AST实战。
对应的,在安装区块的过程中,要加上处理修改现有文件的代码。
const containRoute = fs.existsSync(`${sourceDir}/routes`);// 如果存在 routes 目录,则为多页面区块,需要处理路由逻辑
if (containRoute) {
const re = new RegExp("^(.*/src).*", "gi");
const result = re.exec(dir);
let destDir;
if (!result || !result[1]) {
// 操作目录不包含 src 目录
const inProjectRoot = fs.existsSync(`${cwd}/src`);
if (!inProjectRoot) {
throw new Error(
"找不到 src 目录。区块包含路由配置,请在项目内运行此命令。"
);
}
destDir = `${cwd}/src`;
} else {
destDir = result[1];
}
// 拷贝新的文件
await runCmd(`cp -r ${sourceDir}/modules ${destDir}/`);
await runCmd(`cp -r ${sourceDir}/routes ${destDir}/`);
const files = fs.readdirSync(`${sourceDir}/routes/route`);
if (!files || files.length === 0) {
throw new Error("区块不包含路由文件");
}
// 获取路由变量名【AST】
const routeName = getNamedExport(`${sourceDir}/routes/route/${files[0]}`);
const i = files[0].indexOf(".tsx");
const routeFileName = files[0].substring(0, i);
// 插入 import 和 export(routes/index)【AST】
insertImportAndExport(
`${destDir}/routes/index.tsx`,
routeName,
routeFileName
);
// 获取 route-path 一级路由名【AST】
const moduleName = getModuleName(`${destDir}/constants/route-path.ts`);
if (!moduleName) {
console.error(
"❗️ " +
chalk.red(
`没有找到文件${destDir}/constants/route-path.ts, 需要手动将新增路由添加到app.ts`
)
);
} else {
// 更改 app.ts【AST】
updateEntry(`${destDir}/app.ts`, moduleName, routeFileName, routeName);
const selectedItem = blocks.find((item) => item.value === block);
// 插入新菜单【AST】
updateMenu(
`${destDir}/configs/menu.js`,
moduleName,
routeFileName,
selectedItem.name
);
}
}
注释中有【AST】标识的就涉及到抽象语法树的运用,下面是其中一个例子:
// 插入 import 和 export(routes/index)function insertImportAndExport(indexRoutePath, routeName, routeFileName) {
let importInserted = false;
const result = fs.existsSync(indexRoutePath);
if (!result) {
throw new Error(`没有找到文件:${indexRoutePath}`);
}
const content = fs.readFileSync(indexRoutePath, "utf8");
const ast = parser.parse(content, {
sourceType: "module",
plugins: ["jsx", "typescript"],
});
traverse(ast, {
ImportDeclaration(astPath) {
// 插入import(routes/index)
if (!importInserted) {
const id = t.identifier(routeName);
const sp = t.importSpecifier(id, id);
const literal = t.stringLiteral(`./route/${routeFileName}`);
const declare = t.importDeclaration([sp], literal);
astPath.insertBefore(declare);
importInserted = true;
}
},
ExportDefaultDeclaration(astPath) {
// 导出路由(routes/index)
const properties = astPath.node.declaration.properties;
const id = t.identifier(routeName);
const property = t.objectProperty(id, id, false, true);
properties.push(property);
},
});
const output = generate(ast, { jsescOption: { minimal: true } });
fs.writeFileSync(indexRoutePath, output.code);
}
使用 AST 修改文件并不难,就是有点繁琐,对文件的约定内容也有要求,在此就不展开了。
四、总结
本文介绍了服务于区块开发的命令行工具的实现细节,分享实现思路和当中用到的一些工具库。在下一篇文章中,我将会介绍配套VSCode插件的实现细节。
javascript前端blockreact.js
阅读 68更新于 今天 02:58
本作品系原创,采用《署名-非商业性使用-禁止演绎 4.0 国际》许可协议
睿Talk
dabai
4.8k 声望
269 粉丝
dabai
4.8k 声望
269 粉丝
宣传栏
目录
欢迎关注我的公众号睿Talk,获取我最新的文章:
一、前言
在上一篇文章中,我简单的介绍了基于区块开发的总体思路和配套工具。接下来我会用 2 篇文章来分别介绍命令行工具和VSCode插件的具体实现细节。
二、基础功能
命令行工具的基础功能包含以下几点:
- 列出可选的区块列表
- 通过链接预览效果
- 将选中的区块安装到项目中
列出可选的区块列表并预览
由于区块信息是会动态变化的,所以区块列表必须通过接口获取。数据源方面一切从简,只是在ngnix后面挂了一个json文件,区块信息有什么变化就直接修改文件。
获取到区块信息后,就要考虑如何在命令行展现了。由于操作过程中涉及到一系列交互,一番调研后决定使用 Inquirer.js。单单有列表还不够,用户还需要去预览区块的效果,这里用到了 terminal-link 这个工具。
为了使展现效果更生动,使用 chalk 来添加字体颜色,
最终的展现效果如下:
关键代码如下:
const blockArray = blocks.map((block) => {const { name, value, preview } = block;
const link = terminalLink("预览", preview);
return {
name: `📦 ${chalk.cyan(name)} ${link}`,
value: value,
};
});
const choice = await inquirer.prompt([
{
type: "list",
name: "block",
message: `⛰ 请选择区块(共 ${blockArray.length} 个 )`,
choices: blockArray,
pageSize: 10,
},
{
type: "confirm",
name: "cwd",
message: `在当前目录安装区块吗?[${cwd}]`,
default: "y",
},
]);
// 选中的区块和安装路径
const { block, cwd: cur } = choice;
将选中的区块安装到项目中
获得用户选择的区块和区块的安装路径后,下一步就是获取区块的源码,并添加到项目中。所有区块的源码都集中存放在 git 仓库,只需要把仓库克隆下来,然后把文件夹拷贝到目标路径就可以了。过程中使用了 ora 来显示 loading 状态,rimraf 来删除目录。
// child_process模块const exec = cp.exec;
const spinner = ora();
// 目标目录
const dir = path.resolve(".")
// 存放区块源码仓库的临时目录
const tmpdir = path.resolve(dir, ".block");
spinner.start(`📥 获取区块`);
exec(
`git clone --depth=1 http://git.xxx.com/xxx/block.git ${tmpdir}`
);
spinner.succeed();
spinner.start(`💻 拷贝区块`);
// 这里都block变量是用户选择都区块名称
const sourceDir = path.resolve(tmpdir, `src/block/${block}`);
exec(`cp -r ${sourceDir}/. ${dir}/${block}`);
spinner.succeed();
spinner.start(`🗑️ 清理源区块文件`);
rimraf.sync(tmpdir);
spinner.succeed();
spinner.start(`👌 区块安装完成`);
spinner.succeed();
到此为止区块就能成功的安装到项目中去了。
三、进阶功能
区块大体上分为3类:
- 单页面
- 页面+弹窗
- 多页面
其中多页面区块会涉及到路由定义,为了更好的用户体验,会根据团队内约定的代码组织方式修改现有的文件。比如在区块安装前是这个样子:
区块安装后,不需要改任何代码,会自动添加对应的菜单项和路由:
再来看看代码的修改记录:
要实现这个功能,就要用到 AST 了。AST 的使用方法可以看我之前写的 AST实战。
对应的,在安装区块的过程中,要加上处理修改现有文件的代码。
const containRoute = fs.existsSync(`${sourceDir}/routes`);// 如果存在 routes 目录,则为多页面区块,需要处理路由逻辑
if (containRoute) {
const re = new RegExp("^(.*/src).*", "gi");
const result = re.exec(dir);
let destDir;
if (!result || !result[1]) {
// 操作目录不包含 src 目录
const inProjectRoot = fs.existsSync(`${cwd}/src`);
if (!inProjectRoot) {
throw new Error(
"找不到 src 目录。区块包含路由配置,请在项目内运行此命令。"
);
}
destDir = `${cwd}/src`;
} else {
destDir = result[1];
}
// 拷贝新的文件
await runCmd(`cp -r ${sourceDir}/modules ${destDir}/`);
await runCmd(`cp -r ${sourceDir}/routes ${destDir}/`);
const files = fs.readdirSync(`${sourceDir}/routes/route`);
if (!files || files.length === 0) {
throw new Error("区块不包含路由文件");
}
// 获取路由变量名【AST】
const routeName = getNamedExport(`${sourceDir}/routes/route/${files[0]}`);
const i = files[0].indexOf(".tsx");
const routeFileName = files[0].substring(0, i);
// 插入 import 和 export(routes/index)【AST】
insertImportAndExport(
`${destDir}/routes/index.tsx`,
routeName,
routeFileName
);
// 获取 route-path 一级路由名【AST】
const moduleName = getModuleName(`${destDir}/constants/route-path.ts`);
if (!moduleName) {
console.error(
"❗️ " +
chalk.red(
`没有找到文件${destDir}/constants/route-path.ts, 需要手动将新增路由添加到app.ts`
)
);
} else {
// 更改 app.ts【AST】
updateEntry(`${destDir}/app.ts`, moduleName, routeFileName, routeName);
const selectedItem = blocks.find((item) => item.value === block);
// 插入新菜单【AST】
updateMenu(
`${destDir}/configs/menu.js`,
moduleName,
routeFileName,
selectedItem.name
);
}
}
注释中有【AST】标识的就涉及到抽象语法树的运用,下面是其中一个例子:
// 插入 import 和 export(routes/index)function insertImportAndExport(indexRoutePath, routeName, routeFileName) {
let importInserted = false;
const result = fs.existsSync(indexRoutePath);
if (!result) {
throw new Error(`没有找到文件:${indexRoutePath}`);
}
const content = fs.readFileSync(indexRoutePath, "utf8");
const ast = parser.parse(content, {
sourceType: "module",
plugins: ["jsx", "typescript"],
});
traverse(ast, {
ImportDeclaration(astPath) {
// 插入import(routes/index)
if (!importInserted) {
const id = t.identifier(routeName);
const sp = t.importSpecifier(id, id);
const literal = t.stringLiteral(`./route/${routeFileName}`);
const declare = t.importDeclaration([sp], literal);
astPath.insertBefore(declare);
importInserted = true;
}
},
ExportDefaultDeclaration(astPath) {
// 导出路由(routes/index)
const properties = astPath.node.declaration.properties;
const id = t.identifier(routeName);
const property = t.objectProperty(id, id, false, true);
properties.push(property);
},
});
const output = generate(ast, { jsescOption: { minimal: true } });
fs.writeFileSync(indexRoutePath, output.code);
}
使用 AST 修改文件并不难,就是有点繁琐,对文件的约定内容也有要求,在此就不展开了。
四、总结
本文介绍了服务于区块开发的命令行工具的实现细节,分享实现思路和当中用到的一些工具库。在下一篇文章中,我将会介绍配套VSCode插件的实现细节。
以上是 【JS】基于区块开发(二):命令行工具 的全部内容, 来源链接: utcz.com/a/112852.html


得票时间